
3 Ingredient DIY Chocolate Recipe
Picture this: the rich, earthy scent of cacao swirling through your kitchen, mingling with the subtle tropical aroma of melted coconut oil. As you mix these simple ingredients, the silky smoothness invites your fingers to linger just a little longer. Soon, you’ll have homemade chocolate morsels that melt like a dream on your tongue, sweetened with a gentle kiss of maple syrup or honey. This 3 Ingredient DIY Chocolate Recipe is a delightful, fuss-free way to indulge in decadent chocolate without ever leaving home. Trust me, it’s as fun to make as it is to eat.
Why You’ll Love This 3 Ingredient DIY Chocolate Recipe
- Simple Ingredients: Uses just pantry staples—cacao powder, coconut oil, and your choice of maple syrup or honey—nothing fancy, just pure deliciousness.
- Perfect for Anytime: Whether it’s a mid-afternoon snack or a last-minute dessert, this recipe fits effortlessly into your busy lifestyle.
- Impressive Presentation: Pour the silky mixture into charming molds and watch your homemade chocolates transform into beautiful, bite-sized works of art.
- Customizable: Adjust the sweetness easily with your favorite natural sweetener or experiment with molds to suit your mood and occasion.
Why This 3 Ingredient DIY Chocolate Recipe Works
What makes this 3 Ingredient DIY Chocolate Recipe truly shine is its simplicity and the harmony of its components. The virgin coconut oil gently melts into a luscious, creamy base once chilled, providing the perfect texture. Pure cacao powder delivers deep, earthy chocolate notes—rich but not overpowering. Sweetening with maple syrup or honey adds a natural floral sweetness that balances the bitterness of cacao. Whisking ensures all ingredients blend seamlessly, giving you that irresistible melt-in-your-mouth sensation every time. The chilled molds let the mixture set firmly, yielding perfectly shaped, glossy chocolates ready to impress.
Ingredients You’ll Need
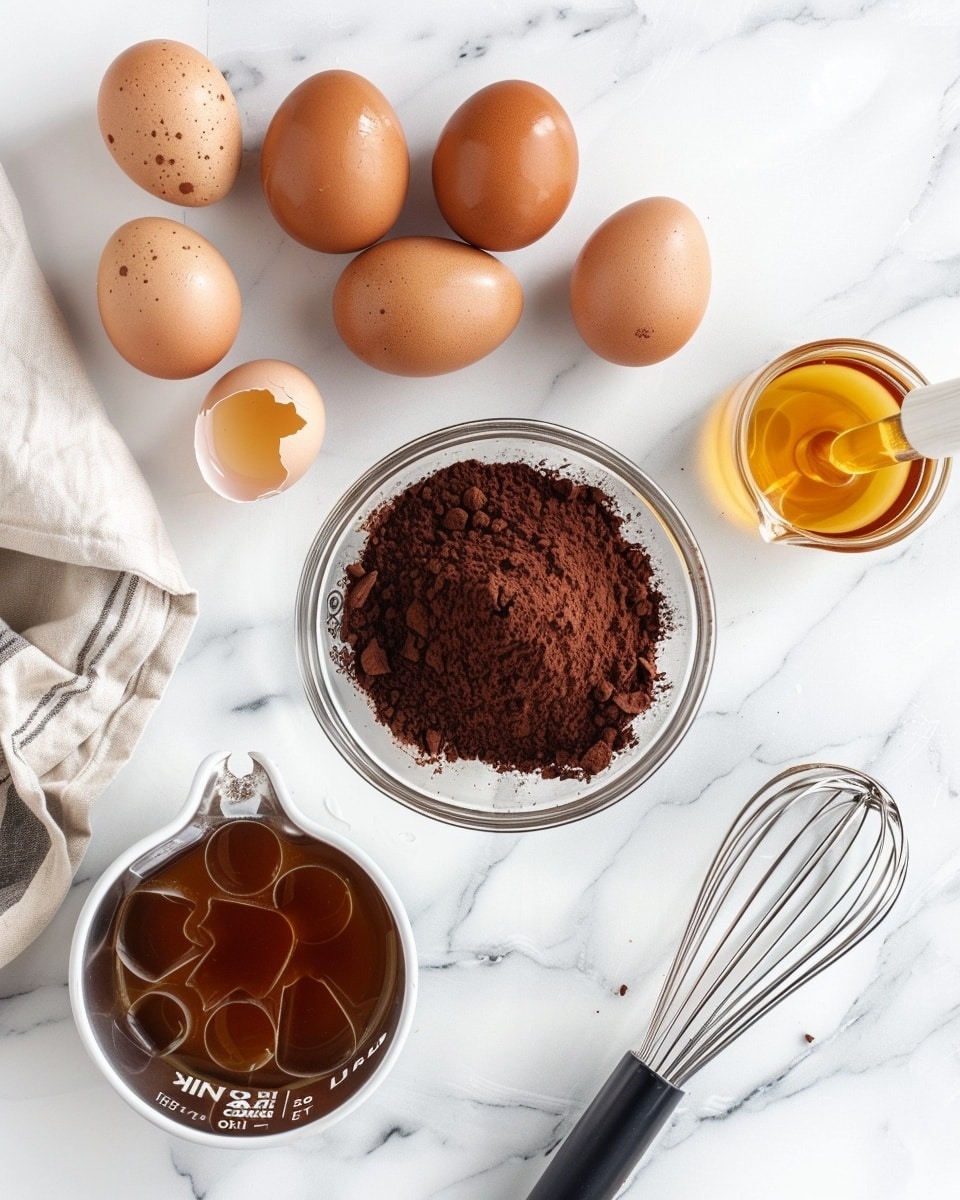
The beauty of this recipe lies in its straightforward, wholesome ingredients—each plays a crucial role in creating that meltaway chocolate magic.
- 1/2 cup cacao powder: Provides the deep, rich chocolate flavor without any artificial additives.
- 1/2 cup virgin coconut oil (melted): Adds creaminess and helps the chocolate set solid when chilled.
- 5-6 tablespoons maple syrup or honey: Natural sweeteners that bring a gentle, nuanced sweetness to balance the cacao’s bitterness.
Ingredient Substitutions & Tips
- Cacao powder: You can substitute with unsweetened cocoa powder if cacao isn’t available. However, cacao tends to have a richer, less processed flavor.
- Virgin coconut oil: If coconut oil isn’t accessible, refined coconut oil or even avocado oil can work, but expect slightly different texture and taste.
- Maple syrup or honey: Agave nectar or rice syrup can be used as vegan-friendly alternatives without compromising sweetness.
- Sweetness level: Adjust the amount of sweetener to suit your taste—start with 5 tablespoons and add more if you prefer a sweeter bite.
👨🍳 Pro Tips for Perfect Results
- Use high-quality cacao powder: It makes a noticeable difference in flavor—look for raw or organic cacao if you can.
- Melt coconut oil gently: Avoid overheating; just warm until melted to preserve its delicate flavor.
- Whisk thoroughly: To avoid grainy or uneven texture, mix until completely smooth and glossy.
- Choose fun molds: Silicone molds make releasing your chocolates easier and more rewarding.
- Freeze, don’t refrigerate: Freezing speeds up setting and ensures a firmer chocolate with a better snap.
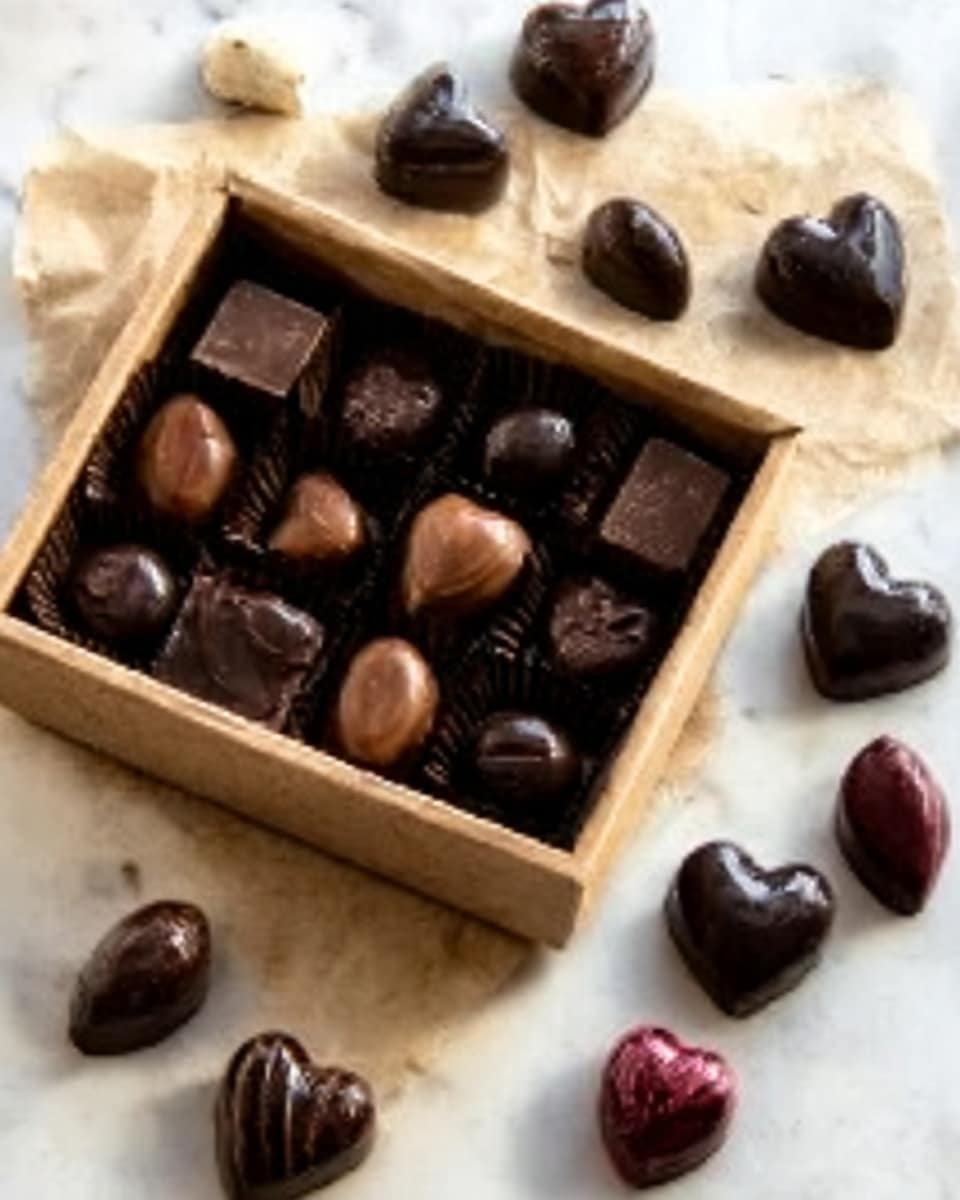
How to Make 3 Ingredient DIY Chocolate Recipe
Step 1: Combine Your Ingredients
Begin by placing the cacao powder, melted virgin coconut oil, and maple syrup (or honey) into a medium-sized mixing bowl. Use a whisk or a hand blender to blend until silky smooth and fully incorporated, with no lumps lingering. This is where the magic happens; your chocolate base should look glossy and inviting.
💡 Pro Tip: If you prefer an extra smooth texture, blend for a few more seconds using a hand blender on low speed.
Step 2: Pour Into Molds
Select your favorite chocolate molds—hearts, eggs, or mini bars all work beautifully. Pour the chocolate mixture evenly into each cavity, filling them generously but without overflowing. Tap the mold lightly on the counter to release air bubbles and smooth the surface.
💡 Pro Tip: Silicone molds are ideal for easy removal later, and they help your chocolates keep a perfect shape.
Step 3: Freeze to Set
Place the filled molds in the freezer and let them sit for 2 to 3 hours. This chilling process solidifies the coconut oil, giving your chocolates a satisfying snap and that creamy melt-in-your-mouth texture everyone adores.
💡 Pro Tip: Avoid freezing for longer than 3 hours to prevent frost buildup which can affect texture.
Step 4: Enjoy Your Homemade Treats
Carefully unmold your chocolates and admire your handiwork—each piece a tiny treasure of velvety, rich chocolate. Pop one in your mouth and savor the instantly uplifting flavor. Share with loved ones or stash a few for solo indulgence.
💡 Pro Tip: Keep these chocolates in a cool place or the fridge to prevent melting during warmer days.
Common Mistakes to Avoid
Learn from these common pitfalls:
- Overheating coconut oil: This can cause loss of flavor and an oily texture in your chocolates.
- Not mixing well enough: Leads to grainy texture and uneven sweetness.
- Using too much sweetener: Can overpower the natural richness of the cacao and make chocolates sticky.
- Skipping molds: Freezing the mixture on a flat tray results in uneven shapes and difficulty in handling.
- Refrigerating instead of freezing: Refrigeration takes longer and may yield softer chocolates that melt too quickly.
- Improper storage: Leaving chocolates at room temperature in warm weather will cause melting and loss of texture.
Delicious Variations to Try
Once you’ve mastered the classic version of this 3 Ingredient DIY Chocolate Recipe, try these tasty twists to keep things exciting and fresh.
Nutty Delight
Add a tablespoon of finely chopped toasted almonds, pistachios, or walnuts to the chocolate mixture before pouring into molds. This adds a satisfying crunch and nutty depth.
Coconut Dream
Sprinkle shredded unsweetened coconut on top of the chocolate in molds before freezing—it creates a lovely tropical contrast both in look and flavor.
Spiced Chocolate
Mix in a pinch of cinnamon or cardamom for a subtle warmth that enhances the natural cacao richness.
Minty Fresh
Add a few drops of pure peppermint extract to the chocolate mixture for that refreshing twist that’s perfect after meals.
Berry Bliss
Press a few dried blueberries or crushed freeze-dried raspberries onto the chocolate surface before freezing for bursts of tartness.
Sea Salt Kiss
Sprinkle a pinch of flaky sea salt on top just before freezing for that irresistible sweet-salty combo.
How to Serve 3 Ingredient DIY Chocolate Recipe
Garnishes
Try garnishing with fresh mint leaves, a dusting of cacao powder, or a few edible flower petals to elevate the presentation.
Side Dishes
Serve alongside warm herbal tea, a creamy chai latte, or fresh berries for delightful contrast and balance.
Creative Ways to Present
Arrange your chocolates on a decorative platter with parchment paper, nestled in colorful mini cupcake liners, or packaged in small gift boxes for sharing with friends and family.
Make Ahead and Storage
Storing Leftovers
Store leftover chocolates in an airtight container in the refrigerator or a cool, dry place to keep them firm and fresh for up to two weeks.
Freezing
If you want to keep them longer, freeze your chocolates in a sealed container or zip-top bag for up to 3 months. Thaw in the fridge before serving for the best texture.
Reheating
Avoid heating the chocolates directly. Instead, let them soften to room temperature naturally to enjoy the perfect melt-in-your-mouth experience.
FAQs
Can I use regular cocoa instead of cacao powder?
Yes, unsweetened cocoa powder can be used, but cacao powder has a richer, less processed flavor that many prefer.
Is this recipe vegan?
It certainly can be! Use maple syrup or agave nectar instead of honey to keep it completely plant-based.
Can I substitute coconut oil with another fat?
You can try refined coconut oil or avocado oil; however, coconut oil’s solidifying property at room temperature is key to achieving the perfect chocolate texture.
How long do these chocolates last?
Stored properly in the fridge or freezer, they can last up to 2 weeks or 3 months respectively.
Can I add nuts or dried fruits?
Absolutely! Adding chopped nuts or dried fruits before freezing adds delightful texture and flavor variations.
Why did my chocolate turn out grainy?
Graininess usually happens if ingredients aren’t mixed well or cacao powder is not finely sifted. Whisk thoroughly to avoid this.
Can I use artificial sweeteners?
For best flavor and texture, stick to natural sweeteners like maple syrup or honey.
Is it okay to use this chocolate for baking?
This chocolate is best enjoyed as a no-bake treat; it melts quickly due to the coconut oil content and isn’t suitable for baking.
Final Thoughts
There’s something truly special about crafting your own chocolate from scratch with just three wholesome ingredients. This 3 Ingredient DIY Chocolate Recipe captures the silky richness and the sweet, mellow balance that homemade treats bring to your table. Whether you’re sharing with loved ones or treating yourself, it’s a delightful experience that’s simple, satisfying, and utterly delicious.
Have you tried this 3 Ingredient DIY Chocolate Recipe? I’d love to hear how it turned out! Leave a comment below. If you loved this recipe, please share it with your friends and family. Happy cooking! 🍫
Print3 Ingredient DIY Chocolate Recipe

A simple and wholesome 3-ingredient DIY chocolate recipe that combines cacao powder, melted virgin coconut oil, and natural sweetener for a quick, homemade treat. Perfect for those craving a healthier alternative to store-bought chocolates, this recipe is easy to prepare and requires no baking.
- Prep Time: 5 minutes
- Cook Time: 0 minutes
- Total Time: 5 minutes plus 2-3 hours freezing time
- Yield: 30 small chocolates 1x
- Category: Dessert
- Method: No-Cook
- Cuisine: International
- Diet: Vegan
Ingredients
Ingredients
- 1/2 cup cacao powder
- 1/2 cup virgin coconut oil (melted)
- 5–6 tablespoons maple syrup or honey (use 6 tablespoons if you prefer extra sweet)
Instructions
- Mix Ingredients: In a medium-sized bowl, thoroughly mix the cacao powder, melted virgin coconut oil, and maple syrup or honey. Use a whisk or a hand blender to ensure the ingredients are fully combined and smooth.
- Pour into Molds: Transfer the chocolate mixture into fun silicone molds such as egg-shaped or heart-shaped molds to give them a creative shape.
- Freeze: Place the molds in the freezer and let the chocolate set for 2 to 3 hours until firm.
- Enjoy: Remove the chocolates from the molds and enjoy your homemade, healthy chocolate treat!
Notes
- You can swap the maple syrup for honey to suit your taste preferences.
- Store the chocolates in the freezer to keep them firm and fresh.
- Try adding nuts or dried fruits in the molds before freezing for additional texture.
- This recipe is naturally vegan if maple syrup is used instead of honey.
- If you prefer a sweeter chocolate, use 6 tablespoons of the sweetener instead of 5.
Keywords: 3 ingredient chocolate, homemade chocolate, healthy chocolate, vegan chocolate, no bake chocolate, easy chocolate recipe

