
Authentic Roti Canai Recipe
Picture this: warm, flaky layers of golden roti canai resting on a plate, the enticing aroma of toasted dough mingling with a hint of ghee and spice, inviting you to tear into its crisp edges. You hear the soft crackle as you pull apart each layer, revealing a tender, buttery inside that melts on your tongue. Making this Authentic Roti Canai Recipe is like unfolding a little magic in your kitchen—quick enough for a weekend treat, yet impressive enough to wow guests. Ready to embark on a culinary journey with a recipe that’s both comforting and utterly addictive?
Why You’ll Love This Authentic Roti Canai Recipe
- Ready in 30 minutes active time: While the dough rests for hours, your hands-on prep is delightfully quick, perfect for busy days.
- Uses simple ingredients: Flour, water, salt, and oil—ingredients you likely already have in your pantry, making it effortlessly accessible.
- Perfect for beginners: Detailed steps and tips ensure you can master the art of this flaky flatbread without frustration.
- Impressive presentation: Those spiral layers look beautiful on any plate, making you the star of any meal or gathering.
- Customizable: Whether you want to add fillings, spices, or serve with a variety of curries, this recipe adapts beautifully.
Why This Authentic Roti Canai Recipe Works
This Authentic Roti Canai Recipe excels because of its simplicity combined with technique. The initial mixing of boiling and room-temperature water creates a dough that’s soft yet manageable, perfect for stretching paper thin without tearing. The use of oil during resting and shaping builds the signature layered texture, ensuring each bite offers that delightful crunch followed by buttery tenderness. Plus, allowing the dough to rest for hours lets the gluten relax and develop, so your roti stretches beautifully and cooks evenly every time.

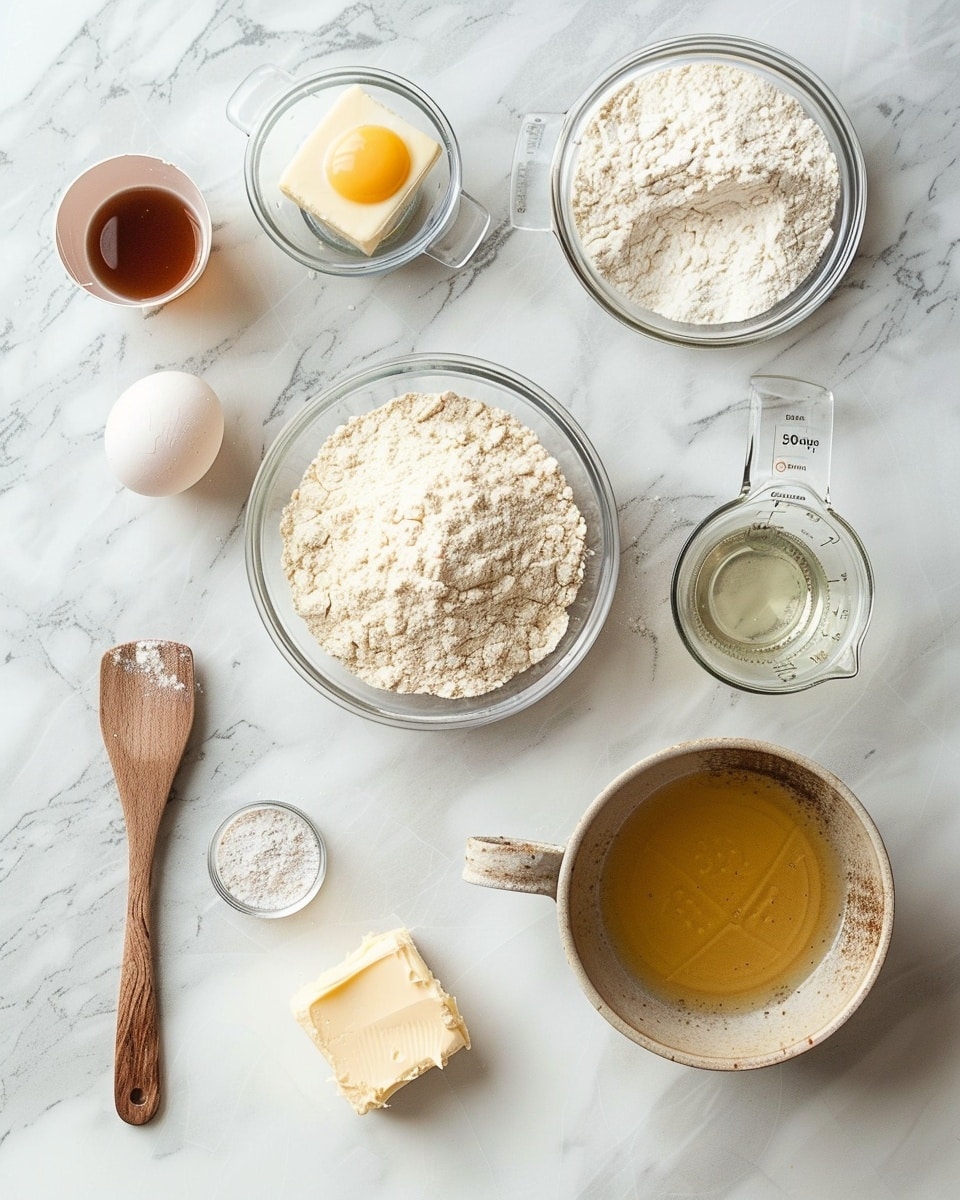
Ingredients You’ll Need
Every ingredient in this recipe plays a crucial role in creating that authentic roti canai texture and flavor. They’re simple, straightforward, and easy to source, making this recipe approachable yet deeply satisfying.
- All-purpose flour: The foundation of your dough, providing the right gluten structure for stretch and chew.
- Sea salt: Enhances flavor and balances the dough’s richness.
- Boiling water: Helps to gelatinize the flour slightly, giving softness to the final texture.
- Room temperature water: Combines with the hot water to form a pliable dough.
- Oil (vegetable or other neutral oils): Key for coating, layering, and frying, it creates those signature flaky, crisp layers.
- Butter or ghee (optional): Adds an indulgent buttery richness and extra flavor depth.
Ingredient Substitutions & Tips
- All-purpose flour: You can experiment with bread flour for a slightly chewier texture or use a gluten-free blend, though the layers may be less pronounced.
- Sea salt: Regular table salt works fine, but reduce slightly to avoid over-salting.
- Oil: Use melted coconut oil for a subtle nutty flavor or ghee exclusively for richness.
- Water: Avoid using cold water—it makes the dough tough. Warm, room-temperature plus boiling water combination is key to softness.
👨🍳 Pro Tips for Perfect Results
- Rest is essential: Don’t skimp on dough resting times—this is what unlocks the silky, stretchable texture.
- Oil generously: Coat dough balls thoroughly to prevent drying out and ensure flaky layers.
- Stretch with care: Be patient and gentle while stretching so the dough doesn’t tear; it gets easier with practice.
- Medium heat for cooking: Too hot will burn the roti; too low will make it greasy. A steady medium heat is just right.
- Squash when hot: Press the roti after cooking to separate layers—it’s the secret to that beautiful flakiness.
How to Make Authentic Roti Canai Recipe
Step 1: Mix the flour and salt
Start by combining your all-purpose flour and salt in a large bowl. Stir them well so the salt is evenly distributed. This dry mix is the canvas for your dough’s texture and flavor.
💡 Pro Tip: Use a fork or spatula to mix thoroughly, breaking up any clumps of salt.
Step 2: Add boiling water about halfway
Pour the boiling water gradually into the flour mixture while stirring continuously. This process forms small clumps and slightly cooks the flour, which helps soften the dough later on.
💡 Pro Tip: Stir quickly and thoroughly to distribute the heat evenly and avoid large lumps.
Step 3: Incorporate the room temperature water
Next, add the room temperature water little by little, mixing with your hands as the dough starts forming. Aim for a soft but not sticky dough, scraping the sides of the bowl as needed.
💡 Pro Tip: Don’t rush; adding water slowly helps gauge the dough’s consistency perfectly.
Step 4: Rest the dough wrapped
Cover your dough tightly with plastic wrap and let it rest for 30 minutes to an hour. This stage lets the gluten structure develop and relax, making your dough more elastic and easier to work with.
💡 Pro Tip: If you’re pressed for time, a 30-minute rest still works magic!
Step 5: Knead to smooth the dough
After resting, knead the dough on a clean surface for 2 to 3 minutes until it becomes smooth and satiny. This kneading activates the gluten, essential for stretchability and the layered texture.
💡 Pro Tip: If the dough sticks, lightly oil your hands or sprinkle a little flour.
Step 6: Divide and oil the dough balls
Weigh and portion the dough into eight equal pieces, shaping each into a neat ball. Coat each ball generously with vegetable oil, then place them spaced apart on a large, oiled plate or flat container.
💡 Pro Tip: Keep the dough balls covered with plastic wrap while resting to prevent drying.
Step 7: Long dough rest
Allow the dough balls to rest for at least 2 hours (or up to 12 hours) to increase pliability. This resting period ensures your dough will stretch beautifully thin without snapping.
💡 Pro Tip: Overnight resting in the fridge is perfect if you want to prep ahead.
Step 8: Stretch and layer the dough
On a clean, oiled surface, flatten one dough ball with your palm. Gently stretch it out paper-thin until you can almost see through it. Be patient and spread the stretching evenly around all sides.
💡 Pro Tip: Let one edge lightly stick to the surface, then pull the opposite edge gently to stretch evenly without tearing.
Step 9: Oil and roll the dough
Brush a thin layer of oil or ghee over the stretched dough. Roll it tightly into a long tube, or fold it into overlapping layers before shaping.
💡 Pro Tip: Roll firmly but don’t squish the dough—air between layers is what makes this roti flaky.
Step 10: Coil into spirals and rest again
Take your rolled dough tube and coil it into a tight spiral, tucking the ends under to seal. Place the coil on the oiled plate and cover. Rest for another hour; this lets the dough relax and results in that perfect layering structure.
💡 Pro Tip: Press the spiral gently with your palm to seal and shape it neatly.
Step 11: Cook to golden perfection
Heat a non-stick pan over medium heat. Flatten the dough spiral into a 6 to 7-inch disc using your hands. Place a little oil on the pan and cook the roti, flipping frequently, until both sides are golden and crisp, about 4 minutes total.
💡 Pro Tip: Adjust heat as needed to avoid burning but get a nice crispy crust.
Step 12: Squash for fluffiness and serve warm
While still hot, clap or gently press the cooked roti between your hands to separate layers and enhance flakiness. Serve immediately with your favorite curry or dipping sauce for an authentic experience.
💡 Pro Tip: Serve warm for the best texture and flavor!
Common Mistakes to Avoid
Learn from these common pitfalls:
- Using cold water: Cold water tightens gluten and makes the dough tough and difficult to stretch.
- Skipping resting times: Without proper rest, the dough won’t be as pliable, resulting in tears rather than smooth stretches.
- Not oiling the dough balls enough: Leads to drying out and sticking, ruining the delicate layers.
- Stretching too roughly: Tears the dough, forcing you to patch or restart.
- Cooking on too high heat: Burns the outside before the inside cooks, leaving a raw center.
- Rolling the dough too thick: Fails to create the signature thin layers and fluffy texture.
Delicious Variations to Try
Once you’ve mastered the classic version of this Authentic Roti Canai Recipe, why not explore exciting twists?
Stuffed Roti Canai (Roti Telur)
Add a beaten egg and chopped onions inside the dough before folding and cooking. It transforms simple roti into a hearty, satisfying meal.
Sweet Roti with Sugar and Banana
Sprinkle sugar and thinly sliced banana on the stretched dough before rolling. Pan-fry to a caramelized, sweet treat that’s irresistible.
Cheese and Curry Roti
Fill the roti with grated cheese and a spoonful of curry; cook until melty and golden for a fusion twist that’s delightfully indulgent.
Whole Wheat Roti Canai
Swap half the all-purpose flour for whole wheat for a nuttier flavor and a slightly denser, wholesome texture.
Herb-Infused Roti
Incorporate finely chopped herbs like cilantro or curry leaves into the dough for an aromatic surprise in every bite.
How to Serve Authentic Roti Canai Recipe
Garnishes
Fresh coriander, a squeeze of lime, or a sprinkle of toasted sesame seeds add burst of freshness and texture.
Side Dishes
Classic pairings include dhal (lentil curry), chicken or beef curry, sambal (spicy chili paste), or even a simple bowl of warm coconut chutney.
Creative Ways to Present
Serve the roti stacked high on a colorful platter with small bowls of various dips and curries for an interactive meal. Or fold and slice into Spanish tapas-style bites for a crowd-pleasing appetizer.
Make Ahead and Storage
Storing Leftovers
Wrap leftover cooked roti tightly in foil or plastic wrap, then place in an airtight container. Store in the refrigerator for up to 2 days without losing too much texture.
Freezing
Let roti cool completely, then freeze individually wrapped pieces in a freezer bag. Thaw and reheat gently for a quick snack anytime.
Reheating
Reheat roti in a hot skillet with a little oil or butter to revive crispness, or warm briefly in the oven wrapped in foil. Avoid microwaving to prevent sogginess.
FAQs
Can I make this Authentic Roti Canai Recipe gluten-free?
Traditional roti relies on gluten for stretch and layers, so gluten-free versions can be tricky. You can try gluten-free flour blends but expect a different texture and fewer layers.
How long can I store the dough before cooking?
You can rest the dough covered at room temperature for up to 12 hours, or refrigerate overnight. Just bring it back to room temperature before shaping.
What is the best oil to use for layering and frying?
Neutral oils like vegetable, canola, or sunflower work best. You can also use ghee or melted butter for extra richness and flavor.
Why does my roti tear when I stretch it?
This usually means the dough wasn’t rested long enough, or the gluten wasn’t developed properly. Be gentle and patient during stretching, and ensure proper resting times.
Can I use a rolling pin instead of stretching by hand?
Yes, you can use a rolling pin, but the authentic technique uses hands for better control and delicate stretching.
How thin should the roti be stretched?
Stretch it until it’s translucent enough to see your hand through the dough, allowing for delicate, flaky layers.
What side dishes pair best with roti canai?
Traditional dhal, spicy chicken curry, fish curry, or sambal are excellent companions. You can also enjoy it with yogurt or pickled vegetables.
Can I add fillings to this recipe?
Absolutely! Stuffing with egg, onions, or sweet fillings like sugar and banana is a popular variation that adds delicious flair.
Final Thoughts
This Authentic Roti Canai Recipe holds a treasured place in my heart, reminding me of bustling mornings and comforting family meals. Each flaky, buttery layer is like a little celebration of tradition and love in your own kitchen. Whether you’re making it for breakfast, lunch, or an impressive dinner side, I promise this recipe will bring a burst of joy to your table.
Have you tried this Authentic Roti Canai Recipe? I’d love to hear how it turned out! Leave a comment below. If you loved this recipe, please share it with friends and family. Happy cooking! 🌿
PrintAuthentic Roti Canai Recipe

Roti Canai is a traditional Malaysian flaky flatbread that is crispy on the outside and soft on the inside. It is made from a simple dough of flour, water, salt, and oil, which is stretched thin, folded, and cooked on a hot pan until golden brown. Perfectly paired with curry or dhal, this recipe guides you through the process of making authentic roti canai in your own kitchen with detailed steps for resting, shaping, and cooking the dough to achieve the desired layered texture.
- Prep Time: 4 hours 50 minutes
- Cook Time: 20 minutes
- Total Time: 5 hours 10 minutes
- Yield: 4 servings (8 rotis) 1x
- Category: Flatbread
- Method: Stovetop
- Cuisine: Malaysian
Ingredients
Dough Ingredients
- 500 g all purpose flour (about 4 cups, measured by spoon and level method)
- 1 tsp sea salt
- 180 mL boiling water (¾ cup)
- 180 mL room temperature water (¾ cup)
For Coating, Layering, and Cooking
- Vegetable oil (for coating, layering, and cooking)
- Butter or ghee (optional, for layering and flavor)
Instructions
- Initial Mixing: In a large bowl, combine the all purpose flour and sea salt. Stir to mix the salt evenly throughout the flour.
- Add Hot Water: While stirring the flour with a fork or spatula, pour in the boiling water and mix until the flour forms small clumps and the water is evenly distributed.
- Add Room Temperature Water: Gradually add the room temperature water, mixing preferably by hand, to form a soft but not sticky dough with a rough texture.
- Rest the Dough: Cover the bowl with plastic wrap and let the dough rest for about 30 minutes to 1 hour to allow gluten development and water absorption.
- Knead the Dough: After resting, knead the dough for 2 to 3 minutes until it develops a smooth, satiny surface. Continue kneading if needed to achieve the desired texture.
- Divide and Shape: Weigh the dough and divide it into 8 equal portions (about 90 to 100 g each). Shape each portion into a smooth round dough ball. Cover with plastic wrap and set aside.
- Oil Coating and Rest: Prepare a bowl of vegetable oil and a large plate or flat container lightly coated with oil. Roll each dough ball in the oil to coat fully and place them spaced apart on the oiled plate. Cover with plastic wrap and let rest for at least 2 hours or up to 12 hours for better pliability.
- Prepare for Shaping: Place some oil, butter, or ghee in a bowl for spreading during shaping.
- Stretch the Dough: Take one dough ball and flatten it on a smooth work surface. Use your hands to gently stretch the dough as thin as possible until it is paper-thin and semi-transparent, shaping it into a circle or rectangle without tearing.
- Layer with Fat: Spread a thin layer of oil, butter, or ghee over the stretched dough surface to help create flaky layers.
- Roll the Dough: Roll the dough into a tight log or fold it with 0.5 to 1 inch folds, layering the dough over itself carefully.
- Form Spiral: Coil the rolled dough log into a tight spiral. Tuck the ends underneath the spiral and press down gently with your palm to seal the coil.
- Rest Coiled Dough: Place the spiral-shaped dough back on the oiled plate, cover with plastic wrap, and let rest for at least one more hour.
- Heat the Pan: Preheat an 8-inch or larger non-stick pan or tawa over medium heat.
- Flatten the Dough: Take one rested coiled dough portion and flatten it using your hands or a rolling pin into a 6 to 7 inch diameter roti.
- Cook the Roti: Lightly oil the pan’s surface and place the flattened roti on it. Cook until golden brown, flipping multiple times to ensure even browning on both sides, about 4 minutes total per roti.
- Separate the Layers: Once cooked, place the roti on a cooling rack. While still hot, gently squash the roti with a clapping motion using your hands to separate the flaky layers.
- Repeat and Serve: Repeat the cooking process with remaining dough portions and serve the warm roti canai with curry or your favorite dipping sauce.
Notes
- Resting the dough for longer (up to 12 hours) improves gluten development and makes the dough more pliable and easier to stretch.
- Stretch the dough carefully to avoid tears; practice builds technique for thin, even layers.
- Using butter or ghee instead of oil during layering adds richer flavor and flakier texture.
- Adjust stove heat depending on your pan to prevent burning or undercooking; medium heat works best for even cooking.
- Squashing the cooked roti helps to separate the layers and achieve the characteristic flakiness of roti canai.
- This recipe yields 4 servings, about 8 rotis in total.
Keywords: Roti Canai, Malaysian flatbread, flaky flatbread recipe, homemade roti, pan-fried flatbread, layered flatbread, curry bread


