
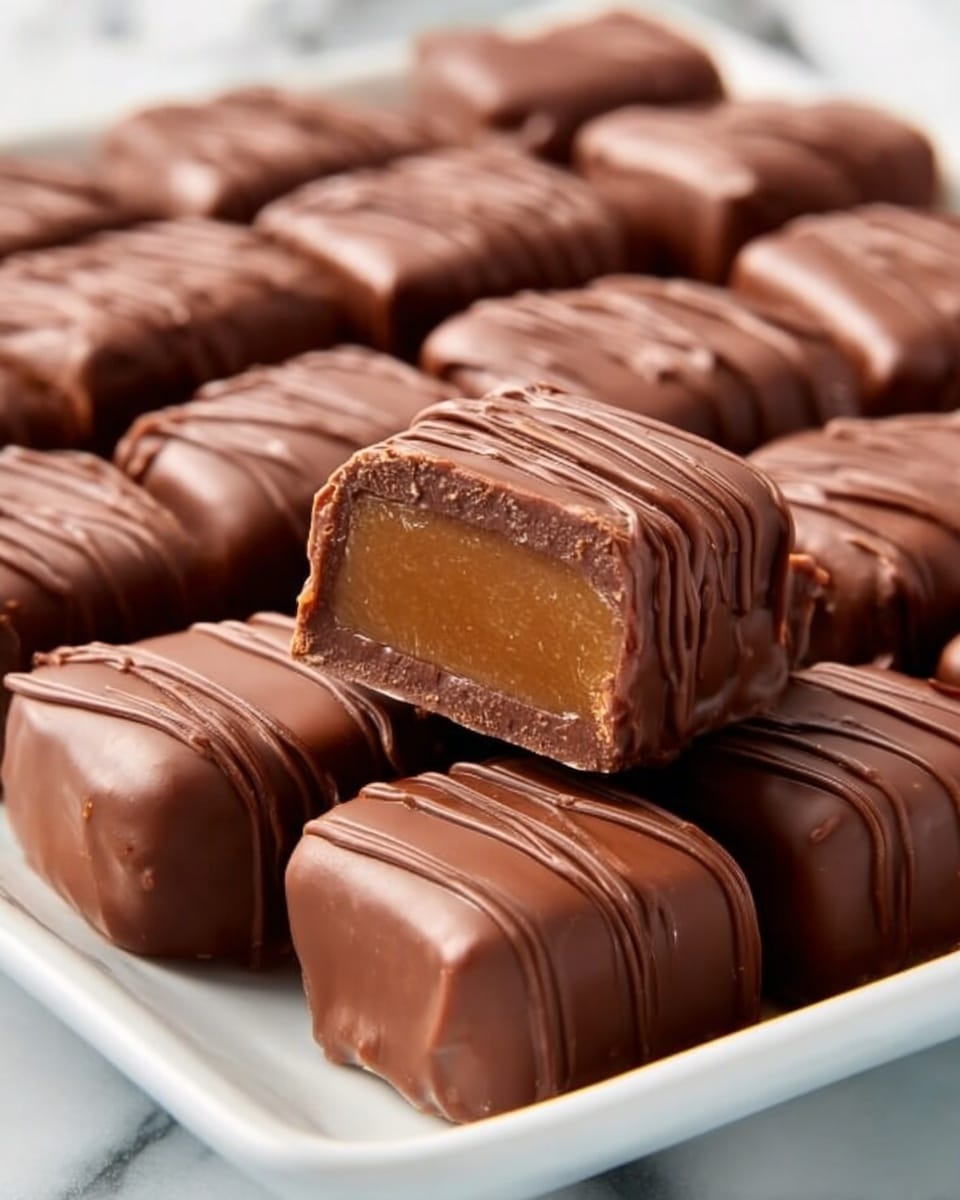
Butterscotch Squares Recipe
Picture this: the moment you unwrap a glossy, dark chocolate-covered butterscotch square, the rich aroma of caramelized brown sugar and creamy vanilla teases your senses. As you bite in, a luscious, soft filling melts in your mouth, perfectly balanced by the bittersweet chocolate shell. The warmth of butter and cream lingers, leaving behind an irresistible sweetness that feels like a cozy hug. This Butterscotch Squares Recipe is a delightful indulgence that is both impressive to serve and surprisingly comforting to make. Whether it’s for a festive gathering or a quiet treat, these squares bring a touch of magic to every moment.
Why You’ll Love This Butterscotch Squares Recipe
- Decadent yet approachable: This recipe combines classic candy-making techniques to create something truly special without daunting steps.
- Reliable results: Following the simple method guarantees creamy, chewy centers wrapped in smooth chocolate every time.
- Perfect for gifting and sharing: These bite-sized delights make stunning homemade presents or party treats that wow guests.
- Flexible preparation: Make the filling ahead and dip in chocolate when you’re ready — great for planning ahead!
- Customizable flavors: Easily tweak vanilla, salt level, or chocolate coating to match your preference.
Why This Butterscotch Squares Recipe Works
The magic behind this Butterscotch Squares Recipe lies in its precise balance of ingredients and temperature control. First, cooking the brown sugar, cream, and butter mixture to exactly 236ºF ensures the filling sets to the perfect soft-ball stage, creating a luscious texture that isn’t too hard or gooey. The careful incorporation of powdered sugar smooths the filling and adds the right sweetness. Finally, dipping each square into melted chocolate seals in the flavor and adds a pleasant, crisp shell. This combination results in a truffle-like candy that melts on the tongue with each bite, delivering rich butterscotch flavor wrapped in silky chocolate.
Ingredients You’ll Need
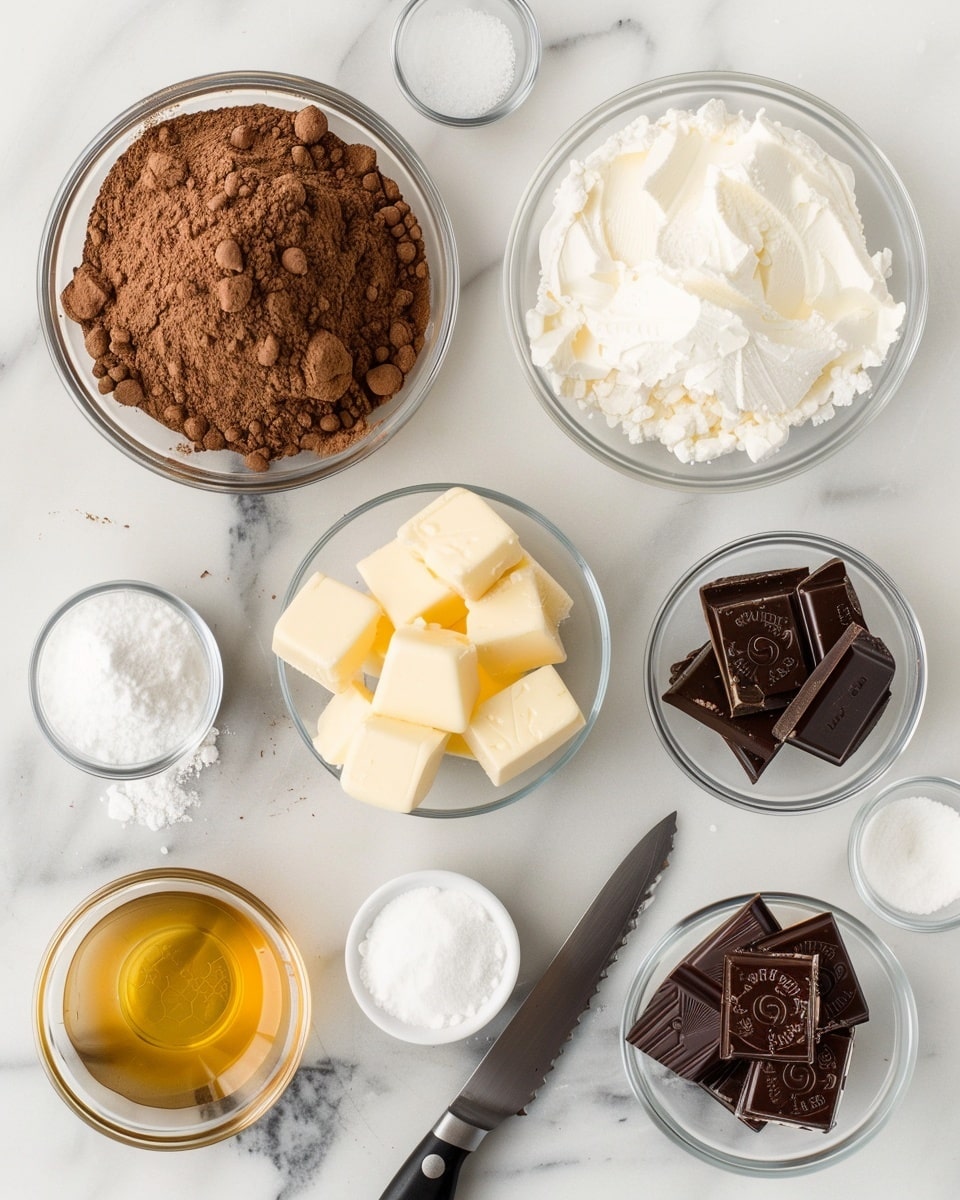
The beauty of this recipe is that it uses straightforward ingredients you likely already have, yet each plays a vital role in creating those melt-in-your-mouth Butterscotch Squares.
- Packed brown sugar (2 cups, 400g): Provides the deep caramel flavor and sweetness.
- Heavy whipping cream (¾ cup, 177ml): Adds richness and smooth texture.
- Unsalted butter (6 tablespoons, 84g): Contributes creaminess and depth of flavor.
- Vanilla extract (½ teaspoon): Enhances all flavors with warm aroma.
- Salt (¼ teaspoon): Balances sweetness and brightens the candy.
- Powdered sugar (1 cup, 113g): Creates the silky texture and additional sweetness.
- Chocolate melts (16 ounces): For coating, providing a smooth, glossy finish.
Ingredient Substitutions & Tips
- Brown sugar: You can substitute light brown sugar for a milder flavor or dark brown sugar for a richer, more molasses-heavy taste.
- Heavy whipping cream: Full-fat coconut milk works as a dairy-free alternative but will slightly change the flavor profile.
- Unsalted butter: Use salted butter but reduce added salt by half to keep balance.
- Chocolate melts: High-quality chocolate chips or couverture can be used; just ensure they are fully melted and tempered for best results.
👨🍳 Pro Tips for Perfect Results
- Use a candy thermometer: Accurate temperature is crucial for the perfect set; don’t rely on guesswork.
- Line your pan with foil and spray well: Makes removing the squares a breeze without sticking.
- Stir gently: Avoid over-stirring once the mixture boils to prevent graininess in your filling.
- Chill after dipping: Refrigerate the coated squares promptly so the chocolate sets with a beautiful shine.
- Cut with a sharp knife: Warm your blade slightly for cleaner, neater edges.
How to Make Butterscotch Squares Recipe
Step 1: Preparing Your Pan
Line a 9×9 inch pan with foil and generously spray it with nonstick cooking spray. This step is key to removing the butterscotch filling easily once it’s set. Set the pan aside while you prepare the filling.
💡 Pro Tip: Press down the foil edges tightly to the pan’s corners for a smooth surface to cut later.
Step 2: Cooking the Butterscotch Filling
In a medium saucepan over medium-high heat, combine the packed brown sugar, heavy whipping cream, and unsalted butter. Stir gently until the butter has melted and the sugars have dissolved. Bring the mixture to a steady rolling boil, then reduce the heat to low. Insert a candy thermometer and simmer, stirring occasionally until the mixture reaches 236ºF, which should take about 7-8 minutes.
💡 Pro Tip: Don’t rush this step—accurate temperature ensures the ideal chewy but firm texture.
Step 3: Adding Flavor and Sweetness
Immediately remove the pan from heat and stir in the vanilla extract and salt. Then whisk in the powdered sugar until fully incorporated and smooth. This creates that classic creamy butterscotch texture you’re aiming for. Pour the hot filling into your prepared pan and let it set at room temperature for several hours, or even overnight for best results.
💡 Pro Tip: Use a sturdy whisk to break up any lumps and achieve a silky consistency.
Step 4: Cutting the Butterscotch Squares
Once fully set, lift the butterscotch block out of the pan using the foil. Place on a large cutting board and carefully cut the block into quarters, then cut each quarter into 16 small squares — about 1-inch pieces — for perfect bite-sized treats.
💡 Pro Tip: Warm your knife blade by dipping it in hot water and wiping dry before each cut for smooth edges.
Step 5: Dipping in Chocolate
Melt your chocolate melts according to their package instructions until smooth and glossy. Using a fork or dipping tool, coat each butterscotch square fully in chocolate, gently tapping off any excess. Set them on a wax paper-lined baking sheet and refrigerate until the chocolate hardens.
💡 Pro Tip: Work quickly with the chocolate and keep your dipping utensils warm for a cleaner coat.
Common Mistakes to Avoid
Learn from these common pitfalls:
- Skipping the candy thermometer: Not monitoring temperature can lead to squares that are too soft or too hard.
- Over-stirring after boiling: This can cause grainy texture instead of smooth chewy centers.
- Not lining the pan properly: Makes it harder to remove the set filling cleanly without breaking.
- Cutting too soon: Premature slicing can distort the shape and texture of your squares.
- Chocolate overheating: Overheated melts seize or become grainy, ruining the coating’s shine.
- Not chilling after dipping: Skipping chill time results in soft, messy chocolate shells.
Delicious Variations to Try
Once you’ve mastered the classic Butterscotch Squares Recipe, there are so many exciting ways to mix it up:
Salted Butterscotch Squares
Sprinkle flaky sea salt over the chocolate coating just before chilling for a sophisticated sweet-salty combo that enhances the caramel flavors beautifully.
Espresso Infused Butterscotch
Add a teaspoon of finely ground espresso powder to the filling mixture for a subtle coffee kick that deepens the richness.
Nutty Butterscotch Crunch
Mix in finely chopped toasted pecans or walnuts into the filling before setting for a pleasant crunch and nutty aroma.
White Chocolate Dipped Butterscotch
Swap out chocolate melts for white chocolate for a milder, creamier coating that adds elegance.
Vanilla Bean Butterscotch
Use fresh scraped vanilla bean seeds instead of extract to highlight the vanilla notes with floral complexity.
How to Serve Butterscotch Squares Recipe
Garnishes
Top with a light dusting of cocoa powder, a small sprinkle of sea salt, or finely grated orange zest for visual appeal and bursts of flavor.
Side Dishes
Serve alongside a cup of freshly brewed coffee, chai tea, or rich hot cocoa for an indulgent pairing perfect for afternoon treats or dessert.
Creative Ways to Present
Arrange squares on a decorative serving tray lined with parchment and intersperse with edible flowers or fresh berries for a stunning dessert display. Package leftovers in clear treat bags tied with ribbon for beautiful homemade gifts.
Make Ahead and Storage
Storing Leftovers
Store your Butterscotch Squares in an airtight container in the refrigerator for up to two weeks. Separate layers with parchment or wax paper to prevent sticking.
Freezing
For longer storage, freeze the squares in a single layer on a baking sheet until solid, then transfer to a freezer-safe container. They keep well for up to 3 months and thaw quickly at room temperature.
Reheating
No reheating needed! Just let frozen squares thaw at room temperature for 30 minutes before enjoying to restore their creamy texture.
FAQs
Can I use a different size pan?
Yes, but changing the pan size alters the thickness and setting time. Stick to 9×9 inches for best texture and cutting ease.
What is the best type of chocolate to use for dipping?
Chocolate melts or couverture with at least 60% cocoa solids are ideal for a smooth, glossy shell. Avoid low-quality chips with stabilizers for best results.
How do I know when the butterscotch filling is done cooking?
Use a candy thermometer and remove from heat once it reaches 236ºF — the soft-ball stage — for perfect chewiness.
Can I make this recipe dairy-free?
Substitute heavy cream with full-fat coconut milk and use dairy-free chocolate, but note the flavor will shift slightly.
Why is my filling grainy?
Graininess often results from over-stirring after boiling or crystallization. Stir gently and carefully incorporate powdered sugar to prevent this.
Can I prepare the filling ahead of time?
Absolutely! The filling can be made and set a day in advance, then cut and dipped when ready.
How long do these Butterscotch Squares keep?
Stored properly in the fridge, they last up to 2 weeks, and freezing extends shelf life to 3 months.
Is this recipe kid-friendly? Can kids help?
Yes, it’s a fun project! Kids can help with measuring, stirring (off heat), cutting, and dipping under adult supervision.
Final Thoughts
Making these Butterscotch Squares is like capturing a little piece of candy magic at home. The process might take a bit of patience, but every sticky stir and careful dip is rewarded with bite-sized treasures bursting with buttery, caramel sweetness and rich chocolate. Whether you share them at holidays, gift them to friends, or savor them as your own secret treat, they’re certain to bring smiles all around.
Have you tried this Butterscotch Squares Recipe? I’d love to hear how it turned out! Leave a comment below. If you loved this recipe, please share it with friends and family. Happy cooking! 🍬
PrintButterscotch Squares Recipe
These homemade Butterscotch Squares are a delightful copycat of See’s Candy truffles, featuring a creamy, rich butterscotch filling dipped in smooth chocolate. Perfect for satisfying your sweet tooth, these treats combine a luscious caramel-like center with a crisp chocolate coating.
- Prep Time: 1 hour
- Cook Time: 15 minutes
- Total Time: 4 hours 15 minutes
- Yield: 64 truffles 1x
- Category: Dessert
- Method: Stovetop
- Cuisine: American
Ingredients
Butterscotch Filling
- 2 cups (400g) packed brown sugar
- ¾ cup (177ml) heavy whipping cream
- 6 tablespoons (84g) unsalted butter
- ½ teaspoon vanilla extract
- ¼ teaspoon salt
- 1 cup (113g) powdered sugar
Chocolate Coating
- 16 ounces chocolate melts
Instructions
- Prepare the Pan: Line a 9×9 inch pan with foil and lightly spray it with nonstick cooking spray to ensure easy removal of the butterscotch mixture later.
- Cook the Butterscotch Mixture: In a saucepan over medium-high heat, combine brown sugar, heavy cream, and unsalted butter. Stir until the butter and sugar melt completely. Bring the mixture to a rolling boil, then reduce the heat to low and insert a candy thermometer.
- Simmer to Soft Ball Stage: Allow the mixture to simmer gently, stirring occasionally, until it reaches 236ºF (soft ball stage), which usually takes about 7-8 minutes. This ensures the perfect chewy texture.
- Add Flavorings and Sugar: Remove the pan from heat. Stir in the vanilla extract and salt. Then whisk in the powdered sugar thoroughly until the mixture is smooth and well combined.
- Set the Filling: Pour the butterscotch mixture into the prepared pan, spreading it evenly. Let it cool and set at room temperature for a few hours, or refrigerate overnight if preparing ahead.
- Cut the Squares: Once set, lift the butterscotch block out of the pan using the foil. Using a large sharp knife, cut it into quarters. Then carefully cut each quarter into approximately 16 smaller squares, resulting in about 64 total truffles.
- Melt the Chocolate: Melt the chocolate melts according to the package instructions, either using a microwave or double boiler until smooth.
- Dip the Squares: Using a fork or dipping tool, dip each butterscotch square completely into the melted chocolate, allowing excess to drip off. Place the dipped squares onto a wax paper lined baking sheet.
- Chill to Set: Refrigerate the chocolate-dipped squares until the coating is firm, about 30 minutes to 1 hour, then serve or store in an airtight container.
Notes
- Be sure to use a candy thermometer for accurate temperature to achieve the perfect texture.
- Line your pan with foil extending over the edges to easily lift the block out when set.
- If chocolate is too thick for dipping, add a small amount of vegetable oil or shortening to thin it slightly.
- Store completed butterscotch squares in an airtight container in the refrigerator for up to two weeks.
- Allow chocolate to fully set before serving to avoid melting at room temperature.
Keywords: Butterscotch squares, homemade truffles, chocolate dipped candy, copycat see’s candy, caramel candy recipe, easy chocolate treats


