
Buttery Garlic Cheese Bombs Recipe
The irresistible aroma of warm, buttery garlic fills your kitchen as these golden cheese bombs bake to perfection. Imagine biting into a fluffy, biscuit pillow bursting with gooey melted cheese and the rich, savory kiss of garlic. These Buttery Garlic Cheese Bombs are not just a snack—they are a celebration of comfort in every decadent bite!
Why You’ll Love This Buttery Garlic Cheese Bombs Recipe
- Irresistible Flavor Combo: The luscious blend of garlic, butter, and melted cheese creates an indulgent taste experience that’s hard to beat.
- Simple, Pantry-Friendly Ingredients: With just biscuit dough, cheese cubes, butter, garlic, and a sprinkle of parsley, this recipe is fuss-free and satisfying.
- Perfect for Any Occasion: Whether you’re hosting friends or craving a cozy snack, these cheese bombs fit right in.
- Impressive Yet Easy: They look like fancy treats but come together with a few simple steps that anyone can master.
- Customizable Comfort: Cheese choice and herbs let you tailor every bite to your own cravings, making this recipe endlessly adaptable.
Why This Buttery Garlic Cheese Bombs Recipe Works
What makes these cheese bombs truly magical is their straightforward baking method paired with quality ingredients that shine. Using refrigerated biscuit dough means you save time without compromising on fluffy texture. Encasing small cubes of mozzarella or cheddar ensures every bite carries that perfect cheese pull. The garlic butter brush applied before baking adds a glossy finish and layers of aromatic richness that infuse the dough as it bakes. This technique creates a beautiful golden crust with an ooey-gooey center—a guaranteed crowd-pleaser every time.
Ingredients You’ll Need
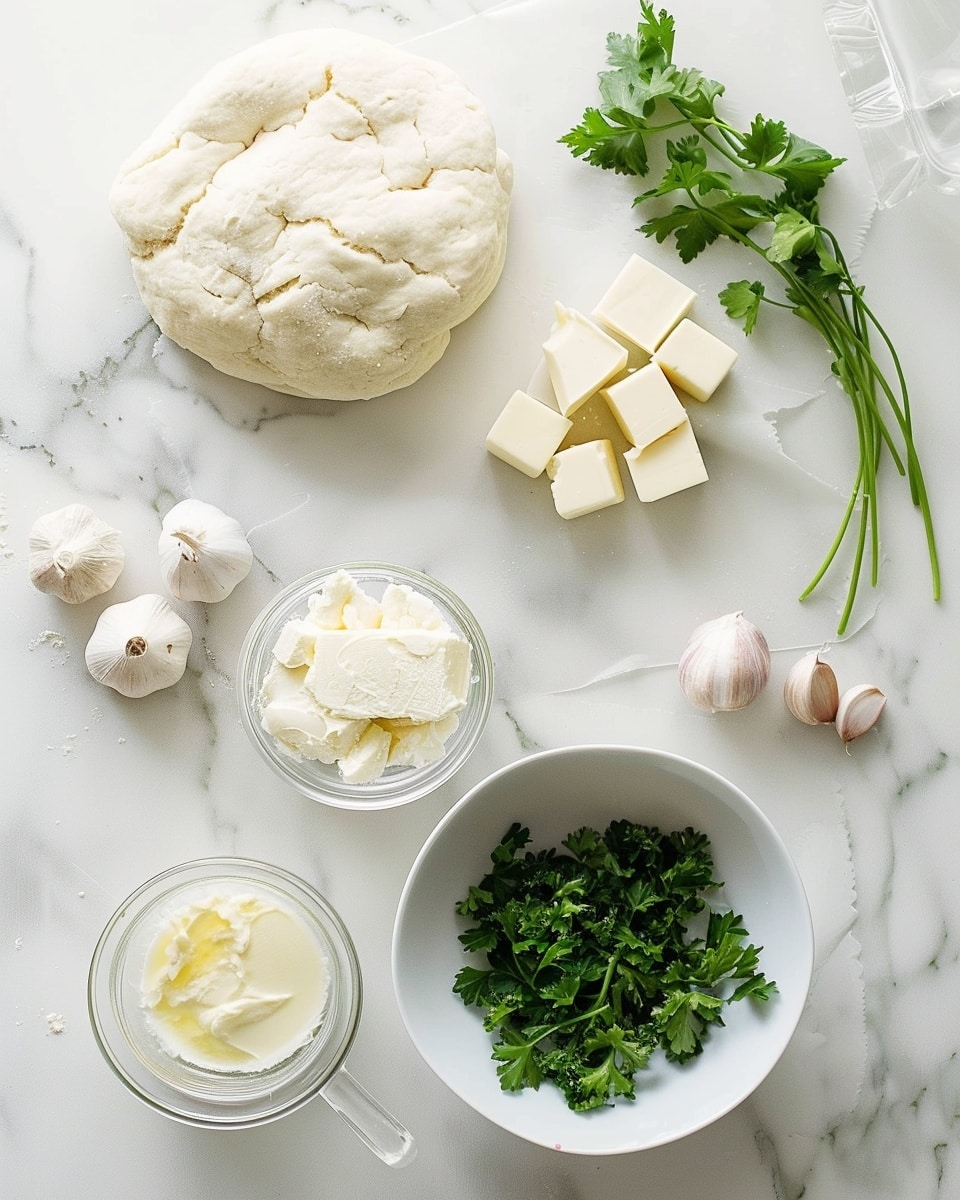
Gather a handful of simple yet stellar ingredients that come together to deliver this comforting classic. Each component plays a vital role—from the buttery richness to the tantalizing garlic kick.
- 1 can 8-count refrigerated biscuit dough: The fluffy base that bakes up soft and pillowy, perfect for wrapping cheese.
- 8 small cubes of mozzarella or cheddar cheese: Melted pockets of cheesy goodness tucked inside each biscuit.
- 4 tablespoons unsalted butter melted: Adds a rich, glossy coating and carries the garlic flavor beautifully.
- 2 cloves garlic minced (or 1/2 teaspoon garlic powder): The aromatic star that makes these cheese bombs crave-worthy.
- 1 tablespoon fresh parsley finely chopped (optional): A fresh, vibrant touch for color and subtle herbaceous notes.
Ingredient Substitutions & Tips
- Biscuit dough: Can be swapped for homemade biscuit dough or crescent rolls if preferred.
- Mozzarella or cheddar cheese: Try Monterey Jack or Colby if you want a milder or sharper twist.
- Garlic: Garlic powder works well as a convenient alternative without sacrificing flavor.
- Parsley: Fresh basil or chives are excellent herb options if you want to switch up the garnish.
👨🍳 Pro Tips for Perfect Results
- Use chilled biscuit dough: Cold dough handles easier and helps form perfect balls.
- Seal edges tightly: Prevent cheese from leaking during baking by pinching well.
- Brush generously with garlic butter: It ensures a golden crust and packs in rich garlic flavor.
- Choose good-quality cheese: It melts better and gives a luscious texture.
- Line baking sheet with parchment paper: Makes cleanup a breeze and keeps bombs from sticking.
How to Make Buttery Garlic Cheese Bombs Recipe
Step 1: Preheat the Oven
Start by warming your oven to 375°F (190°C) and prepare a baking sheet lined with parchment paper—this not only prevents sticking but also makes cleanup effortless after baking these cheesy wonders.
💡 Pro Tip: Ensure your oven is fully preheated for even baking and perfectly golden cheese bombs.
Step 2: Prepare the Biscuits
Pop open your refrigerated biscuit dough and carefully separate each biscuit. Flatten each one slightly into a small disc using your fingers—this makes wrapping the cheese easier and ensures a nice even bake.
💡 Pro Tip: Don’t flatten too thin; just enough to fold and seal over the cheese with ease.
Step 3: Add the Cheese
Place one small cube of your chosen mozzarella or cheddar in the center of each biscuit disc. Fold the dough over the cheese, then pinch and seal the edges completely so none of that melted cheese escapes during baking. Roll each sealed biscuit into a smooth, round ball.
💡 Pro Tip: Sealing well is crucial—this step locks in gooey, molten cheese for that perfect bite.
Step 4: Arrange on the Baking Sheet
Set your cheese bombs seam-side down on the prepared baking sheet, leaving a little space between each. They’ll expand as they bake and you want to make sure they don’t stick together.
💡 Pro Tip: Space them well to get a golden, evenly baked crust on all sides.
Step 5: Make the Garlic Butter
In a small bowl, mix melted unsalted butter with minced garlic and freshly chopped parsley if you’re using it. This lush garlic butter mixture is what will make these cheese bombs truly shine with flavor and glossy finish.
💡 Pro Tip: For a smoother spread, let the butter cool slightly before mixing with garlic to keep it emulsified.
Step 6: Brush with Garlic Butter
Brush the garlicky butter generously over the tops of each cheese bomb. This step infuses every bite with garlicky richness and helps achieve that mouthwatering golden crust while baking.
💡 Pro Tip: Don’t be shy—more butter means more flavor and glorious browning!
Step 7: Bake
Slide the baking sheet into the oven and bake for 15 to 18 minutes until these beauties turn golden brown and the cheese inside reaches oozy, melted perfection.
💡 Pro Tip: Keep an eye on the color; golden edges are your signal they’re just right.
Common Mistakes to Avoid
Learn from these common pitfalls:
- Under-sealing the biscuits: Cheese leakage leads to mess and dry bombs.
- Skipping the garlic butter: That step is key for flavor and crust color.
- Over-flattening the dough: Too thin dough causes bursting or dry texture.
- Overcrowding the baking sheet: Cheese bombs need room to rise and brown evenly.
- Baking at wrong temperature: Too hot burns the outside before cheese melts; too low dries them out.
Delicious Variations to Try
Once you’ve mastered the classic version of these Buttery Garlic Cheese Bombs, why not experiment with some tasty twists?
Spinach Artichoke Style
Add chopped marinated artichokes and thawed spinach to the cheese cubes for a vibrant, savory surprise. This pairs beautifully with the garlic butter and adds a fresh veggie twist. Try our Spinach Artichoke Stuffed Pretzels Recipe for another fun cheesy snack with a veggie boost.
Parmesan Herb Boost
Mix a bit of grated parmesan and Italian herbs into the garlic butter brush for an extra layer of bold flavor.
Spicy Kick
Add red pepper flakes to the garlic butter or sprinkle some cayenne powder inside before sealing to surprise your palate with a gentle heat.
Cheese Medley
Experiment with blending mozzarella, cheddar, and even a little string cheese for an irresistible melty center with varied textures.
Garlic Powder Shortcut
Use garlic powder in the butter mix for a quick alternative that still delivers punchy garlic flavor without the chopping.
How to Serve Buttery Garlic Cheese Bombs Recipe

Garnishes
Sprinkle some finely chopped fresh parsley or chives over the cheese bombs right out of the oven for a pop of color and fresh herbal brightness.
Side Dishes
Pair these cheesy bites with a crisp green salad or a vibrant tomato marinara dipping sauce for a complete snack experience. For a light and creamy side, our 1 Ingredient Keto Cottage Cheese Chips Recipe complements perfectly with contrasting crisp texture.
Creative Ways to Present
Serve these cheese bombs on a wooden board surrounded by small bowls of dipping sauces like ranch, marinara, or pesto. Stack them pyramid-style to wow guests visually while tempting them with that irresistible aroma.
Make Ahead and Storage
Make-Ahead Instructions
Prepare and fill your cheese bombs, then place them sealed on the baking sheet covered loosely with plastic wrap in the fridge for up to 24 hours. Brush with garlic butter and bake just before serving.
Storage
Store leftover cheese bombs in an airtight container in the refrigerator for 2 to 3 days. They remain tasty but best enjoyed fresh.
Freezing
Freeze unbaked cheese bombs by arranging them on a baking sheet in the freezer until firm, then transfer to a freezer-safe bag. Freeze for up to 1 month. Bake directly from frozen, adding a few extra minutes to the baking time.
Reheating
Reheat cheese bombs in a preheated oven at 350°F (175°C) for 8–10 minutes. Avoid microwaving to keep the outer crust crisp and cheese melted evenly.
Expert Tips for Success
- Cold dough is easier to handle and less sticky when forming balls around cheese cubes.
- Don’t skip the garlic butter brush—it’s essential for flavor and golden color.
- Choose cheese that melts well like mozzarella or mild cheddar for the best gooey effect.
- Seal edges firmly to avoid oozing cheese and messy baking sheets.
- Use parchment paper on your baking tray to prevent sticking and simplify cleanup.
- Watch baking closely in the last few minutes to ensure perfect golden crust without burning.
- Customize with herbs like parsley or basil for a fresh pop of flavor and aroma.
Frequently Asked Questions
Can I use other types of cheese besides mozzarella or cheddar?
Absolutely! Feel free to experiment with cheeses like Monterey Jack or Colby, but be sure they melt well to keep that gooey center.
Can I prepare these cheese bombs ahead of time?
Yes! You can assemble them in advance and refrigerate before baking, making them perfect for parties or quick snacks later.
Is there a way to make these vegan or dairy-free?
This recipe relies on butter and cheese, but you can try vegan biscuit dough, dairy-free cheese, and vegan butter alternatives for a plant-based version.
What’s the best way to store leftovers?
Keep them in an airtight container in the fridge for up to 3 days and reheat in the oven to maintain crispness.
Can I freeze these cheese bombs?
Yes, freeze unbaked bombs on a sheet, then transfer to a freezer bag. Bake from frozen, adding some extra minutes for thorough cooking.
Can garlic powder substitute fresh garlic?
Definitely! Garlic powder is a convenient alternative that still delivers pungent flavor, especially in the garlic butter brush.
How do I prevent the cheese from leaking out during baking?
Seal biscuit edges firmly around the cheese and don’t overfill to avoid leaks. A tight pinch and smooth ball shape help keep cheese inside.
Final Thoughts
There’s something so comforting about pulling these warm, buttery garlic cheese bombs out of the oven—the golden crust, the melted cheese surprise inside, and that rich garlicky aroma that fills your home. This recipe is a simple yet delicious way to spoil yourself or impress guests with minimal fuss. Whether you’re serving them up for a snack, appetizer, or casual gathering, each bite promises pure happiness. Dive in and enjoy the cheesy, buttery magic!
Related Recipes You’ll Love
If you enjoyed this recipe, you’ll also love these delicious recipes:
- Chicken, Cheese, and Zucchini Muffins | Easy Savory Snack Recipe – Foodarohub – Soft, savory muffins packed with cheesy goodness and tender shredded chicken for an easy snack or light meal.
Buttery Garlic Cheese Bombs Recipe

Buttery Garlic Cheese Bombs are a delightful treat that combines the fluffiness of biscuits with the gooey richness of melted cheese and the aromatic flavors of garlic.
- Prep Time: 10 minutes
- Cook Time: 15 minutes
- Total Time: 25 minutes
- Yield: 8 cheese bombs 1x
- Category: Snack
- Method: Baking
- Cuisine: American
Ingredients
Ingredients
- 1 can 8-count refrigerated biscuit dough
- 8 small cubes of mozzarella or cheddar cheese
- 4 tablespoons unsalted butter melted
- 2 cloves garlic minced (or 1/2 teaspoon garlic powder)
- 1 tablespoon fresh parsley finely chopped (optional)
Instructions
- Preheat the Oven Preheat the oven to 375°F (190°C) and line a baking sheet with parchment paper for easy cleanup.
- Prepare the Biscuits Open the can of biscuit dough and separate the biscuits. Flatten each one slightly with your fingers to create a small disc.
- Add the Cheese Place one cube of cheese in the center of each biscuit. Fold the dough over the cheese and pinch the edges to seal it completely. Roll each filled biscuit into a smooth ball.
- Arrange on the Baking Sheet Place the sealed cheese bombs seam-side down on the prepared baking sheet, leaving space between them for expansion while baking.
- Make the Garlic Butter In a small bowl, mix the melted butter with minced garlic and parsley (if using).
- Brush with Garlic Butter Brush each biscuit ball generously with the garlic butter mixture before baking.
- Bake Bake in the preheated oven for 12-15 minutes or until golden brown and cheese is melted inside.
Notes
- Using fresh garlic provides the best flavor, but garlic powder is a good substitute if fresh is not available.
- Make sure to seal the biscuits well around the cheese to prevent leakage while baking.
- For an extra touch, sprinkle a little extra parsley over the bombs after baking.
Keywords: Buttery Garlic Cheese Bombs, Cheesy Biscuits, Garlic Butter Cheese Balls, Easy Snack Recipe, Cheese Stuffed Biscuits


