
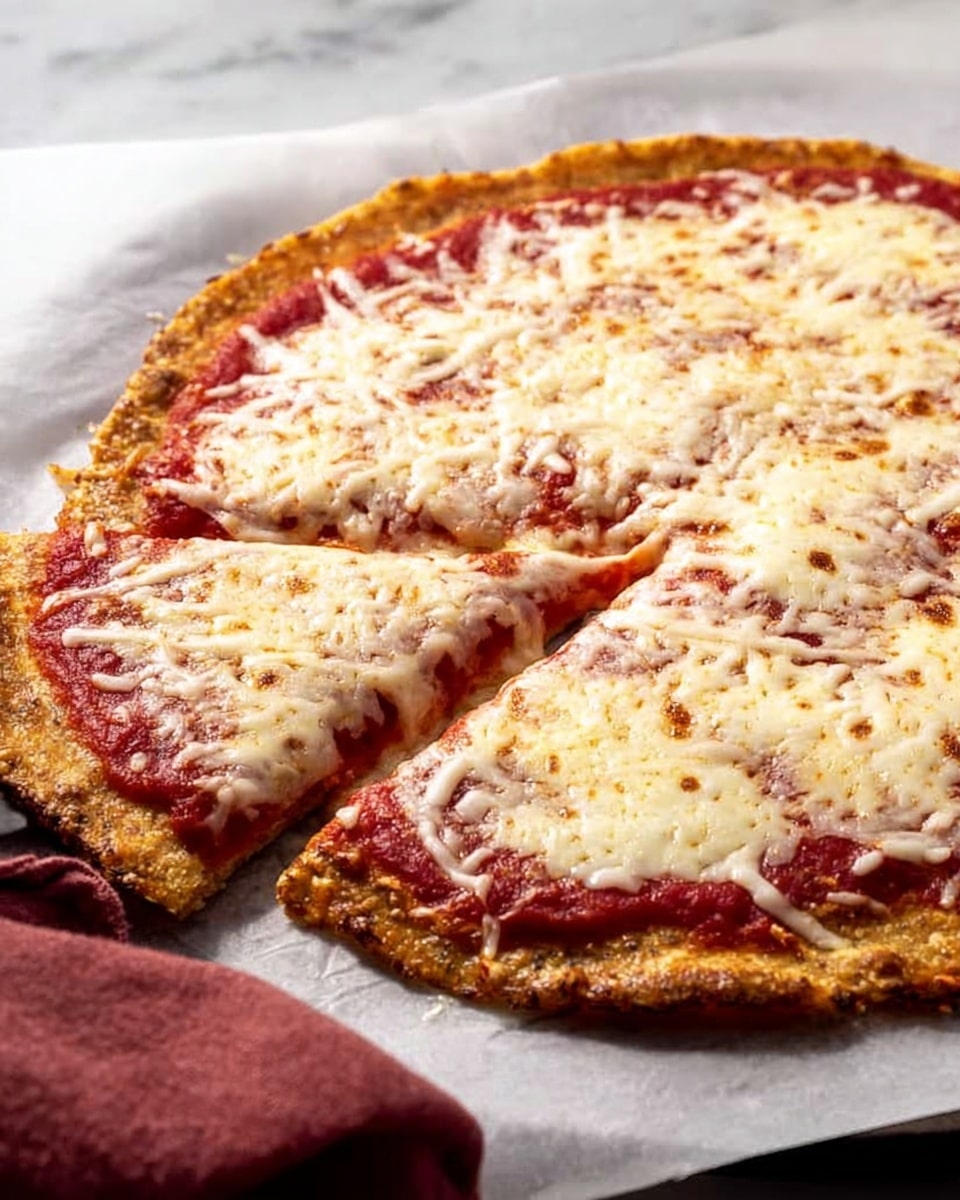
Cauliflower Low Carb Pizza Crust Recipe
I never imagined that a pizza crust could be both healthy and irresistibly delicious until I discovered this Cauliflower Low Carb Pizza Crust Recipe. The moment the crust comes out of the oven, you’re greeted by a tantalizing golden edge and that subtle, roasted cauliflower aroma that whets the appetite instantly. Each bite offers a perfect balance of crispness and tender chew, making it the ideal base for all your favorite toppings without the guilt.
Why You’ll Love This Cauliflower Low Carb Pizza Crust Recipe
- Deliciously Flavorful: This crust has a wonderful savory depth thanks to homemade vegetable bouillon powder, making every bite taste rich without heavy carbs or gluten.
- Simple Ingredients: You only need pantry staples like frozen riced cauliflower, eggs, tapioca starch, and a sprinkle of seasoning, which keeps your shopping list short and sweet.
- Perfect for Weeknights: With just 20 minutes of prep and 18 minutes of baking, you can whip this up fast enough for a cozy dinner no matter the day.
- Impressive Presentation: The crust forms a beautiful 10-inch round with slightly raised edges, giving your pizza a professional, homemade look that impresses family and friends.
- Customizable to Your Taste: This recipe is a versatile canvas—top it with your favorite dairy-free cheese and tomato sauce or experiment with colorful veggies to match your mood.
Why This Cauliflower Low Carb Pizza Crust Recipe Works
The magic behind this Cauliflower Low Carb Pizza Crust Recipe lies in its thoughtful method and smart ingredient choices. Removing every drop of moisture from the cauliflower before mixing is key—it ensures a crust that bakes up crispy, not soggy. Combining riced cauliflower with eggs creates a sturdy but tender base, while the tapioca starch binds everything together beautifully, giving you that satisfying stretch and firmness you expect from a pizza crust. Baking it on a heated pizza stone or preheated cookie sheet guarantees a golden-brown bottom that won’t let you down.
Ingredients You’ll Need
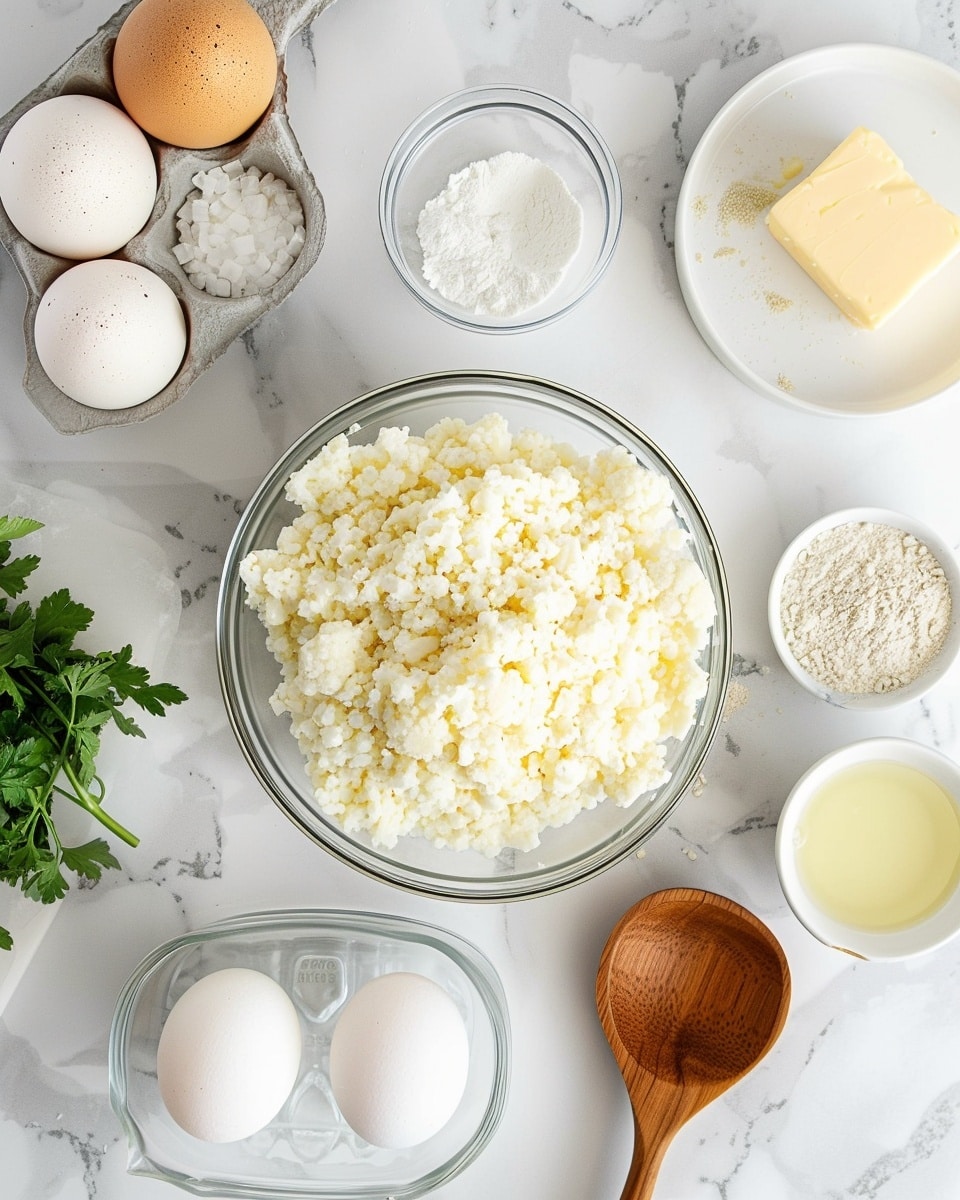
Gather these wholesome ingredients for your crust, each playing a special role in transforming humble cauliflower into a mouthwatering low carb pizza base.
- Frozen riced cauliflower (12 ounces): Either defrosted or use 4 cups of raw cauliflower florets for freshness.
- Eggs (2, lightly beaten): These bind the crust ingredients together for stability and texture.
- Homemade vegetable bouillon powder (3 tablespoons): Or a mix of 1/4 cup nutritional yeast flakes and 1/4 teaspoon kosher salt to add rich umami flavor.
- Tapioca starch/flour (1/4 cup): Acts as the gluten-free glue that helps achieve that perfect chewy yet crispy bite.
- Optional toppings: Tomato sauce and dairy-free shredded cheese substitute to finish your pizza just how you like it.
Ingredient Substitutions & Tips
- Riced Cauliflower: Fresh raw cauliflower florets work great if you prefer over frozen, just rice them finely.
- Vegetable Bouillon Powder: Swap for nutritional yeast and kosher salt if you want a cheesy, savory twist.
- Tapioca Starch: Arrowroot powder can be a suitable substitute if tapioca isn’t available.
- Eggs: For an egg-free version, flaxseed meal mixed with water can be experimented with, although texture will differ.
👨🍳 Pro Tips for Perfect Results
- Make sure to wring out the cauliflower thoroughly: Moisture is the enemy of crispiness here.
- Preheat your pizza stone or cookie sheet: This helps develop a golden, crunchy crust bottom.
- Spread the crust evenly: Aim for about 1/3-inch thickness for an ideal bake and texture.
- Flip the crust carefully: Baking both sides ensures a nicely browned, sturdy base.
- Customize toppings to your liking: Don’t overload the crust to maintain its structure and bake quality.
How to Make Cauliflower Low Carb Pizza Crust Recipe
Step 1: Preheat oven
Set your oven to a toasty 400°F. If you own a pizza stone, pop it inside before preheating—that secret trick crisps the crust beautifully. No stone? A preheated cookie sheet works wonders too.
💡 Pro Tip: Preheating your baking surface is a subtle game changer for crust texture.
Step 2: Remove moisture from cauliflower
Wrap your defrosted or cooked riced cauliflower tightly in a tea towel, cheesecloth, or a fine mesh bag. Squeeze with all your might—the more moisture you release now, the crispier your crust later.
💡 Pro Tip: You’d be surprised how much water cauliflower holds; wring it out until it feels almost dry.
Step 3: Dry cauliflower thoroughly
Continue wringing until the cauliflower clumps together and is as dry as possible. You can even prepare this step days ahead—just keep the cauliflower sealed in the fridge until you’re ready.
💡 Pro Tip: Dry cauliflower equals less soggy crust. Patience here pays off.
Step 4: Process cauliflower and eggs
Pop the dried cauliflower and lightly beaten eggs into a food processor. Pulse until the texture turns smoothly curdled without any large chunks, ensuring an even base.
💡 Pro Tip: A mini food processor will do the job perfectly without overworking the mixture.
Step 5: Add bouillon and starch
In goes the vegetable bouillon powder (or your nutritional yeast and salt mix) along with the tapioca starch. Pulse a few more times until everything blends into a cohesive, smooth batter.
💡 Pro Tip: The starch is your crust’s secret weapon—don’t skip this for the perfect bite.
Step 6: Form the crust
Transfer the mixture onto a large square of parchment paper. Using an offset spatula or large spoon, shape it into a 10-inch circle about 1/3-inch thick, smoothing the top and forming a raised edge to contain toppings later.
💡 Pro Tip: The raised edge adds a lovely professional touch and keeps your toppings neatly tucked in.
Step 7: Bake and flip crust
Slide the crust (with parchment) onto your heated pizza stone or cookie sheet. Bake for 10 minutes, then carefully flip it over and bake for another 3 minutes to achieve a golden brown finish on top.
💡 Pro Tip: Flipping helps both sides become delightfully crisp and visually appealing.
Step 8: Prepare for topping
Turn the oven temperature up to 425°F. Remove the crust and add your favorite tomato sauce and dairy-free shredded cheese, or let the crust cool completely for storage.
💡 Pro Tip: Baking toppings onto a hot crust seals in flavor and texture beautifully.
Step 9: Bake with toppings
Return your topped pizza to the oven and bake until the cheese substitute melts, toppings set, and edges brown, usually about 5 more minutes. Serve it immediately to enjoy at its best.
💡 Pro Tip: Keep an eye on the edges—perfectly browned means perfectly done!
Common Mistakes to Avoid
Learn from these common pitfalls:
- Not wringing out enough moisture: Leads to a soggy crust that won’t crisp.
- Skipping the preheated baking surface: Results in an unevenly cooked, soft base.
- Thick or uneven spreading of crust mixture: Causes inconsistency in baking and texture.
- Overloading toppings: Makes the crust soggy and difficult to bake through.
- Not flipping the crust: Missing out on that golden, crisp top layer.
- Using raw cauliflower without ricing properly: Results in lumps and uneven texture.
Delicious Variations to Try
Once you’ve mastered the core Cauliflower Low Carb Pizza Crust Recipe, the possibilities for toppings and flavor twists are endless—all while staying wholesome and halal.
Herbed Garlic Cauliflower Crust
Add minced garlic and fresh Italian herbs like basil and oregano to the crust mix for an aromatic punch that elevates every bite.
Spicy Za’atar Crust
Sprinkle za’atar seasoning into the batter and top with caramelized onions and olives for a Middle Eastern flair.
Veggie Lover’s Delight
Top with sliced mushrooms, bell peppers, and black olives with plenty of tomato sauce and your favorite dairy-free cheese substitute for a colorful, nutrient-packed meal.
Cheesy Vegan-Friendly
Use nutritional yeast flakes as part of the seasoning to bring a subtle cheesy note into the crust itself, then top with dairy-free mozzarella.
Rainbow Veggie Flatbread Pizza
For another vibrant twist on pizza, try our Rainbow Veggie Flatbread Pizza Recipe – Foodarohub, which features colorful vegetables and a unique flatbread base. It’s a terrific companion our cauliflower crust pizza for when you want variety.
How to Serve Cauliflower Low Carb Pizza Crust Recipe
Garnishes
Add fresh basil leaves or a sprinkle of crushed red pepper flakes for vivid color and a flavor burst that complements the savory crust perfectly.
Side Dishes
Pair this pizza with a crisp green salad tossed in lemon vinaigrette or a bowl of roasted garlic hummus for dipping, creating a balanced, satisfying meal.
Creative Ways to Present
Slice into eighths and serve on rustic wooden boards for a casual meal, or create mini personal pizzas by dividing the dough and topping them individually—perfect for family gatherings or dinner parties.
Make Ahead and Storage
Make-Ahead Instructions
You can prepare the dried, riced cauliflower up to several days before baking—just keep it stored in a sealed container in the fridge until you’re ready to shape your crust.
Storage
Once baked and cooled completely, wrap your pizza crust tightly with plastic wrap or foil and store refrigerated for up to 2 days, keeping it fresh for your next meal.
Freezing
For longer storage, pop the wrapped crust in the freezer where it will keep for several weeks—perfect for spontaneous pizza cravings!
Reheating
Reheat gently in a preheated oven at 375°F to revive the crispness, avoiding sogginess common with microwaving.
Expert Tips for Success
- Always drain the cauliflower thoroughly to avoid a watery crust.
- Use a pizza stone or preheated baking sheet to crisp the bottom.
- Be patient when shaping the crust to ensure even thickness.
- Flip the crust mid-bake for even browning and texture.
- Let the crust cool completely before freezing for best results.
- Adjust seasonings to suit your taste, especially if substituting bouillon with nutritional yeast.
- Don’t overload toppings to keep your crust crisp and sturdy.
Frequently Asked Questions
Can I use fresh cauliflower instead of frozen riced cauliflower?
Absolutely! Using fresh riced cauliflower works just as well; just make sure to rice it finely and thoroughly wring out the moisture before using.
Is this recipe gluten-free and dairy-free?
Yes, this crust is both gluten-free and dairy-free, making it perfect for those with dietary restrictions seeking low carb options.
Can I make the crust ahead of time?
Yes! You can prepare the riced cauliflower a few days in advance or bake the crust ahead and refrigerate or freeze it for later use.
What does tapioca starch do in this recipe?
Tapioca starch acts as a binder, helping the crust hold together and achieve that ideal chewy texture without gluten.
How do I ensure my crust is crispy?
Wring out as much moisture as possible and bake on a preheated stone or cookie sheet, flipping mid-way to brown both sides evenly.
Can I add other spices or herbs into the crust?
Definitely! Feel free to mix in your favorite Italian herbs or spices to personalize the flavor of your crust.
Is this recipe suitable for vegetarians?
Yes, it’s vegetarian-friendly and can easily be adapted for vegans by using plant-based egg substitutes.
Final Thoughts
This Cauliflower Low Carb Pizza Crust Recipe is a delightful game changer in healthy cooking that brings warmth and comfort to your table. Its satisfying texture and gentle cauliflower flavor make it an inviting base for endless creative toppings. Whether you’re keeping it simple with tomato sauce and dairy-free cheese or experimenting with vibrant veggies, this crust delivers both flavor and nourishment. I can’t wait for you to try making this recipe and share in the joy of a wholesome, homemade pizza night that everyone will love!
PrintCauliflower Low Carb Pizza Crust Recipe

This Cauliflower Low Carb Pizza Crust is a healthy, grain-free alternative to traditional pizza dough, perfect for those seeking a gluten-free or low-carb option. It features a crispy crust made from riced cauliflower and tapioca starch, ready to be topped with your favorite sauce and dairy-free cheese for a delicious, guilt-free pizza experience.
- Prep Time: 15 minutes
- Cook Time: 18 minutes
- Total Time: 33 minutes
- Yield: 8 servings 1x
- Category: Pizza
- Method: Baking
- Cuisine: Low Carb
- Diet: Gluten Free, Low Carb, Vegetarian
Ingredients
Crust Ingredients
- 12– ounces frozen riced cauliflower (defrosted (or 4 cups raw cauliflower florets) (See Recipe Notes))
- 2 eggs (lightly beaten)
- 3 tablespoons homemade vegetable bouillon powder ((or substitute 1/4 cup (20 g) nutritional yeast flakes + 1/4 teaspoon kosher salt))
- 1/4 cup tapioca starch/flour
Topping Ingredients (Optional)
- Tomato sauce and dairy-free shredded cheese substitute (for topping (optional))
Instructions
- Preheat Oven: Preheat your oven to 400°F. If you have a pizza stone, place it in the oven before preheating as it will help the pizza base to crisp during baking. If not, place a cookie sheet in the oven instead.
- Dry Cauliflower: Place the defrosted (or cooked), riced cauliflower to a large tea towel, cheesecloth, or fine mesh bag. Gather the towel, cloth or bag tightly around the contents and wring out all of the moisture. There will be more than you expect.
- Remove Excess Moisture: Keep wringing until the cauliflower is clumped and as dry as humanly possible. Set it aside. This step can be completed days ahead of time, placed in a sealed container and stored in the refrigerator until ready to proceed with the recipe.
- Combine Cauliflower and Eggs: In a food processor (a miniature one will work just fine), place the dried, riced cauliflower and the eggs, and pulse until well-combined and as smooth as possible. It will have a curdled texture, but there shouldn’t be any larger pieces of cauliflower visible.
- Add Seasoning and Starch: Add the powdered vegetable bouillon (or nutritional yeast and salt), and the tapioca starch, and pulse again until the mixture is well-combined and as smooth as possible.
- Shape Crust: Transfer the entire mixture to a large, square piece of parchment paper. Using an offset spatula or large spoon, spread into a round about 10-inches in diameter and 1/3-inch thick, smoothing the top as much as possible. Use the flat edge of the spatula or a butter knife to create a raised edge around the perimeter of the pizza.
- Bake Crust Initial: Transfer the crust on the parchment to the pizza stone or cookie sheet in the hot oven and bake for 10 minutes. Working quickly, flip the pizza crust over and continue to bake for another 3 minutes to help brown the top.
- Prepare Toppings or Store: Raise the oven temperature to 425°F. Remove the crust from the oven and top as desired (or allow to cool completely on a wire rack, wrap tightly and store in the refrigerator for 2 days or the freezer for longer storage).
- Bake with Toppings: Return the crust to the oven and bake at 425°F until the toppings are set, the cheese melted, and the edges very browned (about another 5 minutes). Remove from the oven and serve immediately.
Notes
- The step to wring out the cauliflower can be done days ahead and stored in the refrigerator in a sealed container.
- Using a pizza stone helps the crust crisp better during baking.
- You can substitute homemade vegetable bouillon powder with nutritional yeast flakes and kosher salt.
- Crust can be cooled completely and stored for 2 days in the refrigerator or frozen for longer storage before adding toppings and baking.
Keywords: cauliflower pizza crust, low carb pizza, gluten free pizza, dairy free pizza, vegetable crust pizza

