
Cheeseburger Bombs Recipe
I never thought I’d find a Cheeseburger Bombs Recipe easier than this—and the first bite immediately transports you to that perfect snapshot of late-night cravings and family fun. Imagine juicy, seasoned ground beef mingled with tangy pickles, sharp onions, and melty cheddar all tucked inside a soft, golden biscuit. It’s like a tiny explosion of classic cheeseburger flavors in every bite, and it’s perfect for sharing at parties or snacking any time your taste buds call for a savory treat.
Why You’ll Love This Cheeseburger Bombs Recipe
- Flavor-packed bites: Each bomb bursts with seasoned ground beef, tangy pickles, and melted cheddar, creating a savory snack that satisfies cravings instantly.
- Simple ingredients: Using everyday staples like refrigerated biscuit dough and common condiments means no stressful shopping trips—just grab what you have!
- Perfect for any gathering: Whether it’s a casual family night or a lively game day, these bombs are bite-sized crowd-pleasers everyone will love.
- Impressively easy to bake: With just 15 minutes of oven time, these golden bites come out perfectly crisp yet soft—a real showstopper without fuss.
- Customizable filling: Feel free to tweak with your favorite pickles, cheese types, or seasonings to make these cheeseburger bombs uniquely yours.
Why This Cheeseburger Bombs Recipe Works
This recipe shines because of its smart balance of flavors and clever use of refrigerated biscuit dough, which saves time and adds a wonderfully tender texture. Browning the ground beef first locks in rich, juicy notes, and mixing in tangy pickles and fresh onions infuses each bomb with a refreshing crunch and zest. Folding the biscuits carefully around the filling ensures no juice escapes, so you get a delightful burst of cheesy, meaty goodness that is perfectly sealed in soft, golden pockets. Baking at 375°F delivers the golden crust every time, making these bombs irresistibly beautiful and delicious.
Ingredients You’ll Need
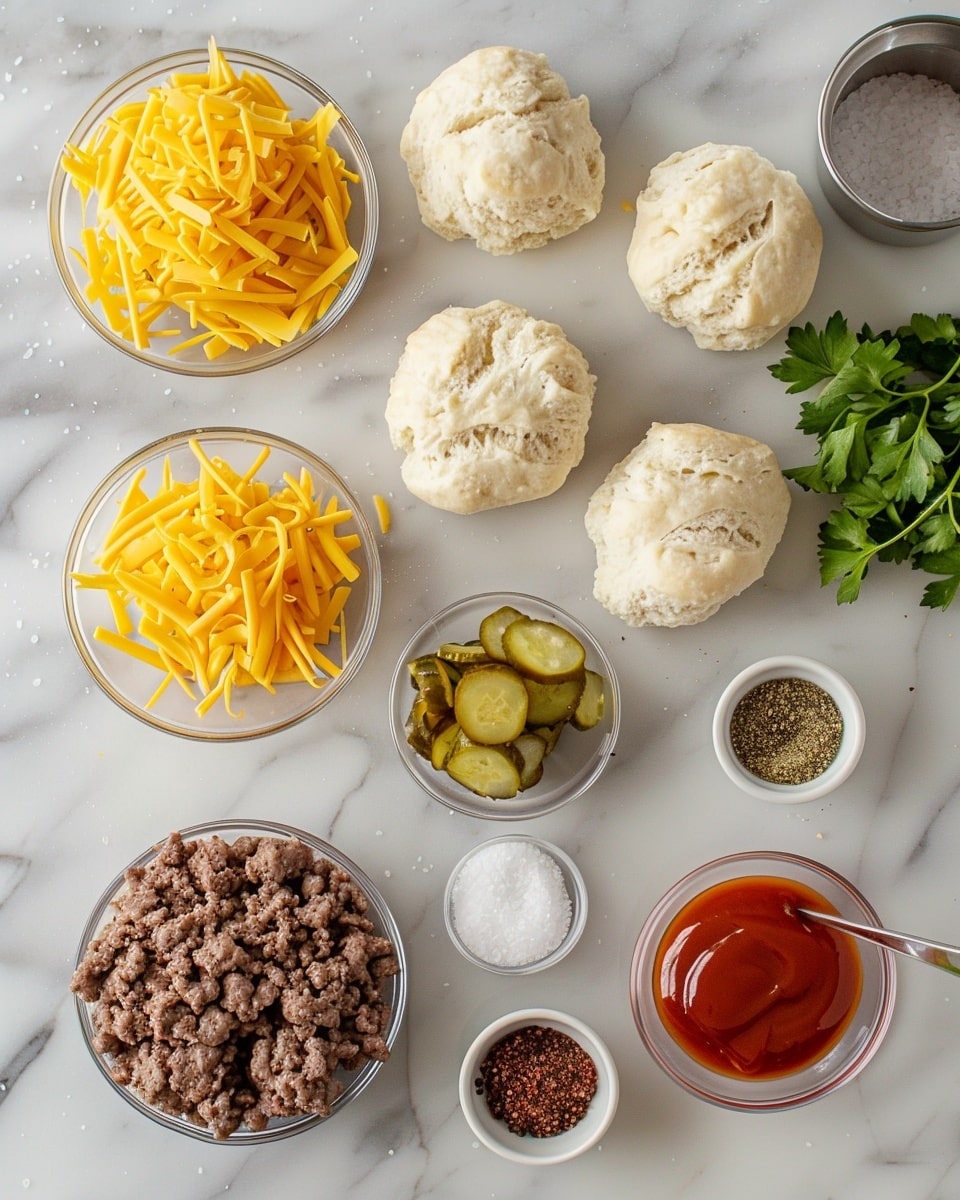
Gather the essentials that bring classic cheeseburger flavors into a fun, handheld snack. From hearty ground beef to tangy pickles and sharp cheddar, each ingredient plays a starring role.
- 1 lb ground beef: The savory heart of these bombs, providing juicy, rich flavor.
- 1 cup shredded cheddar cheese: Melts beautifully to add creamy, tangy delight.
- 1/2 cup diced onion: Adds fresh bite and a hint of sweetness when cooked.
- 1/4 cup pickles, chopped: Brings zing and crunch for that classic cheeseburger tang.
- 1 package refrigerated biscuit dough: The tender, flaky shell that holds all the tasty fillings.
- 1 tablespoon mustard: Infuses a subtle tang and depth to the meat mixture.
- 1 tablespoon ketchup: Adds a slight sweetness and vibrant flavor boost.
- Salt and pepper to taste: Essential seasonings to lift and balance every bite.
Ingredient Substitutions & Tips
- Ground beef: Swap with ground turkey or chicken for a leaner option that still keeps the texture delightful.
- Shredded cheddar cheese: Experiment with Monterey Jack or mozzarella for a milder, creamier melt.
- Pickles: Try dill or bread-and-butter varieties depending on how tangy or sweet you prefer your bites.
- Biscuit dough: Use crescent roll dough to add a flakier texture and a buttery finish.
👨🍳 Pro Tips for Perfect Results
- Use medium heat: When browning the beef, keep the temperature moderate to avoid drying it out and ensure juicy bites.
- Don’t overfill: Just a spoonful of beef mixture keeps the bombs from bursting open while baking.
- Seal edges well: Pinch biscuit dough firmly to prevent leaks and maintain their signature shape.
- Cheese layering: Adding cheese on top of the beef helps it melt evenly throughout the bomb.
- Rest before serving: Let the bombs cool slightly so the filling sets and prevents burning your mouth.
How to Make Cheeseburger Bombs Recipe
Step 1: Preheat your oven
Preheat your oven to a cozy 375°F (190°C), setting the stage for golden, flaky biscuits filled with a savory surprise. This step ensures even baking, so your bombs come out beautifully crisp on the outside and juicy inside.
💡 Pro Tip: Give your oven plenty of time to reach the exact temperature for consistent results.
Step 2: Cook the beef
Warm your skillet over medium heat and brown the ground beef until beautifully caramelized. This step unlocks rich meaty flavors and gets rid of extra fat, ensuring every bite is just right.
💡 Pro Tip: Drain any excess fat to keep the filling from getting greasy.
Step 3: Mix ingredients
Into the cooked beef, stir in diced onion, chopped pickles, mustard, ketchup, and season generously with salt and pepper. The combination creates a balanced punch of tangy, savory, and slightly sweet flavors, bringing those iconic cheeseburger vibes.
💡 Pro Tip: Taste as you go to fine-tune your flavor – a personal touch always makes these bombs better.
Step 4: Prepare dough
Open your biscuit dough package and carefully separate it into individual biscuits. The soft dough will soon transform into the perfect vessel for your filling.
💡 Pro Tip: Flatten each biscuit gently on a clean surface for an even layer ready to hug the filling.
Step 5: Fill dough
Place a spoonful of the beef mixture in the center of each flattened biscuit. This careful placement ensures each bomb is a perfectly balanced bite of meat and dough.
💡 Pro Tip: Keep the filling centered to avoid any spillover during baking.
Step 6: Add cheese
Top each beef-filled biscuit with a small handful of shredded cheddar cheese. As it melts, it binds the filling and adds creamy richness to every bite.
💡 Pro Tip: Use sharp cheddar for a bolder flavor punch.
Step 7: Seal bombs
Fold the biscuit dough carefully over the filling and pinch the edges to create tight little parcels. A good seal traps all the flavors inside, giving you that perfect pop of juicy goodness when you bite in.
💡 Pro Tip: Moisten edges with a little water to help the dough stick better.
Step 8: Arrange on baking sheet
Place your filled bombs spaced evenly on a baking sheet. This prevents them from sticking together and ensures even heat circulation, promoting that irresistible golden crust.
💡 Pro Tip: Line the sheet with parchment paper for easy cleanup and to keep bottoms crisp.
Step 9: Bake
Slide the baking sheet into your preheated oven and bake for 12-15 minutes until the biscuits turn a gorgeous golden brown. The aroma will fill your kitchen, teasing those delicious bites to come.
💡 Pro Tip: Keep an eye on them after 12 minutes to avoid over-browning.
Step 10: Cool and serve
Once out of the oven, allow your cheeseburger bombs to cool slightly so the filling sets just right. Now, they’re ready to be devoured—perfect for sharing or savoring as a satisfying snack.
💡 Pro Tip: Serve warm with extra ketchup or mustard on the side for dipping.
Common Mistakes to Avoid
Learn from these common pitfalls:
- Overfilling the dough: Stuffing too much filling can cause the bombs to burst open while baking.
- Insufficient sealing: Not pinching edges firmly results in gooey filling leaking out.
- Too high oven temperature: Baking too hot risks burning the crust before the filling heats through.
- Using cold dough directly: Not allowing dough to reach room temperature can make folding harder and less pliable.
- Skipping draining of beef fat: Having excess grease in the filling can make bombs soggy and heavy.
- Serving immediately: Cutting into bombs when piping hot can cause burns and messy fillings.
Delicious Variations to Try
Once you’ve mastered the classic cheeseburger bombs, why not add your own twist?
Spicy Jalapeño Bombs
Mix diced jalapeños into the beef mixture for a fiery kick that excites the palate.
Cheese Lover’s Delight
Add a blend of mozzarella and sharp cheddar for extra gooeyness that cheese fanatics adore.
BBQ Flavor Bombs
Swap ketchup and mustard for tangy barbecue sauce, infusing a smoky sweetness into every bite.
Mushroom & Swiss Bombs
Incorporate sautéed mushrooms and swap cheddar for Swiss cheese for a gourmet feel.
Veggie Boost Bombs
Mix finely diced bell peppers and spinach into the beef to pack in color and nutrients.
For a fresh twist and more cheesy appetizer ideas, try our Cheesy Fried Rice Balls with Broccoli Recipe. It’s a great companion to your cheeseburger bombs for parties or snacking.
How to Serve Cheeseburger Bombs Recipe

Garnishes
Sprinkle freshly chopped parsley or chives for a pop of green and fresh aroma. Serve with extra ketchup, mustard, or a tangy dipping sauce for added flavor layers.
Side Dishes
Pair with classic fries or crispy potato wedges to keep the comfort food vibes high. A simple side salad with a zesty vinaigrette also balances the richness beautifully.
Creative Ways to Present
Arrange cheeseburger bombs on a wooden board with mini dipping bowls for an inviting appetizer spread. For fun, serve them with toothpicks or skewers, perfect for easy grab-and-go party snacks. They also make a hit alongside sliders like our Mini Chili Cheese Dog Sliders Recipe, rounding out a hearty and playful finger food feast.
Make Ahead and Storage
Make-Ahead Instructions
Prepare the beef filling and assemble the bombs in advance. Store them unbaked on a tray covered with plastic wrap in the refrigerator until ready to bake, saving you prep time on busy days.
Storage
Once baked and cooled, place cheeseburger bombs in an airtight container and refrigerate. They stay fresh for up to 3 days while maintaining great flavor.
Freezing
Freeze unbaked bombs arranged on a baking sheet until solid, then transfer to freezer bags. They freeze well for up to 1 month, allowing you to bake fresh anytime cravings hit.
Reheating
To reheat, warm bombs in a preheated oven at 350°F for 8-10 minutes or until heated through. Avoid microwaving to keep the biscuit flaky and crisp.
Expert Tips for Success
- Always drain excess fat from cooked beef to avoid greasy filling and soggy dough.
- Use sharp cheddar cheese for bold flavor that stands up to the beef and condiments.
- Take your time sealing edges to prevent any filling leaks during baking.
- Preheat the oven fully for even, golden baking and that perfect biscuit texture.
- Let the bombs cool for a few minutes before serving for easier handling and to avoid burns.
- Customize spices by adding paprika or garlic powder for extra savory depth.
- Serve with dipping sauces like ranch, spicy mayo, or honey mustard for fun flavor combos.
Frequently Asked Questions
Can I make these cheeseburger bombs vegetarian?
Absolutely! Replace the ground beef with cooked lentils or a plant-based meat substitute to keep them delicious and meat-free.
Is refrigerated biscuit dough the best option?
It’s perfect for quick preparation and great texture, but you can use homemade biscuit dough or crescent roll dough as alternatives.
Can I prepare these in advance and bake later?
Yes! Assemble the bombs and keep them covered in the refrigerator until baking time to save preparation time on busy days.
What’s the best way to reheat leftovers?
Warm them in a preheated oven at 350°F for about 8-10 minutes to keep the biscuits flaky and the filling heated evenly.
Are these suitable for kids’ parties?
Definitely! The bite-sized size and fun flavors make cheeseburger bombs a huge hit with kids and adults alike.
Can I freeze these for later use?
Yes, freeze unbaked bombs on a tray, then transfer to freezer bags. Bake them straight from frozen, adding a few extra minutes to baking time.
What dipping sauces go well with cheeseburger bombs?
Classic ketchup, mustard, spicy mayo, or ranch dressing all make excellent companions for these savory treats.
Final Thoughts
These Cheeseburger Bombs deliver a comforting crunch and juicy, cheesy filling that’s truly irresistible. They’re a recipe that invites you to get creative, share laughter, and enjoy delicious moments around the table. Whether it’s a casual snack or a party appetizer, making these bites feels more like a fun adventure than cooking. So gather your ingredients, embrace the cozy kitchen smells, and treat yourself to this little bomb of happiness—you won’t regret it.
Related Recipes You’ll Love
If you enjoyed this recipe, you’ll also love these delicious recipes:
- Irresistible Pizza Hut Cheese Sticks Recipe Made Easy Recipe – A crispy, cheesy snack that pairs beautifully with cheeseburger bombs for those cheese lovers out there.
Cheeseburger Bombs Recipe

Cheeseburger Bombs are savory, bite-sized treats filled with seasoned ground beef, pickles, onions, and melted cheddar cheese, all wrapped in flaky biscuit dough and baked to golden perfection.
- Prep Time: 15 minutes
- Cook Time: 15 minutes
- Total Time: 30 minutes
- Yield: 12 servings 1x
- Category: Appetizer
- Method: Baking
- Cuisine: American
Ingredients
Ingredients
- 1 lb ground beef
- 1 cup shredded cheddar cheese
- 1/2 cup diced onion
- 1/4 cup pickles, chopped
- 1 package refrigerated biscuit dough
- 1 tablespoon mustard
- 1 tablespoon ketchup
- Salt and pepper to taste
Instructions
- Preheat your oven to 375°F (190°C). Preheat your oven to 375°F (190°C).
- Brown the ground beef. In a skillet, brown the ground beef over medium heat. Drain excess fat.
- Add flavorings to beef. Add onion, pickles, mustard, ketchup, salt, and pepper to the beef. Mix well.
- Prepare biscuit dough. Open the biscuit dough and separate it into individual biscuits.
- Fill biscuits. Flatten each biscuit and place a spoonful of the beef mixture in the center.
- Add cheese. Add a small amount of shredded cheese on top of the beef mixture.
- Seal biscuits. Fold the biscuit over the filling and pinch the edges to seal it.
- Arrange for baking. Place the filled biscuits on a baking sheet.
- Bake. Bake for 12-15 minutes or until golden brown.
- Cool before serving. Let cool slightly before serving.
Notes
Keywords: Cheeseburger Bombs, cheesy appetizers, baked biscuit snacks, party finger foods, ground beef recipes


