
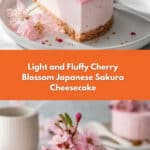
Cherry Blossom Japanese Sakura Cheesecake Recipe
I never thought I’d find a cheesecake recipe easier than this Cherry Blossom Japanese Sakura Cheesecake Recipe! The moment you open the oven door, a delicate floral scent of salted sakura blossoms dances in the air, welcoming you to a soft, creamy delight that feels like springtime in every bite. Its gentle pink hues peek through with elegance, promising a dessert experience that’s both soothing and unforgettable.
Why You’ll Love This Cherry Blossom Japanese Sakura Cheesecake Recipe
- Elegant Floral Flavor: Infused with the subtle aroma of salted sakura blossoms, this cheesecake offers a uniquely fragrant and light taste that will captivate your senses.
- Simple, Wholesome Ingredients: Using cream cheese, eggs, and pantry staples, it’s approachable yet refined with the special touch of cake flour and cornstarch for that perfect texture.
- Perfect for Special Occasions: Its dainty presentation adorned with sakura blossoms makes it ideal for celebrations or impressing guests with a slice of Japan’s charm.
- Gentle Baking Method: The water bath technique ensures a luscious, crack-free finish that feels like a cloud of flavor and creaminess.
- Make-Ahead Friendly: With around 16 hours of chilling to enhance flavor and texture, you can prepare this cheesecake well in advance for stress-free entertaining.
Why This Cherry Blossom Japanese Sakura Cheesecake Recipe Works
This Cherry Blossom Japanese Sakura Cheesecake Recipe achieves its delicate texture and flavor through a few smart steps. First, soaking salted sakura blossoms takes away excess saltiness and allows their floral essence to subtly infuse the cake. Then, the heatproof bowl carefully warmed over simmering water smooths out the cream cheese, butter, and milk, creating a silky base that’s key to the creamy mouthfeel. Finally, the magic happens with the water bath baking at 320°F (160°C), which gently cooks the cheesecake over about 1 hour while preventing cracks and dryness. This method guarantees that tender, melt-in-your-mouth experience Japanese cheesecakes are famous for.
Ingredients You’ll Need
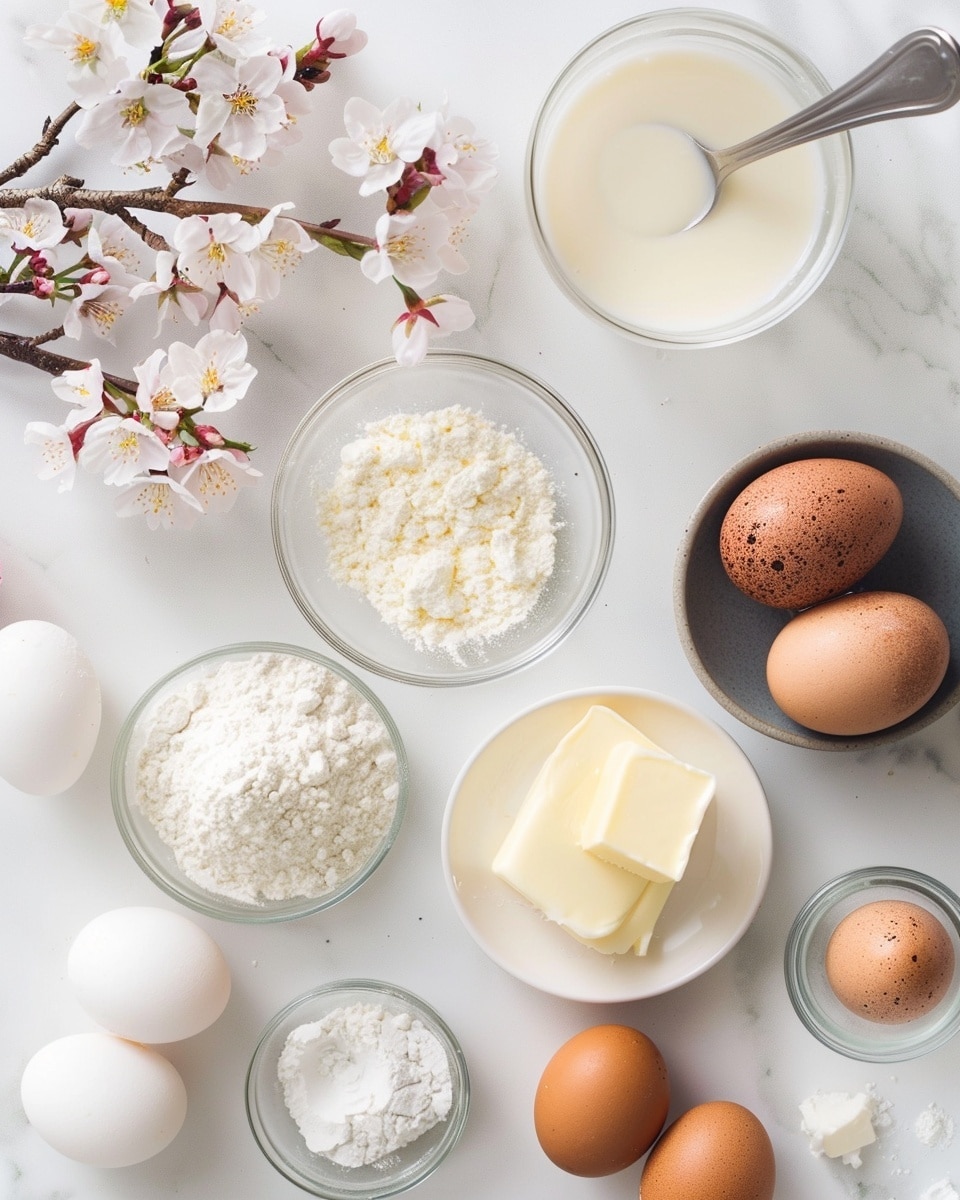
Gather these beautiful and thoughtfully chosen ingredients that bring the delicate flavors and textures together in harmonious balance.
- 10 salted sakura blossoms: These fragrant blossoms add a subtle floral aroma and pretty decoration.
- 1 cup water: To soak and desalinate the sakura blossoms, ensuring a mild flavor.
- 8 oz cream cheese, softened: The rich, creamy backbone of the cheesecake.
- 4 tablespoons unsalted butter, softened: Adds richness and smoothness to the base.
- 1/3 cup milk: Lightens the batter for a perfect creamy texture.
- 3 large eggs, separated: Egg yolks enrich the batter, while whipped whites lighten it up.
- 1/4 cup granulated sugar: Sweetens the mix without overpowering.
- 1/4 cup cake flour, sifted: Contributes to the cake’s tender crumb.
- 2 tablespoons cornstarch, sifted: Adds structure and stability to the delicate cheesecake.
- 1/2 teaspoon lemon juice: Balances the sweetness with a gentle tang.
- 1/4 teaspoon cream of tartar: Stabilizes the egg whites for fluffy peaks.
Ingredient Substitutions & Tips
- Salted sakura blossoms: If unavailable, rose petals or dried edible flowers can offer a similar floral touch.
- Cream cheese: Mascarpone can be used for an even creamier, richer texture.
- Cake flour: For a substitute, use all-purpose flour minus 2 tablespoons plus 2 tablespoons cornstarch for lightness.
- Milk: Almond or soy milk works well for a subtle nutty undertone and dairy-free option.
👨🍳 Pro Tips for Perfect Results
- Soak sakura blossoms well: Ensures salt is removed for delicate flavor balance.
- Use room temperature ingredients: Helps the mixture blend smoothly without lumps.
- Fold egg whites gently: To keep the batter airy and light without deflating it.
- Prep water bath carefully: Prevent water from splashing into batter for even baking.
- Don’t rush chilling: Letting the cheesecake rest overnight intensifies flavor and texture.
How to Make Cherry Blossom Japanese Sakura Cheesecake Recipe
Step 1: Soak salted sakura blossoms
Start by soaking those beautiful salted sakura blossoms in 1 cup of water for 30 minutes. This tender soak removes extra salt while preparing the blossoms to infuse their delicate fragrance into the dessert. After soaking, drain and gently pat them dry to keep their integrity intact.
💡 Pro Tip: Handle the blossoms carefully; they are fragile and add the signature charm.
Step 2: Preheat and prepare pan
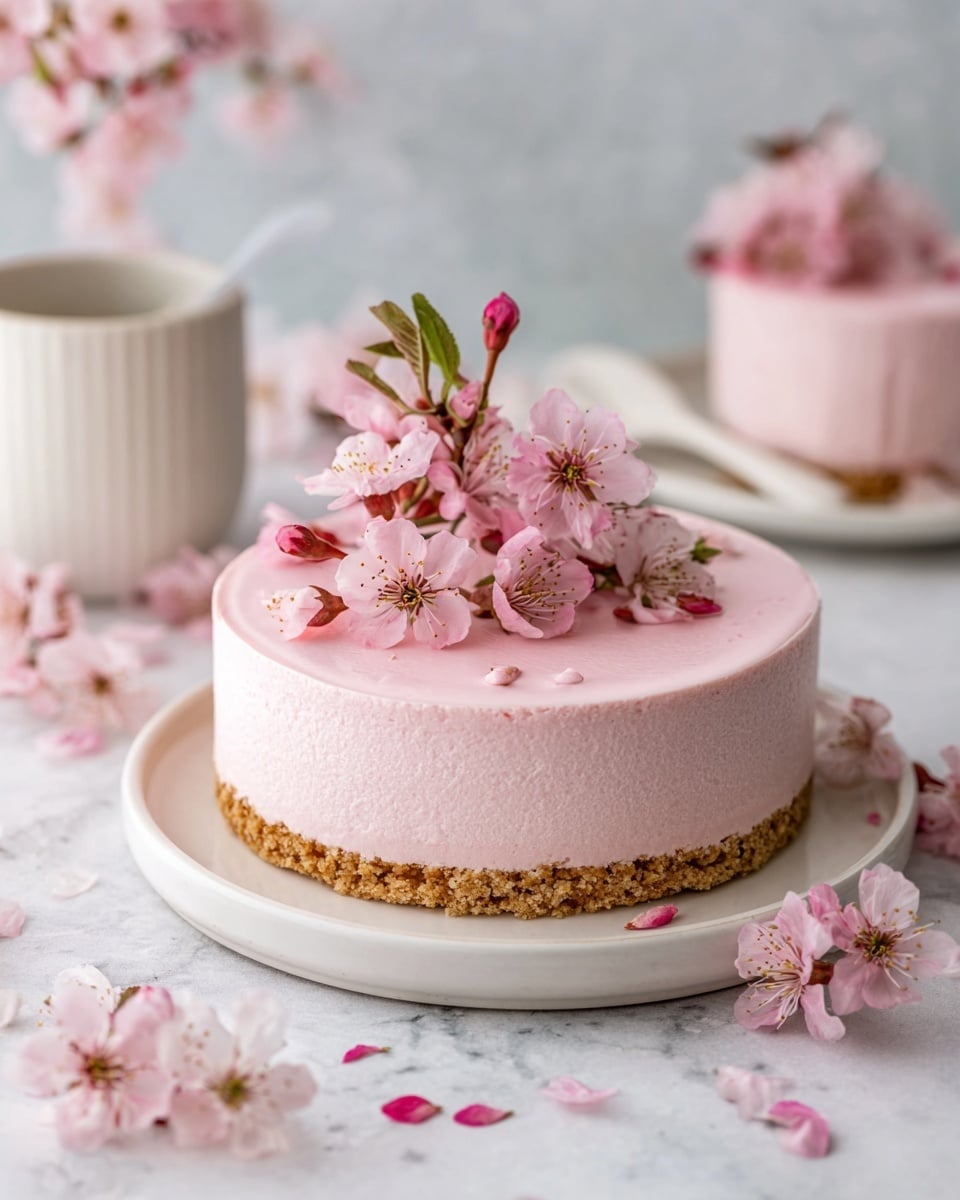
While the blossoms soak, preheat your oven to 320°F (160°C). Line a 6-inch round cake pan with parchment paper at the bottom and sides to prevent sticking. Arrange the sakura blossoms evenly at the pan’s base — these will create a stunning floral pattern once the cheesecake is unmolded.
💡 Pro Tip: Press the blossoms gently to keep them flat against the pan for an elegant finish.
Step 3: Make cream cheese mixture
Combine softened cream cheese, unsalted butter, and milk in a heatproof bowl. Set this bowl over simmering water to gently melt and mix these key ingredients into a silky, smooth base. Once perfectly blended, remove from heat and allow it to cool slightly before moving on.
💡 Pro Tip: Stir continuously for a lump-free, velvety consistency.
Step 4: Add egg yolks and dry ingredients
Whisk the egg yolks, lemon juice, sifted cake flour, and cornstarch into the cooled cream cheese mixture. Combine gently but thoroughly, so you create a tender, lightly thickened batter that’s ready to support the lightness of the egg whites.
💡 Pro Tip: Avoid overmixing to maintain a delicate texture.
Step 5: Beat egg whites
In a separate clean bowl, beat the egg whites with cream of tartar until foamy. Slowly add granulated sugar and keep beating until soft, glossy peaks form—this is the secret to your airy, fluffy cheesecake.
💡 Pro Tip: Make sure no yolk contaminates the whites for maximum volume.
Step 6: Fold egg whites into batter
Gently fold the egg whites into your cream cheese batter in three parts. Use a light hand and a spatula to combine everything evenly, preserving the whipped egg whites’ airy texture that makes this cheesecake so light.
💡 Pro Tip: Fold just until combined to keep the batter airy and soft.
Step 7: Pour batter and tap pan
Pour the delicate batter over the arranged sakura blossoms in the cake pan. Tap the pan lightly to release any trapped air bubbles—this step ensures a smooth final surface and flawless texture.
💡 Pro Tip: Vintage kimono prints or a soft pink cloth can make a pretty styling addition here.
Step 8: Prepare water bath and bake
Place the cake pan inside a larger baking tray filled with about 1 inch of hot water. This water bath will gently regulate heat and moisture during baking. Bake the cheesecake for about 60 minutes until it’s set with a lightly golden top. Once done, turn off the oven and leave the cheesecake inside, door slightly open, for 10–15 minutes to finish gently.
💡 Pro Tip: Use a towel under the water bath pan for easier handling and spill prevention.
Step 9: Cool and unmold
Remove the cheesecake from the oven and water bath, then let it cool completely at room temperature. Carefully unmold it by inverting the pan to reveal the sakura blossoms beautifully arranged on top—a delicate floral masterpiece.
💡 Pro Tip: Run a thin spatula around the edges to help release the cake smoothly.
Step 10: Chill before serving
For the best flavor and texture, chill the cake in the refrigerator for several hours or overnight. This resting time allows the flavors to meld and the cheesecake to develop that seductive creamy firmness.
💡 Pro Tip: Cover with plastic wrap to prevent drying or absorbing other fridge odors.
Common Mistakes to Avoid
Learn from these common pitfalls:
- Not soaking sakura blossoms enough: Results in an overly salty or harsh floral flavor.
- Overmixing batter: Can cause a dense or tough texture rather than light and creamy.
- Underbeating egg whites: Leads to less lift and a heavy, flat cheesecake.
- Water bath leaks: Letting water seep into the cake pan ruins texture.
- Skipping resting time: Serving right after baking can make the cheesecake too soft or lacking full flavor.
- Improper oven temperature: Baking too hot cracks or browns the cake unevenly.
Delicious Variations to Try
Once you’ve mastered this Cherry Blossom Japanese Sakura Cheesecake Recipe, why not customize it for even more fun?
Mango Sakura Cheesecake
Add a tropical twist by folding in fresh mango puree into the batter or layering mango slices atop to complement the floral notes. Try our Tropical Mango Cheesecake Recipe – Foodarohub for inspiration on blending fruity richness with creamy cake.
Vanilla Bean Infusion
Enhance the flavor by adding the seeds of one vanilla bean to the cream cheese mixture for a warm, classic scent that pairs beautifully with sakura’s floral charm.
Matcha Sakura Cheesecake
Mix in a teaspoon of high-quality matcha powder for an earthy, slightly bitter contrast that captures the essence of traditional Japanese sweets.
Fruit Garnish Medley
Top with seasonal berries or citrus segments for a burst of freshness and color against the pale cheesecake surface.
Sprinkles and Shortbread Cookies
Serve alongside vibrant and fun Funfetti Shortbread Sandwich Cookies with Frosting Recipe – Foodarohub to add a playful and contrasting texture on the side.
How to Serve Cherry Blossom Japanese Sakura Cheesecake Recipe
Garnishes
Delicate salted sakura blossoms make an elegant decoration on top. Consider adding a light dusting of powdered sugar or a few edible flower petals for an extra touch of grace.
Side Dishes
This cheesecake pairs wonderfully with a crisp green tea or a refreshing yuzu sorbet to balance sweetness and accentuate its floral notes.
Creative Ways to Present
Serve individual slices on pastel-colored plates with a small scoop of vanilla bean ice cream. For a special occasion, place each portion inside a clear dome cloche adorned with cherry blossom branches for a stunning reveal.
Make Ahead and Storage
Make-Ahead Instructions
You can prepare the batter and bake the cheesecake in advance, then chill it overnight or up to 24 hours for perfect results.
Storage
Keep the finished cheesecake covered tightly in the refrigerator. It will stay fresh and delicious for up to 3 days.
Freezing
This cheesecake freezes well! Wrap it securely in plastic wrap and aluminum foil, and it will keep for up to 1 month. Thaw overnight in the refrigerator before serving.
Reheating
Since this cheesecake is best enjoyed chilled, avoid reheating. Instead, let it sit at room temperature for 20 minutes before serving for optimal creaminess.
Expert Tips for Success
- Use fresh, room-temperature eggs and cream cheese for smooth batter.
- Double-sift dry ingredients to avoid lumps and maintain delicate crumb.
- Be patient when folding egg whites to keep maximum volume.
- Use a reliable oven thermometer to maintain steady 320°F (160°C) for baking.
- Don’t skip the water bath — it’s key for crack-free, silky texture.
- Chill cheesecake thoroughly overnight for best flavor and firmness.
- Add a splash of lemon juice to balance sweetness and brighten flavor.
Frequently Asked Questions
Can I use fresh sakura blossoms instead of salted ones?
Fresh sakura blossoms are ideal if you can find them, but salted blossoms are more common and add a traditional salty-sweet note. Just be sure to soak salted blossoms well to remove excess salt.
Why is a water bath necessary for this cheesecake?
The water bath provides gentle, even heat during baking, preventing cracks and creating the cheesecake’s signature soft and creamy texture.
Can I make this cheesecake gluten-free?
Yes! Substitute the cake flour with a gluten-free flour blend and ensure your cornstarch and other ingredients are gluten-free certified.
What’s the best way to store leftover cheesecake?
Keep it covered in the refrigerator for up to 3 days. For longer storage, wrap tightly and freeze for up to 1 month.
Is this recipe vegetarian-friendly?
Absolutely! This recipe uses no gelatin or animal-derived rennet and is suitable for vegetarian diets.
Can I speed up the chilling time?
While you can chill for a minimum of 4 hours, overnight chilling around 16 hours yields the best texture and flavor development.
How do I avoid cracks on my cheesecake?
Gently fold the egg whites, avoid overmixing, bake in a water bath, and allow the cheesecake to cool gradually inside the oven before removing it.
Final Thoughts
This Cherry Blossom Japanese Sakura Cheesecake Recipe is truly a labor of love and celebration, encapsulating the ephemeral beauty of sakura in a soft, velvety dessert. Every forkful is a gentle dance of floral aroma and creamy indulgence that invites you to savor the moment and share a piece of Japanese tradition. Try making it for your next gathering and enjoy the whispers of spring that brighten your table and delight your guests.
PrintCherry Blossom Japanese Sakura Cheesecake Recipe
This delicate Cherry Blossom Japanese Sakura Cheesecake features a creamy, lightly baked texture with subtly floral sakura blossoms decorating its surface, perfect for an elegant dessert.
- Prep Time: 20 minutes
- Cook Time: 1 hour
- Total Time: 7 hours 50 minutes
- Yield: 8 servings 1x
- Category: Dessert
- Method: Baking
- Cuisine: Japanese
- Diet: Vegetarian
Ingredients
Ingredients
- 10 salted sakura blossoms
- 1 cup water
- 8 oz cream cheese, softened
- 4 tablespoons unsalted butter, softened
- 1/3 cup milk
- 3 large eggs, separated
- 1/4 cup granulated sugar
- 1/4 cup cake flour, sifted
- 2 tablespoons cornstarch, sifted
- 1/2 teaspoon lemon juice
- 1/4 teaspoon cream of tartar
Instructions
- Soak Blossoms: Soak salted sakura blossoms in water for 30 minutes to remove excess salt. Drain well and gently pat dry.
- Preheat Oven and Prepare Pan: Preheat oven to 320°F (160°C). Line the bottom and sides of a 6-inch round cake pan with parchment. Arrange sakura blossoms at the bottom for decoration.
- Melt Mixture: In a heatproof bowl, combine cream cheese, butter, and milk. Set over a saucepan of simmering water (double boiler) and stir until smooth. Remove from heat and let it cool slightly.
- Add Ingredients: Add egg yolks, lemon juice, cake flour, and cornstarch into the cream cheese mixture. Whisk gently until just combined.
- Beat Egg Whites: In a separate bowl, beat egg whites with cream of tartar until foamy. Gradually add sugar and beat until soft peaks form.
- Fold Mixtures: Gently fold the egg white mixture into the cream cheese batter, in three additions. Mix until just incorporated.
- Pour Batter: Pour the batter into the prepared pan over the sakura blossoms. Tap pan to release air bubbles.
- Prepare Water Bath: Place the cake pan in a larger baking tray filled with about 1 inch of hot water (water bath).
- Bake Cheesecake: Bake for about 60 minutes until set and lightly golden on top. Turn off oven and leave cheesecake inside for 10-15 minutes with the door slightly open.
- Cool and Unmold: Remove from oven and water bath. Let cool completely before carefully unmolding. Invert to reveal sakura blossoms on top.
- Chill: Chill in the refrigerator for several hours or overnight before serving for best texture and flavor.
Notes
- Soaking salted sakura blossoms removes excess salt for balanced flavor.
- Baking in a water bath helps achieve the cheesecake’s smooth, creamy texture.
- Chilling overnight enhances the texture and flavor of the cheesecake.
Keywords: Sakura Cheesecake, Japanese Cheesecake, Cherry Blossom Dessert, Baked Cheesecake, Floral Cheesecake