
Chocolate Cremeux Recipe
Picture this: a velvety pool of rich, dark chocolate that glistens under soft kitchen lights, its aroma wrapping you in a warm chocolate hug. You take a spoonful of this luxurious chocolate cremeux, and it melts effortlessly on your tongue, teasing you with deep cocoa notes and a silky, custardy texture. Making this Chocolate Cremeux Recipe feels like a decadent little celebration, yet it’s surprisingly approachable—a perfect treat that whispers elegance while being utterly comforting. Whether for a cozy night in or impressing guests, this dessert promises an unforgettable experience that’s well worth the time and love it requires.
Why You’ll Love This Chocolate Cremeux Recipe
- Unparalleled Indulgence: This dessert is decadently creamy and packed with complex, smooth chocolate flavor that will captivate every chocolate lover’s heart.
- Made from Simple Ingredients: With pantry staples like eggs, cream, sugar, and good-quality dark chocolate, it’s easy to pull together without hunting down rare ingredients.
- Perfect Make-Ahead Dessert: It requires some chilling time but minimal hands-on effort, so you can prepare it hours in advance and wow guests with ease.
- Impressive Yet Approachable: Looks and tastes like a dessert from a fancy patisserie but is actually a warm, homey delight you’ll confidently whip up in your kitchen.
- Customizable to Your Taste: Whether you want to add a touch of vanilla, try a different chocolate percentage, or mix in subtle spices, this recipe adapts beautifully.
Why This Chocolate Cremeux Recipe Works
This Chocolate Cremeux Recipe thrives on its meticulous balance of temperature control and ingredient quality. The slow heating of milk and cream together gently infuses the base with lusciousness, while the careful whisking of egg yolks and sugar ensures a perfectly smooth texture. Slowly integrating the hot milk into the eggs tempers them, preventing curdling and achieving that signature creamy custard. Finely chopped dark chocolate melts seamlessly into the warm mixture, creating a rich, velvety finish. Finally, allowing the cremeux to chill for several hours lets flavors deepen and the texture to set into that melt-in-your-mouth bliss we all crave.
Ingredients You’ll Need
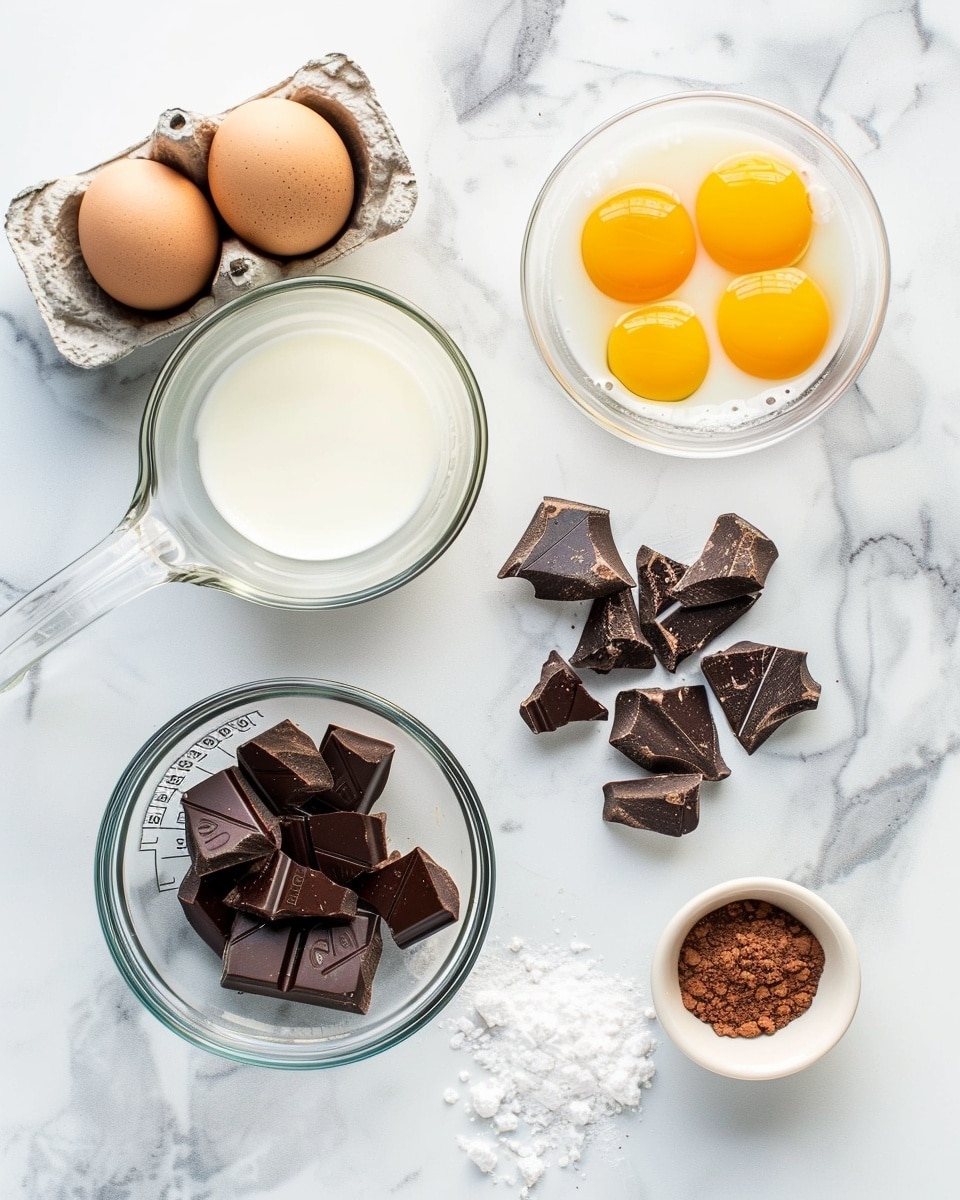
Each simple ingredient plays a vital part in creating the sublime texture and rich flavor of this chocolate cremeux. Let’s explore what you’ll need:
- Full-fat milk (¾ cup / 180ml): Provides a creamy base that’s neither too heavy nor too light.
- Heavy cream (¾ cup / 180ml): Boosts the richness, contributing to the silky mouthfeel.
- Egg yolks (4 large, room temperature): The foundation for thickening and that custard-like texture.
- White granulated sugar (⅓ cup / 65g): Sweetens gently while helping with texture and structure.
- Vanilla extract (1 ½ teaspoons, optional): Adds a fragrant, warming aroma that complements chocolate perfectly.
- Dark chocolate (200g, 50-60% cocoa solids), finely chopped: The star ingredient that delivers that deep chocolate intensity and smoothness.
Ingredient Substitutions & Tips
- Full-fat milk: You can use almond or oat milk for a dairy-free twist, though the texture will be lighter.
- Heavy cream: Coconut cream is a suitable substitute if avoiding dairy, lending a subtle tropical undertone.
- Dark chocolate: Experiment with different cocoa percentages (from 55% up to 70%) to tailor the bitterness and sweetness to your preference.
- Vanilla extract: Try substituting with vanilla bean paste or a pinch of cinnamon for extra warmth and complexity.
👨🍳 Pro Tips for Perfect Results
- Use room temperature egg yolks: This helps them blend smoothly without clumping or curdling when heated.
- Whisk constantly when heating: Prevents the custard from sticking or scrambling, resulting in that perfect silky texture.
- Use a candy thermometer: Aim for around 82C (180F) to thicken the cremeux without overcooking the egg yolks.
- Press plastic wrap directly on the surface: Stops a skin from forming while chilling, keeping your cremeux silky smooth.
- Gently pulse the immersion blender: This emulsifies the mixture without adding unwanted air bubbles, giving you a flawless finish.
How to Make Chocolate Cremeux Recipe
Step 1: Warm the Milk and Cream
In a medium saucepan with a heavy base, combine the full-fat milk and heavy cream. Set the heat to low-medium and gently warm the mixture, stirring occasionally, until you see tiny bubbles just forming around the edges. This step primes the dairy for the perfect custard without boiling it, ensuring smoothness in the final dessert.
💡 Pro Tip: Keep an eye on the temperature—avoid full boiling as it can scorch the mixture and ruin the texture.
Step 2: Whisk Egg Yolks and Sugar
While your milk and cream are warming, whisk together the room-temperature egg yolks and white sugar in a separate bowl. Use a balloon whisk to combine until the mixture becomes lighter in color and delightfully smooth. This aeration helps create a delicate custard that will thicken beautifully without cracking.
💡 Pro Tip: Make sure no sugar granules remain; a smooth yolk-sugar mix means a silky cremeux.
Step 3: Temper the Eggs with the Warm Dairy
Very slowly drizzle the hot milk-cream mixture into the egg yolks while whisking constantly. This gradual blending prevents the eggs from cooking too quickly and scrambling. Secure your bowl on a damp tea towel to keep it steady, then once combined, pour everything back into the saucepan.
💡 Pro Tip: Keep whisking steadily and temper slowly—patience at this stage ensures a luscious texture.
Step 4: Cook Until Thickened
Return the saucepan to low heat and cook gently for 10-15 minutes. Stir constantly with a spatula, scraping the sides and bottom to prevent scorching. The custard will thicken and coat the back of your spoon. To test, run your finger through the coating—if it leaves a clear line without the mixture running, you’ve reached the perfect consistency. Or check with a candy thermometer for about 82C (180F).
💡 Pro Tip: Avoid rushing here—low heat and constant stirring are essential for that smooth, creamy finish.
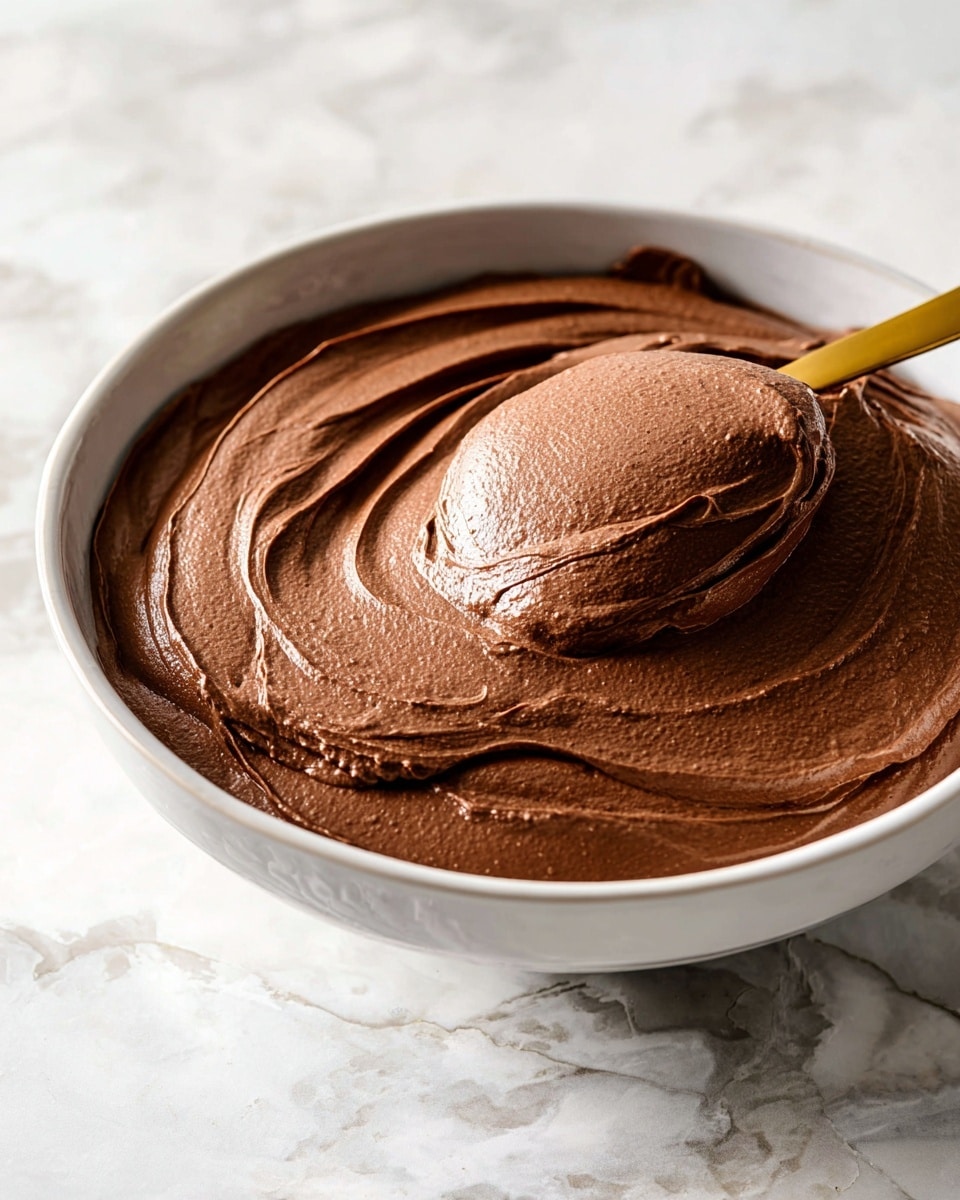
Step 5: Add Vanilla and Mix in Chocolate
Remove the saucepan from heat. Stir in the vanilla extract if using. Immediately pour the warm custard over the finely chopped dark chocolate in a heatproof bowl. Let it sit for a minute to soften the chocolate, then gently stir until completely smooth and glossy. If you want an extra velvety texture, briefly pulse an immersion blender underwater, careful not to introduce air bubbles.
💡 Pro Tip: Use high-quality chocolate with at least 50-60% cocoa for rich flavor and a smooth finish.
Step 6: Chill Until Set
Pour the chocolate cremeux into a shallow dish or leave it in the bowl. Press plastic wrap directly onto the surface to prevent a skin from forming. Refrigerate for at least 6 hours, or up to 3 days, to let the flavors marry and develop that signature creamy texture.
💡 Pro Tip: Longer chilling deepens the flavor and perfects the texture, so don’t rush this step!
Common Mistakes to Avoid
Learn from these common pitfalls:
- Overheating the custard: Cooking beyond 82C/180F can scramble the eggs, resulting in a grainy texture.
- Rushing the tempering process: Adding hot dairy too quickly to eggs causes lumps and curdling.
- Skipping the plastic wrap on chilling: Leads to an unappetizing skin that affects texture.
- Using low-quality chocolate: Can dull the flavor and lead to a less smooth cremeux.
- Whisking too vigorously when blending chocolate: Introducing air creates bubbles, making the cremeux less silky.
- Not chilling long enough: The texture won’t set properly if rushed, missing that decadent custardy feel.
Delicious Variations to Try
Once you’ve mastered this classic Chocolate Cremeux Recipe, why not experiment with these tasty twists?
Orange Zest Infusion
Add a teaspoon of finely grated orange zest to the milk and cream while warming to lend a bright, citrusy aroma that beautifully complements the chocolate’s depth.
Spiced Chocolate Cremeux
Stir in a pinch of ground cinnamon or cardamom with the sugar and egg yolks for a warm, exotic flavor that adds comforting complexity.
Mint Chocolate Delight
Add a teaspoon of mint extract or infuse the milk with fresh mint leaves before warming to create a refreshing contrast to the rich chocolate.
Coconut Chocolate Cremeux
Use coconut cream instead of heavy cream and garnish with toasted shredded coconut for a tropical vibe that’s irresistibly creamy and fragrant.
Peanut Butter Swirl
Fold in a swirl of smooth peanut butter right before chilling for an indulgent flavor pairing that’s both fancy and nostalgic.
How to Serve Chocolate Cremeux Recipe
Garnishes
Lightly dust with cocoa powder, sprinkle flaky sea salt, or top with fresh berries or a dollop of whipped cream to balance the richness.
Side Dishes
Pair with crisp biscotti, buttery shortbread cookies, or even fresh fruit slices like raspberries or orange segments for contrasting textures.
Creative Ways to Present
Serve the cremeux in elegant ramekins or stemmed glasses. Add edible flowers or a drizzle of caramel sauce for a stunning presentation that will wow your guests.
Make Ahead and Storage
Storing Leftovers
Cover the cremeux tightly with plastic wrap and refrigerate for up to 3 days. Keeping it chilled ensures that luscious texture stays intact.
Freezing
This dessert does not freeze well due to its delicate custard texture; freezing can cause separation and graininess.
Reheating
Chocolate cremeux is best served chilled, so avoid reheating. If you’d like a warmer dessert, gently warm a small portion with care, stirring frequently, but ideally enjoy it cold.
FAQs
Can I use a different type of chocolate for this Chocolate Cremeux Recipe?
Absolutely! Stick to good quality chocolate between 50%-70% cocoa for best results. You can experiment with bittersweet or milk chocolate, though the sweetness and texture may vary.
How long does the Chocolate Cremeux need to chill?
At least 6 hours is essential for the flavors to develop and the texture to set perfectly. Chilling overnight is even better!
What temperature should I cook the custard to?
Around 82C (180F) is ideal. This thickens the custard safely without curdling the eggs.
Can I make this recipe dairy-free?
Yes! Substitute the milk with almond or oat milk and the heavy cream with coconut cream for a dairy-free version with a slightly different flavor and texture.
Why is it important to press plastic wrap on the surface?
This prevents a skin from forming as the cremeux chills, keeping the texture silky smooth.
Is this recipe suitable for making in larger batches?
Definitely, just be sure to adjust cooking times carefully and whisk steadily to maintain the correct texture.
Can I add alcohol to the Chocolate Cremeux?
To keep this recipe strictly halal, it’s best to avoid adding alcohol-based ingredients.
How do I know when the custard is done cooking?
It will thicken to coat the back of a spoon and hold a line when you run your finger through it, or reach about 82C (180F) on a candy thermometer.
Final Thoughts
This Chocolate Cremeux Recipe is truly a love letter to chocolate and custard alike. Every spoonful delivers a dreamy, luscious experience that feels like a treat from a fancy patisserie while being rooted in the comfort of home cooking. The beautiful, creamy texture paired with deep, rich chocolate flavor makes it a dessert you’ll want to joyfully revisit and share with those you love. Its simplicity, elegance, and versatility mean it’s a shining star in any recipe collection.
Have you tried this Chocolate Cremeux Recipe? I’d love to hear how it turned out! Leave a comment below. If you loved this recipe, please share it with friends and family. Happy cooking! 🍫
PrintChocolate Cremeux Recipe

This rich and silky Chocolate Cremeux is a luscious French dessert perfect for chocolate lovers. Made with a creamy custard base infused with dark chocolate, it is smooth, intensely chocolaty, and elegantly simple. The dessert requires gentle stovetop cooking and chilling for a creamy, melt-in-your-mouth texture, ideal for serving on its own or as a decadent component in larger dessert creations.
- Prep Time: 15 minutes
- Cook Time: 15 minutes
- Total Time: 6 hours 30 minutes
- Yield: 2 servings 1x
- Category: Dessert
- Method: Stovetop
- Cuisine: French
Ingredients
Custard Base
- ¾ cup full-fat milk (180ml)
- ¾ cup heavy cream (180ml)
- 4 large egg yolks, room temperature
- ⅓ cup white granulated sugar (65g / 2.3oz)
- 1 ½ teaspoons vanilla extract (optional)
Chocolate
- 200 g dark chocolate (50-60% cocoa solids), finely chopped
Instructions
- Heat the milk and cream: Pour the milk and cream into a heavy-based medium saucepan over low to medium heat. Heat while stirring occasionally until bubbles just begin to appear around the edges, indicating the mixture is scalding but not boiling.
- Whisk egg yolks and sugar: While the milk and cream heat, whisk together the egg yolks and sugar in a medium bowl using a balloon whisk until the mixture becomes smooth and lightened in color.
- Temper the eggs: Slowly drizzle the hot milk and cream mixture into the egg yolks while constantly whisking to prevent curdling. Set the bowl on a damp tea towel to keep it steady. Once combined, pour the mixture back into the saucepan.
- Cook the custard: Gently heat the mixture over low heat, stirring constantly with a spatula for 10-15 minutes until it thickens and coats the back of a spoon, or when it reaches approximately 82°C (180°F) on a candy thermometer. Do not let it boil.
- Remove from heat and add vanilla: Take the saucepan off the heat and stir in the vanilla extract if using.
- Combine with chocolate: Immediately pour the hot custard over the finely chopped dark chocolate in a bowl. Let it sit for about a minute to soften the chocolate, then stir until smooth and fully combined.
- Emulsify (optional): For a silkier texture, use an immersion blender to pulse the mixture a few times, keeping the blade submerged to avoid incorporating air and creating bubbles.
- Chill the cremeux: Transfer the mixture into a wide, shallow dish or leave it in the bowl. Press plastic wrap directly onto the surface to prevent a skin from forming. Chill in the refrigerator for at least 6 hours or up to 3 days before serving.
- Serve and enjoy: Once chilled, serve the chocolate cremeux on its own or use it as a component in other desserts. Enjoy its smooth, rich texture and intense chocolate flavor.
Notes
- Use good quality dark chocolate with 50-60% cocoa solids for the best flavor and texture.
- Do not allow the custard to boil during cooking; this prevents curdling and ensures a smooth texture.
- Whisking constantly while adding hot milk and while cooking the custard is crucial to avoid scrambling the eggs.
- Chilling time is important to achieve the proper set and develop flavor; do not shorten chilling time.
- The optional immersion blender step improves smoothness but should be done gently to avoid incorporating air.
- The cremeux can be stored in the refrigerator for up to 3 days.
Keywords: Chocolate Cremeux, French dessert, chocolate custard, creamy chocolate dessert, stovetop custard

