
Chocolate Homemade Puffed Rice Cereal Recipe
Picture this: the moment you open the oven door, a warm cascade of rich chocolate aroma floods your kitchen, mingling with the subtle crispness of toasted puffed rice. The glossy sheen of melted dark chocolate coats each crunchy puff, promising a swirl of bittersweet delight with every bite. This Chocolate Homemade Puffed Rice Cereal Recipe feels like a tender hug from your childhood, reinvented as a wholesome, irresistible treat that’s as fun to make as it is to devour.
Whether you’re craving a snack that’s both comforting and wholesome or a breakfast that feels like a little celebration, this recipe hits every note. With just a handful of ingredients and less than half an hour from start to finish, you’ll be amazed at how something so delightfully simple can steal the spotlight on your table. Trust me, once you try this, you’ll keep coming back for more!
Why You’ll Love This Chocolate Homemade Puffed Rice Cereal Recipe
- Quick and Easy: Ready in just 25 minutes, this recipe is perfect for when you want homemade goodness without a long wait.
- Simple Ingredients: Uses common pantry staples like puffed rice, cocoa powder, and honey, so no complicated shopping lists here!
- Perfect for Breakfast and Snacking: Crunchy and chocolatey, it satisfies that sweet tooth while keeping things light enough to start your day.
- Impressive Presentation: The glossy chocolate coating makes each puff sparkle like little edible gems, sure to wow anyone you share it with.
- Customizable: Easily tailored with your favorite chocolate chips or a pinch of cinnamon for a personal flair that suits your cravings.
Why This Chocolate Homemade Puffed Rice Cereal Recipe Works
This Chocolate Homemade Puffed Rice Cereal Recipe is a perfect blend of simple techniques and thoughtful ingredient choices that guarantee success every time. First, melting the dark chocolate chips carefully in bursts prevents burning, preserving that silky texture for a flawless coating. Cocoa powder is sifted over the puffed rice to avoid pesky lumps, ensuring an even spread of rich chocolate flavor. Finally, baking the cereal at a low 300°F lets it crisp up gently, locking in that satisfying crunch without risking bitterness. These steps create a balanced, luscious treat that’s crunchy, chocolaty, and utterly addictive.
Ingredients You’ll Need
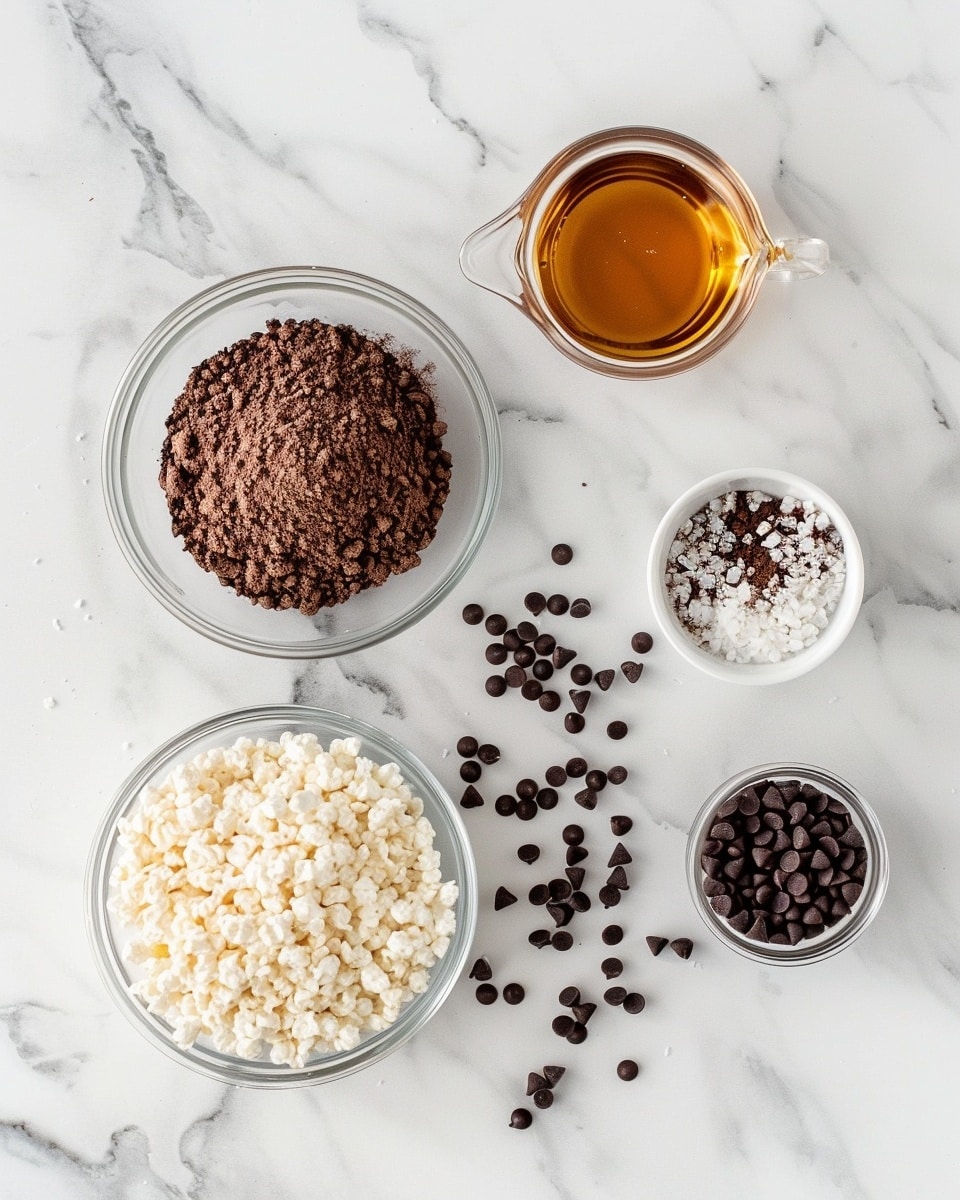
Wholesome, straightforward ingredients form the heart of this recipe, coming together to make a deliciously crunchy, chocolatey cereal that everyone will love.
- 2 cups puffed rice cereal: The light, airy base that brings satisfying crunch to every bite.
- 3 tablespoons cocoa powder: Adds deep, natural chocolate flavor without extra sweetness.
- 2 tablespoons honey or maple syrup: Natural sweeteners that bind the cereal and chocolate together, adding a gentle sweetness.
- 1/4 cup dark chocolate chips: Melted to coat each puff with luscious, bittersweet chocolate.
- 1 teaspoon vanilla extract: Infuses a warm, aromatic undertone that elevates the chocolate’s complexity.
- Pinch of sea salt: Balances sweetness and enhances chocolate’s richness.
Ingredient Substitutions & Tips
- Honey or maple syrup: Use agave nectar or brown rice syrup for a vegan alternative.
- Dark chocolate chips: Swap for dairy-free chocolate chips or chopped dark chocolate bars for different textures.
- Cocoa powder: Dutch-processed cocoa can be used for a milder, less acidic chocolate taste.
- Vanilla extract: Try almond extract for a nutty twist or leave it out to keep things simple.
👨🍳 Pro Tips for Perfect Results
- Melt chocolate gently: Use short bursts in the microwave and stir often to avoid burning.
- Sift cocoa powder: This prevents clumps and ensures every puff gets evenly coated.
- Low oven temperature: Baking at 300°F dries the cereal slowly, which keeps it crisp but not burnt.
- Cool completely before storing: This step is crucial to maintain that crackly crunch and avoid sogginess.
- Use parchment paper: Prevents sticking and makes cleanup a breeze.
How to Make Chocolate Homemade Puffed Rice Cereal Recipe
Step 1: Prep Your Oven and Baking Sheet
Preheat your oven to 300°F (150°C). Line a large baking sheet with parchment paper. This low temperature setting will gently crisp the puffed rice without risking a burnt taste or uneven cooking. Proper oven prep makes all the difference in texture!
💡 Pro Tip: Use parchment paper to prevent sticking and make cleanup simple.
Step 2: Melt the Chocolate Mix
Place the dark chocolate chips in a microwave-safe bowl. Heat in 20-second intervals, stirring well after each one until the chocolate is silky smooth and fully melted. Stir in honey or maple syrup, vanilla extract, and a pinch of sea salt until everything is well combined. This luscious mixture will be your magic binder that coats each puff of rice.
💡 Pro Tip: Stirring frequently keeps the chocolate glossy and prevents overheating.
Step 3: Coat the Puffed Rice with Cocoa
Put the puffed rice cereal into a large mixing bowl. Sift the cocoa powder evenly over the cereal to avoid any clumps that could create uneven flavor bursts. Pour the warm chocolate mixture over the cocoa-dusted puffed rice and gently toss with a spoon or spatula until each puff is lovingly coated in that rich chocolate goodness.
💡 Pro Tip: Toss lightly to avoid breaking the delicate puffed rice while ensuring thorough coating.
Step 4: Spread and Bake
Spread the coated cereal out in a single, even layer on your prepared baking sheet. Pop it in the oven and bake for 12-15 minutes, stirring once halfway through to make sure each bite crisps up evenly. The baking step is what transforms this mix into addictive, crunchy morsels.
💡 Pro Tip: Stir halfway through baking for evenly toasted cereal every time.
Step 5: Cool and Store
Remove the cereal from the oven and let it cool fully on the baking sheet. The cereal will continue to crisp as it cools, achieving that perfect crunch. Once cooled, transfer it to an airtight container to keep it fresh and crunchy for up to two weeks.
💡 Pro Tip: Avoid storing warm cereal to prevent moisture buildup and sogginess.
Common Mistakes to Avoid
Learn from these common pitfalls:
- Overheating chocolate: Can cause a grainy texture or burning, ruining the smooth coating.
- Skipping the sift: Cocoa powder lumps can cause uneven flavor and clumps in the cereal.
- Using too high oven temperature: Leads to burnt or bitter cereal instead of a gentle crisp.
- Not stirring halfway through baking: Results in uneven crisping and burnt edges.
- Storing before cooling: Moisture gets trapped and the cereal becomes soggy.
- Using wet ingredients or humid storage: Causes the cereal to lose its crunch quickly.
Delicious Variations to Try
Once you’ve mastered the classic Chocolate Homemade Puffed Rice Cereal Recipe, there’s plenty of room to get creative and make it your own.
Cinnamon Spice
Add a pinch of ground cinnamon and a dash of nutmeg to the cocoa powder before mixing for a cozy, warming twist.
Espresso Kick
Mix in a teaspoon of espresso powder with the cocoa to bring out deeper, mocha notes that coffee lovers will adore.
Nutty Delight
Stir in finely chopped toasted almonds or hazelnuts to add an extra layer of crunch and nutty flavor.
Orange Zest
Grate fresh orange zest into the melted chocolate mixture for a bright, citrusy surprise that pairs beautifully with chocolate.
Peanut Butter Swirl
Drizzle melted natural peanut butter over the baked cereal before cooling for a rich, salty-sweet upgrade.
How to Serve Chocolate Homemade Puffed Rice Cereal Recipe
Garnishes
Top with a sprinkle of toasted coconut flakes or a handful of fresh berries like raspberries or strawberries for bursts of color and freshness.
Side Dishes
Serve alongside a bowl of chilled almond milk or your favorite plant-based milk for a cozy breakfast or snack. This cereal also pairs wonderfully with plain yogurt drizzled with honey.
Creative Ways to Present
Present the cereal in individual glass jars or mini mason jars for a charming gift or party favor. Layer it with whipped cream and fruit for a quick parfait that dazzles.
Make Ahead and Storage
Storing Leftovers
Keep your homemade puffed rice cereal in an airtight container at room temperature. Proper storage preserves its crunch and flavor for up to two weeks, making it a perfect make-ahead snack.
Freezing
While this cereal freezes well, it’s best enjoyed fresh. You can freeze in an airtight container for up to a month, then re-crisp in a 250°F oven for 5-7 minutes before serving.
Reheating
If your cereal loses its crunch, spread it on a baking sheet and re-crisp it in a 250°F oven for about 5 to 7 minutes. Cool completely before storing again.
FAQs
Can I use other sweeteners instead of honey?
Absolutely! Maple syrup, agave nectar, or brown rice syrup work beautifully. Adjust sweetness to your preference.
Is this recipe vegan?
You can make it vegan by substituting honey with maple syrup or another vegan-friendly sweetener and using dairy-free chocolate chips.
Can I add nuts or dried fruit?
Yes! Adding chopped nuts or dried fruits after baking adds texture and flavor, just avoid mixing them into the hot chocolate mixture to keep them from getting soggy.
How long does this cereal stay fresh?
Stored properly in an airtight container, it stays fresh and crunchy for about two weeks at room temperature.
Can I make this cereal without an oven?
The oven step is key to crisping. Without it, you’ll get coated cereal but it won’t have the same satisfying crunch.
Can I use milk chocolate instead of dark chocolate?
Sure! Using milk chocolate will give a sweeter, creamier coating but dark chocolate offers richer flavor and less sugar.
How do I prevent the cereal from clumping together?
Sifting cocoa powder and gentle tossing helps. Also, spreading the cereal in a single layer on the baking sheet and stirring halfway through prevents clumps.
What’s the best way to serve this cereal?
Spoon it into a bowl with your favorite milk, use it as a crunchy topping for yogurt, or simply enjoy it by the handful as a snack.
Final Thoughts
This Chocolate Homemade Puffed Rice Cereal Recipe has a magical way of turning a few humble ingredients into a crunchy, chocolatey delight that feels both nostalgic and fresh. It’s a perfect little pleasure to brighten your morning or satisfy an afternoon craving. The rich aroma, the beautiful glossy finish, and that addictive crunch—everything about this recipe invites you to savor pure joy in every bite.
Have you tried this Chocolate Homemade Puffed Rice Cereal Recipe? I’d love to hear how it turned out! Leave a comment below. If you loved this recipe, please share it with friends and family. Happy cooking! 🍫
PrintChocolate Homemade Puffed Rice Cereal Recipe

Enjoy a wholesome and crunchy chocolate puff cereal made from scratch with just four simple ingredients. Naturally sweetened and baked to crisp perfection, this delightful treat is perfect for a nutritious breakfast or a satisfying snack. Its easy preparation and refined sugar-free recipe make it an irresistible choice for a tasty, guilt-free indulgence.
- Prep Time: 10 Minutes
- Cook Time: 15 Minutes
- Total Time: 25 Minutes
- Yield: 6 Servings (6 balls) 1x
- Category: Breakfast-Brunch
- Method: Baking
- Cuisine: American
- Diet: Vegetarian
Ingredients
Main Ingredients
- 2 cups puffed rice cereal
- 3 tablespoons cocoa powder
- 2 tablespoons honey or maple syrup
- 1/4 cup dark chocolate chips
- 1 teaspoon vanilla extract
- Pinch of sea salt
Instructions
- Preheat the oven: Preheat your oven to 300°F (150°C) and line a large baking sheet with parchment paper. This low temperature allows the cereal to crisp up without burning.
- Melt chocolate mixture: In a microwave-safe bowl, melt the dark chocolate chips in 20-second intervals, stirring between each until smooth. Stir in honey, vanilla extract, and a pinch of sea salt until well combined.
- Combine ingredients: Place the puffed rice cereal in a large mixing bowl and sift the cocoa powder over it to avoid clumps. Pour the melted chocolate mixture over the cereal and gently toss until every puff is evenly coated.
- Bake the cereal: Spread the coated cereal in a single layer on the prepared baking sheet. Bake for 12-15 minutes, stirring once halfway through to ensure even crisping.
- Cool and store: Remove from oven and let the cereal cool completely on the baking sheet; it will continue to crisp as it cools. Once completely cooled, transfer to an airtight container for storage.
Notes
- Store the cereal in an airtight container at room temperature for up to 2 weeks to maintain crispness.
- If the cereal loses its crunch, re-crisp it by baking at 250°F for 5-7 minutes.
- Maple syrup can be used instead of honey for a different sweetness profile.
- For extra flavor, add a pinch of cinnamon or espresso powder to the cocoa mixture.
- Ensure the cereal is fully cooled before storing to prevent sogginess.
Keywords: chocolate puff cereal, homemade cereal, healthy breakfast, gluten free cereal, refined sugar free, puffed rice snacks, easy breakfast recipes, vegan option cereal


