
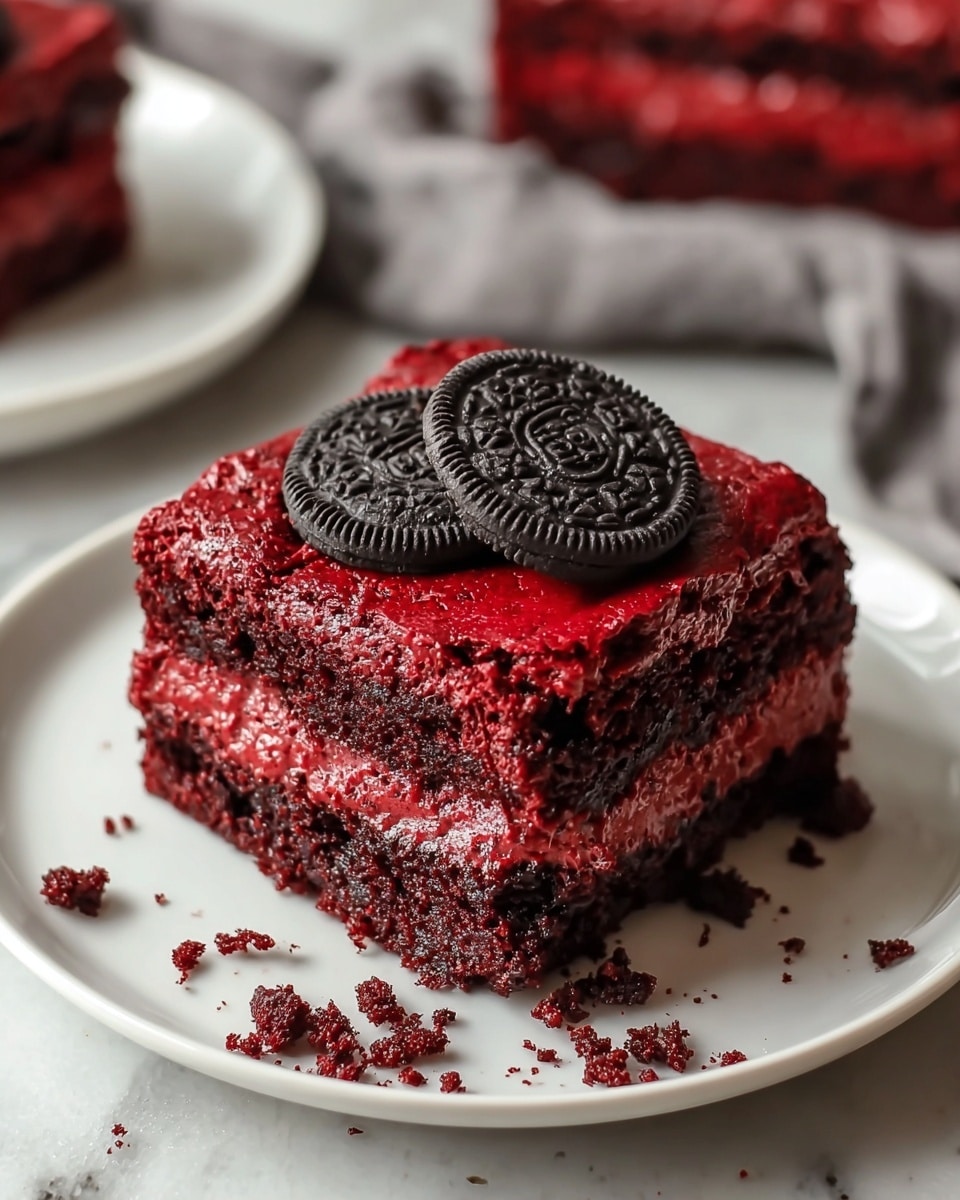
Classic Red Velvet Oreo Brownies Recipe
I never thought I’d find a brownie recipe easier than this one that brings together the irresistible allure of red velvet and the nostalgic crunch of Oreos. As you slice through these luscious, fudgy brownies, the scent of rich cocoa mingles with that signature red velvet essence, tempting you to take just one more bite. This Classic Red Velvet Oreo Brownies Recipe is bound to become your new favorite indulgence.
Why You’ll Love This Classic Red Velvet Oreo Brownies Recipe
- Decadent Flavor Duo: The rich chocolate from cocoa powder pairs perfectly with the iconic red velvet emulsion and the crunchy Oreo pieces, delivering an indulgence unlike any other.
- Simple Ingredients: Using pantry staples such as butter, brown sugar, eggs, flour, and vanilla extract, this recipe is approachable without sacrificing richness.
- Perfectly Fudgy Texture: Thanks to the combination of butter and just enough flour, these brownies stay moist and fudgy, satisfying cravings in every bite.
- Show-Stopping Presentation: A sprinkle of crushed Oreo cookies on top adds crunch, visual appeal, and a classic twist that guests will rave about.
- Generously Sized: This recipe yields 12 hearty slices, enough for sharing or savoring over a few days.
Why This Classic Red Velvet Oreo Brownies Recipe Works
This recipe shines thanks to a few clever techniques and quality ingredients. Starting by melting the butter gently in small increments ensures it blends smoothly with the brown sugar, creating that luscious fudgy base. The red velvet emulsion adds that unmistakable flavor punch that elevates these brownies beyond ordinary chocolate. By whisking the cocoa powder, salt, and flour separately before folding them into the wet mix, you achieve the ideal balance of structure and softness. Finally, the method of lightly crushing Oreos and sprinkling them on top before baking adds delightful texture and visual contrast that makes every bite exciting.
Ingredients You’ll Need
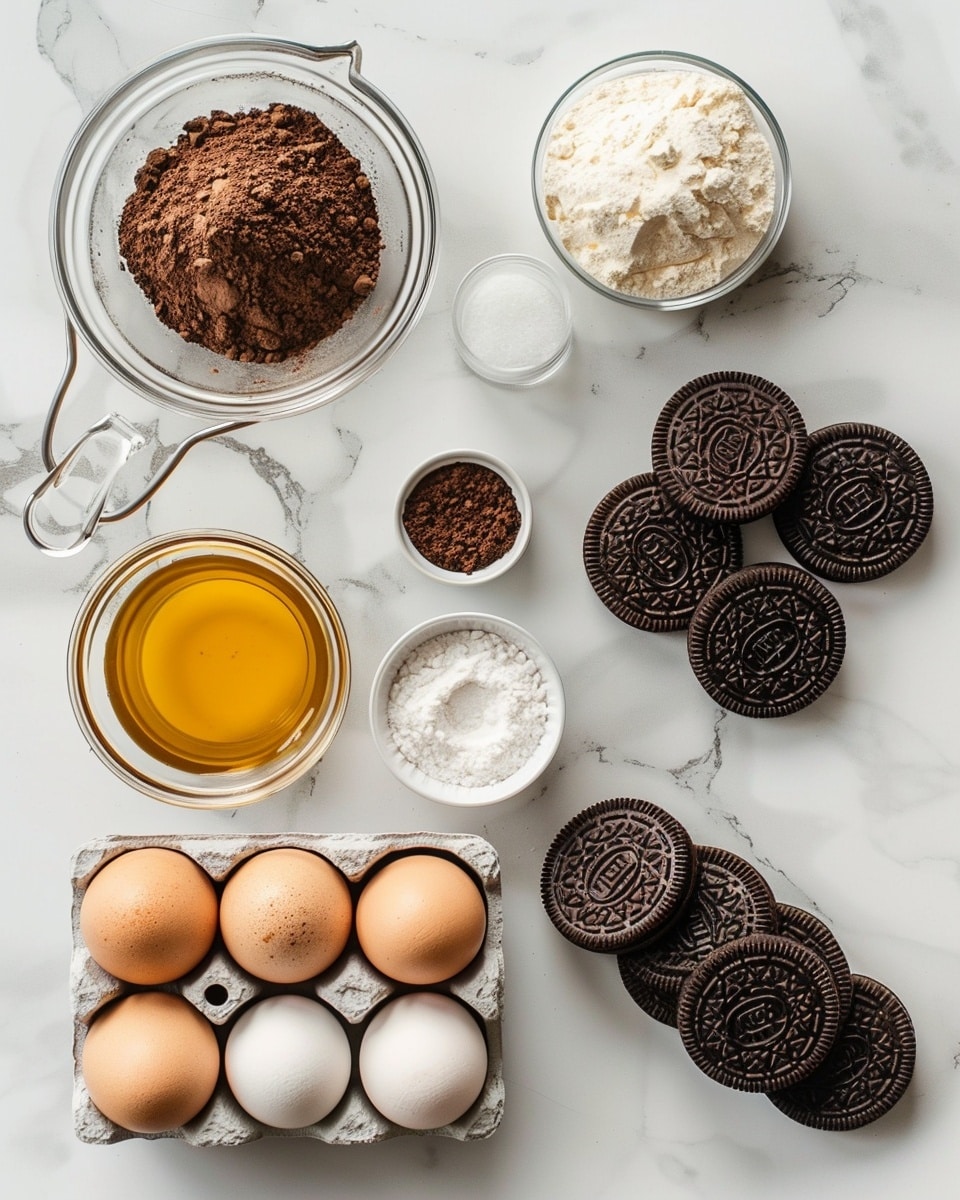
Get ready to gather some kitchen essentials that combine rich indulgence with a pop of nostalgic crunch.
- 1.5 cups Butter: Helps create that rich, fudgy texture that brownies are known for.
- 2.25 cups Brown Sugar: Adds the perfect balance of sweetness and keeps the brownies moist.
- 4 large Eggs: Essential for binding the mixture together.
- 1.5 cups Cocoa Powder: Provides deep, chocolatey flavor.
- 1 tsp Salt: Enhances the overall flavor profile.
- 2 tbsp Red Velvet Emulsion: Brings the iconic red velvet taste and vibrant color.
- 0.75 cup Flour: Gives structure while keeping the texture fudgy.
- 1 tsp Vanilla Extract: Amplifies the richness and rounds out flavors.
- 16 Oreo Cookies (chopped): Adds a delightful crunch throughout the brownies.
Ingredient Substitutions & Tips
- Butter: You can substitute with an equal amount of coconut oil for a slightly different richness and dairy-free option.
- Brown Sugar: Light or dark brown sugar will both work, just choose based on how caramel-rich you want the flavor.
- Red Velvet Emulsion: If unavailable, a combination of vanilla extract and a few drops of red food coloring can be used, but the emulsion provides that authentic taste.
- Oreo Cookies: Feel free to swap for any similar chocolate sandwich cookies if Oreos aren’t on hand.
👨🍳 Pro Tips for Perfect Results
- Cool the melted butter and sugar mixture: Let it rest for about 5 minutes so the eggs don’t cook when added.
- Mix dry ingredients separately: Whisk cocoa, salt, and flour to avoid clumps and ensure even distribution.
- Don’t overmix the batter: Stir gently until combined to keep brownies tender.
- Use room temperature eggs: They blend better and help keep the texture smooth.
- Check doneness with a toothpick: It should come out with a few moist crumbs, never completely dry.
How to Make Classic Red Velvet Oreo Brownies Recipe
Step 1: Preheat and Prepare
Preheat your oven to 350°F and generously grease a 9×13 inch baking dish. This step is crucial to ensure your brownies don’t stick and come out perfectly shaped every time.
💡 Pro Tip: Use parchment paper for an extra easy release.
Step 2: Melt Butter
Melt the butter by cutting it into smaller chunks and microwaving in 30-second increments. This gentle melting method prevents it from burning and helps create that rich fudgy base.
💡 Pro Tip: Stir the butter well after each interval to distribute the heat evenly.
Step 3: Mix Wet Ingredients
Cool the butter-sugar mixture for about 5 minutes, then add the eggs one at a time, beating well after each addition. This slow method ensures a smooth, well-emulsified batter that bakes up beautifully.
💡 Pro Tip: If the mixture looks grainy, give it a gentle whisk to smooth it out before adding eggs.
Step 4: Mix Dry Ingredients
Whisk together the cocoa powder, salt, and flour in a separate bowl to make sure they’re evenly blended and lump-free before joining the wet mix.
💡 Pro Tip: Sifting cocoa powder can help if it tends to clump.
Step 5: Combine Batter
Pour the dry ingredients into the wet mixture and stir gently until just combined. Avoid overmixing to keep the texture tender and fudgy.
💡 Pro Tip: Fold in the chopped Oreos at this stage to incorporate the crunch evenly.
Step 6: Assemble
Spread the batter evenly into the prepared pan. Then, crush the remaining 4 Oreo cookies and sprinkle them over the top, creating a gorgeous texture and flavor contrast as they bake.
💡 Pro Tip: Press the crushed Oreos lightly into the batter so they stick and don’t fall off when cutting.
Step 7: Bake
Bake in the preheated oven for 55 to 65 minutes, or until a toothpick inserted comes out with a few moist crumbs. This slow bake lets the brownies set without drying out.
💡 Pro Tip: Start checking around 55 minutes to avoid overbaking.
Step 8: Cool
Allow the brownies to cool in the pan for 15 to 20 minutes before cutting them into squares. This resting time helps the texture settle and makes for cleaner slices.
💡 Pro Tip: Use a sharp knife and wipe between cuts for neat edges.
Common Mistakes to Avoid
Learn from these common pitfalls:
- Adding eggs to hot butter: This can cook the eggs prematurely, leading to a scrambled texture.
- Overmixing the batter: Incorporating too much air toughens the brownies instead of keeping them moist.
- Not greasing the pan well enough: Can cause the brownies to stick and break apart when serving.
- Baking too long: Will dry out the brownies, stripping them of their luscious fudginess.
- Skipping crushed Oreo topping: It adds essential crunch and visual appeal—don’t miss this step!
- Using expired ingredients: Fresh cocoa powder and Oreos make all the difference in flavor and texture.
Delicious Variations to Try
Once you’ve mastered this classic version, why not put a spin on it for different occasions or cravings?
White Chocolate Drizzle
Drizzle melted white chocolate over cooled brownies and let it set for an elegant, sweet contrast to the dark chocolate and Oreos.
Nutty Surprise
Add a handful of chopped toasted pecans or walnuts into the batter for a satisfying crunch and a nutty layer of flavor.
Peanut Butter Swirl
Drop dollops of creamy peanut butter on top of the batter before baking and swirl with a knife for a luscious combo that’s hard to resist.
Mint Oreo Brownies
Swap classic Oreos for mint-flavored ones for a refreshing twist that complements the red velvet beautifully.
Berry Infusion
Mix fresh or frozen raspberries into the batter for a tart burst that balances the sweetness.
Looking for another luscious dessert to impress? Try our Vanilla Custard Cream Squares Recipe – Foodarohub for a silky, dreamy finish to your meal.
How to Serve Classic Red Velvet Oreo Brownies Recipe
Garnishes
Top with a dusting of powdered sugar, a dollop of whipped cream, or even a few whole Oreo cookies for a dazzling presentation.
Side Dishes
Pair these brownies with a scoop of vanilla bean ice cream or a drizzle of caramel sauce to make dessert extra special.
Creative Ways to Present
Cut into bite-sized squares for parties or layer with fresh strawberries and cream in parfait glasses for a no-fuss, crowd-pleasing dessert display. These brownies also make a delightful gift when wrapped prettily in parchment and tied with a ribbon.
Make Ahead and Storage
Make-Ahead Instructions
You can prepare the batter ahead of time and refrigerate it for up to 24 hours before baking, which enhances the flavors and fits perfectly into a busy schedule.
Storage
Once cooled, store the brownies in an airtight container at room temperature for up to 3 days, or refrigerate for up to a week to maintain freshness.
Freezing
Wrap brownies tightly in plastic wrap and foil, then freeze for up to 3 months. Thaw overnight in the fridge before serving.
Reheating
Warm individual slices in a microwave for 10-15 seconds or reheat in an oven at 300°F for 5-7 minutes to restore that gooey softness.
Expert Tips for Success
- Use high-quality cocoa powder: It profoundly affects the depth of flavor.
- Measure flour accurately: Spoon and level to avoid dry, cakey brownies.
- Be patient cooling: Cutting too soon can make brownies crumbly.
- Chop Oreos uniformly: So every bite has just the right crunch.
- Don’t skip the red velvet emulsion: It’s the secret ingredient for authentic flavor.
- Grease the pan thoroughly: Prevents sticking and helps with clean cuts.
- Test doneness carefully: Aim for moist crumbs on a toothpick, not dry.
Frequently Asked Questions
Can I use regular vanilla extract instead of red velvet emulsion?
While vanilla extract provides flavor, red velvet emulsion gives the distinctive taste and color. For best results, use the emulsion if you can.
How do I know when these brownies are done?
Insert a toothpick around 55 minutes into baking; it should come out with a few moist crumbs but not wet batter.
Can I substitute the Oreos for another cookie?
Yes, chocolate sandwich cookies work well, but Oreos offer the classic taste that complements red velvet perfectly.
Is it better to use unsalted or salted butter?
Use unsalted butter to control the salt level, especially since the recipe already includes salt.
Can I make these brownies gluten-free?
Replace regular flour with a suitable gluten-free baking blend in the same quantity for a gluten-free version.
How should I store leftover brownies?
Keep them in an airtight container at room temperature for several days or in the fridge for a week.
What is the yield of this recipe?
This recipe makes about 12 generous slices, perfect for sharing or savoring slowly.
Final Thoughts
Making these Classic Red Velvet Oreo Brownies is like wrapping yourself in a warm, chocolatey hug filled with crunchy Oreo surprises. The combination of deep cocoa, the unique charm of red velvet, and the crunch of cookies creates a moment of pure joy in every bite. Whether you’re baking for family, friends, or just yourself, this recipe brings comfort and decadence to your kitchen. I hope you enjoy every slice as much as I do — happy baking!
PrintClassic Red Velvet Oreo Brownies Recipe
Classic Red Velvet Oreo Brownies offer a decadent blend of rich chocolate and nostalgic Oreo crunch, perfect for satisfying any sweet tooth.
- Prep Time: 15 minutes
- Cook Time: 1 minutes
- Total Time: 1 hour 35 minutes
- Yield: 12 slices 1x
- Category: DESSERTS
- Method: Baking
- Cuisine: American
- Diet: Vegetarian
Ingredients
For the Brownie Batter
- 1.5 cups Butter helps create that rich, fudgy texture
- 2.25 cups Brown Sugar adds balance of sweetness and moisture
- 4 large Eggs essential for binding
- 1.5 cups Cocoa Powder gives chocolate flavor
- 1 tsp Salt enhances overall flavor
- 2 tbsp Red Velvet Emulsion brings iconic red velvet taste
- 0.75 cup Flour provides structure while keeping fudgy
- 1 tsp Vanilla Extract amplifies richness
- 16 cookies Oreo Cookies (chopped) adds a delightful crunch
For Garnish
- 4 cookies Oreo Cookies (for garnish) offers an appealing topping
Instructions
- Preheat Oven: Preheat your oven to 350°F and generously grease a 9×13 inch baking dish.
- Melt Butter: Melt the butter by cutting it into smaller chunks, microwaving in 30-second increments.
- Cool Mixture and Add Eggs: Cool the butter-sugar mixture for about 5 minutes, then add the eggs one at a time.
- Mix Dry Ingredients: Whisk together the cocoa powder, salt, and flour in a separate bowl.
- Combine Wet and Dry: Combine the wet mixture with the dry ingredients, stirring gently until just mixed.
- Prepare Batter in Pan: Spread the batter into your prepared pan evenly, crush the remaining 4 Oreo cookies and sprinkle them on top.
- Bake: Bake in the preheated oven for 55 to 65 minutes, or until a toothpick comes out with a few moist crumbs.
- Cool and Serve: Cool in the pan for 15 to 20 minutes before cutting into squares for serving.
Notes
- Ensure the butter-sugar mixture cools about 5 minutes before adding eggs to prevent cooking them.
- Bake until a toothpick inserted comes out with a few moist crumbs for perfect fudgy texture.
- Crushing Oreo cookies for topping adds delightful crunch and visual appeal.
Keywords: red velvet brownies, oreo brownies, classic dessert, fudgy brownies, chocolate oreo dessert


