
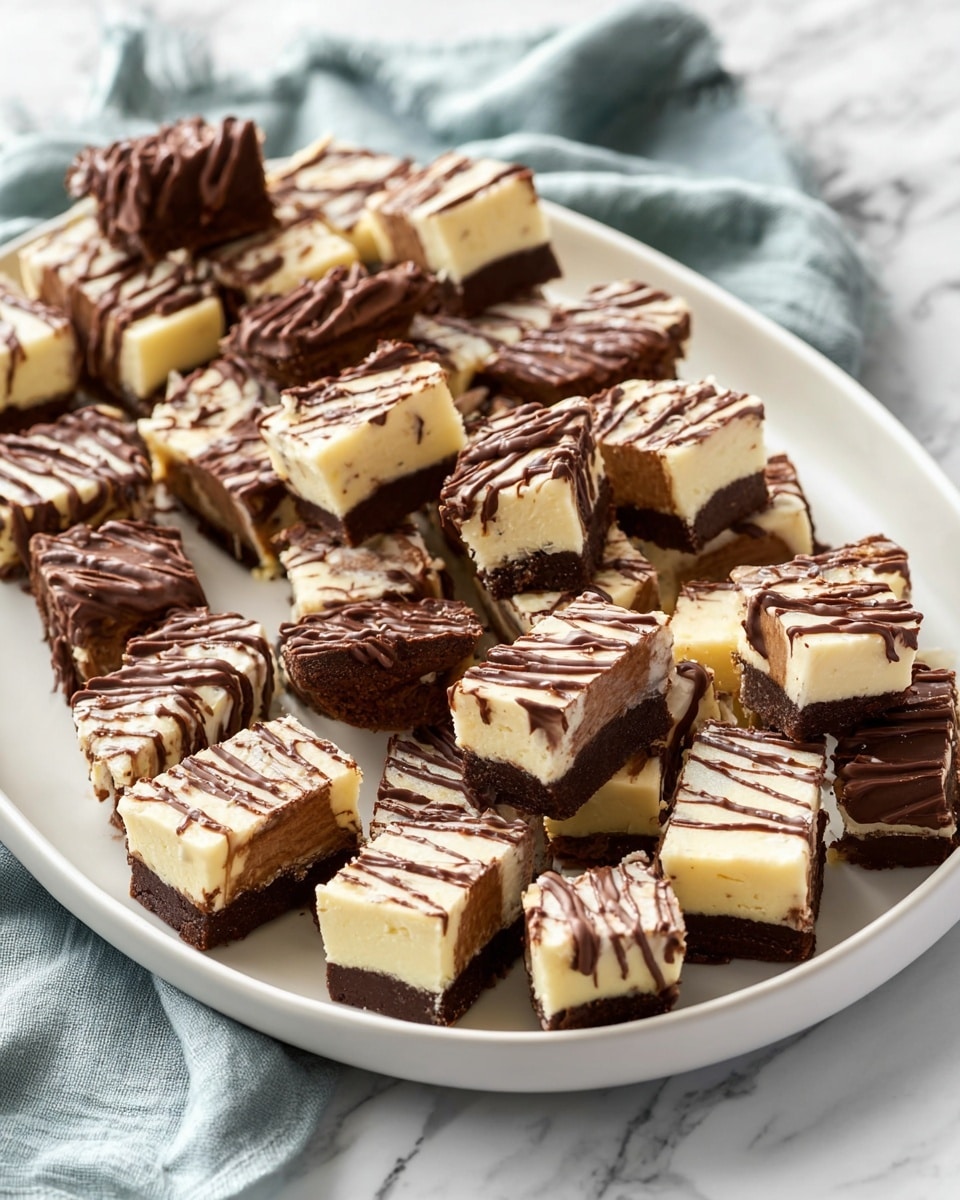
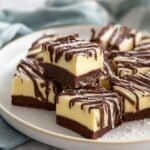
Coconut Fudge Bars Recipe
Picture this: the sweet aroma of rich chocolate intertwined with a whisper of tropical coconut fills your kitchen, promising a treat that’s both indulgent and comforting. As you bite into these luscious Coconut Fudge Bars, your taste buds are greeted by a symphony of creamy white chocolate, crunchy cookie base, and a smooth, melt-in-your-mouth fudge coating. These bars are more than just dessert—they’re a celebration in every bite, perfect for sharing or savoring all to yourself. And the best part? They come together with surprisingly simple steps, making luxury achievable right at home.
Why You’ll Love This Coconut Fudge Bars Recipe
- Decadently Delicious: Each bar boasts a perfect balance of creamy fudge, crunchy base, and shredded coconut for a delightful texture experience.
- Simple Ingredients: Uses pantry staples and easy-to-find treats like sweetened condensed milk and quality chocolates that come together beautifully.
- Impressive Crowd-Pleaser: With its glossy finish and tempting chocolate drizzle, this recipe is perfect for special gatherings or treating yourself.
- Make-Ahead Friendly: Prepare the bars ahead of time and have a stunning dessert ready whenever cravings strike.
- Customizable Flavors: Optional peppermint extract adds a refreshing twist, while the coconut extract crowns the bars with an authentic island vibe.
Why This Coconut Fudge Bars Recipe Works
The magic behind this Coconut Fudge Bars Recipe lies in layering textures and flavors harmoniously. Starting with crushed unfilled chocolate cookies creates a crunchy, sturdy base that perfectly contrasts the creamy fudge topping. Melting sweetened condensed milk with chopped white chocolate ensures a glossy, smooth filling that sets to fudgy perfection. Incorporating desiccated coconut blends subtle nuttiness, while the addition of peppermint extract is an optional burst of cooling freshness. Carefully coating each bar in melted milk chocolate seals in the lusciousness and adds a stunning finish, making every bite irresistible.
Ingredients You’ll Need
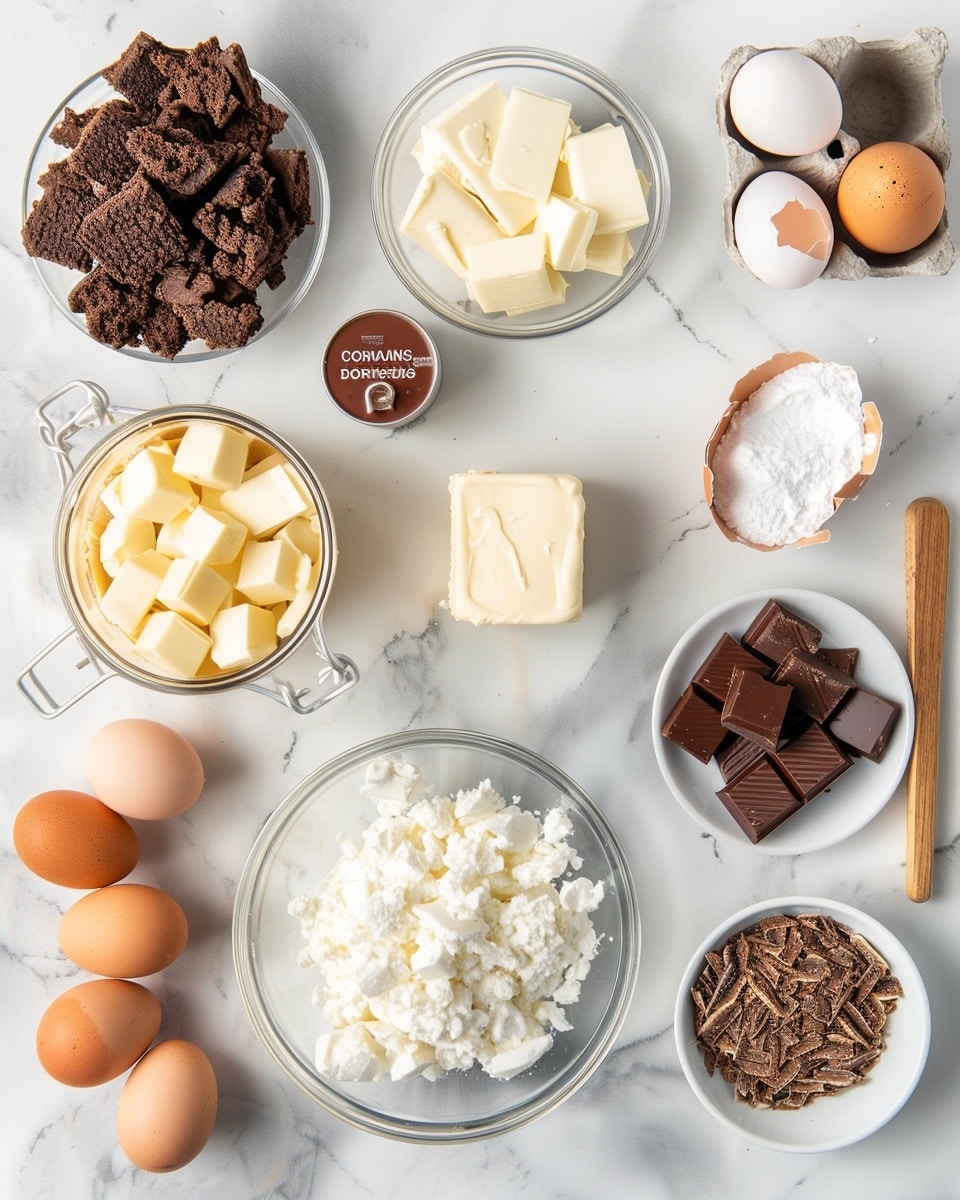
This recipe relies on straightforward, yet carefully chosen ingredients that build layers of taste and texture.
- Unfilled chocolate cookies (250 g): Crunchy base foundation providing texture and mild cocoa flavor.
- Unsalted butter (100 g + 2 tbsp): Adds richness and helps bind the base and filling.
- Sweetened condensed milk (1 can, 395g): Creates creamy sweetness and smooth fudge consistency.
- White chocolate (360 g, chopped): Melts into velvety filling, too rich for chips so always use blocks.
- Coconut extract (1 tsp): Infuses the filling with authentic coconut aroma and flavor.
- Peppermint extract (2 tsp, optional): Adds a cool, refreshing note—a special twist if you wish.
- Desiccated coconut (130 g): Provides chewiness and enhances the coconut taste.
- Milk chocolate (300 g): Used for coating bars, lending a creamy outer layer.
- Dark chocolate (50 g): For drizzling on top, offering a sharp, bittersweet contrast.
Ingredient Substitutions & Tips
- Unfilled chocolate cookies: You can swap for graham crackers or digestive biscuits if you prefer a lighter, honeyed base.
- Unsalted butter: Use salted butter but reduce extra salt elsewhere in the recipe.
- White chocolate: Avoid chips here; if unavailable, a quality white chocolate bar chopped finely will do.
- Desiccated coconut: Unsweetened coconut flakes can substitute but expect a different texture and less sweetness.
👨🍳 Pro Tips for Perfect Results
- Use quality chocolates: Investing in good quality white and milk chocolate dramatically elevates flavor and texture.
- Chop the white chocolate finely: This helps it melt evenly without scorching in the pan.
- Press the cookie crumb base firmly: A compact base creates a sturdy foundation that holds the fudge well.
- Chill the slice overnight: Patience pays off—the longer chilling time results in perfectly firm bars.
- Dip bars quickly: Work briskly when coating the bars so the chocolate sets evenly without clumping.
How to Make Coconut Fudge Bars Recipe
Step 1: Prepare Your Pan and Crush the Cookies
Start by lining an 8-inch square tin with baking paper to ensure easy removal later. Blitz the unfilled chocolate cookies into fine crumbs using a blender or food processor. No processor? No problem! Place cookies in a ziplock bag and crush them with a rolling pin until uniform crumbs form.
💡 Pro Tip: Crumbs should be fine yet textured enough to form a crumbly but compact base.
Step 2: Mix Cookie Crumbs with Melted Butter
Pour the melted butter over the crushed cookies and stir until every crumb is coated. This butter acts as the glue, transforming crumbs into a firm crust once pressed.
💡 Pro Tip: Use the back of a spoon or your hands to press the crumbs firmly into the pan’s base. This step ensures a bite that won’t crumble apart.
Step 3: Chill the Base
Pop the pan into the fridge while you prepare the luscious fudge filling. Chilling tightens the base so it supports the creamy layer without mixing.
💡 Pro Tip: Don’t skip this step! A chilled base is key to keeping your bars tidy when cutting.
Step 4: Make the Coconut Fudge Filling
In a medium heavy saucepan, combine the sweetened condensed milk, chopped white chocolate, and 2 tablespoons of butter over low heat. Stir gently and consistently until all melts smoothly into a glossy, thick mixture.
💡 Pro Tip: Keep the heat low to avoid burning the chocolate. Stirring continuously helps retain silky texture.
Step 5: Stir in Coconut and Extracts
Remove the pan from heat and fold in desiccated coconut, coconut extract, and if using, peppermint extract. These ingredients bring delightful flavor and texture.
💡 Pro Tip: Taste the mixture at this stage—adding peppermint is optional but refreshing.
Step 6: Pour and Chill
Pour the rich, coconutty fudge over the cookie base, spreading evenly. Refrigerate overnight to allow the filling to set firmly and the flavors to meld.
💡 Pro Tip: For fastest results, chill for a minimum of 4 hours, but overnight is best for firm bars.
Step 7: Melt Milk Chocolate for Coating
Once set, melt your milk chocolate in 30-second bursts in the microwave, stirring thoroughly between each until silky smooth. This coating step transforms these bars into glossy little gems.
💡 Pro Tip: Don’t overheat the chocolate to prevent graininess; gentle melting preserves shine.
Step 8: Cut and Dip the Bars
Lift the slice from the tin using the paper lining. Cut it into 32 bars by quartering, then cutting each quarter into eight pieces. Lay baking paper on a large tray and place a wire rack on top. Dip each bar in melted milk chocolate using two forks to coat completely, then transfer to the wire rack to drip and set.
💡 Pro Tip: Work quickly to keep the chocolate fluid and smooth over each bite’s surface.
Step 9: Drizzle Dark Chocolate and Set
Optionally, melt dark chocolate and drizzle over the coated bars for stunning contrast. Allow the chocolate to set again on the wire rack.
💡 Pro Tip: Use a spoon to drizzle in a zigzag motion for a professional look.
Step 10: Store Carefully
Line the bottom of a container with baking paper and transfer the bars from the wire rack carefully. Chill for a couple of hours to fully set the coating.
💡 Pro Tip: Don’t let bars set on the wire rack—not only do they stick, but they lose their glossy finish.
Common Mistakes to Avoid
Learn from these common pitfalls:
- Using chocolate chips instead of chopped chocolate: Chips don’t melt as smoothly, leading to grainy texture.
- Skipping the chill time: Without overnight chilling, bars won’t firm up properly and become messy to cut.
- Pressing the cookie base too lightly: A loose base crumbles instead of holding together.
- Overheating chocolate: This causes the white or milk chocolate to seize or separate.
- Not using baking paper to line the pan: The bars can stick, making removal difficult.
- Coating bars too slowly: Chocolate can harden too fast, resulting in uneven coverage.
Delicious Variations to Try
Once you’ve mastered the classic Coconut Fudge Bars Recipe, why not shake things up a bit?
Tropical Twist
Add chopped dried pineapple or mango into the fudge mixture for a burst of tropical sweetness that complements the coconut beautifully.
Nutty Delight
Fold in toasted chopped almonds or macadamia nuts to the fudge layer for extra crunch and a buttery nut flavor.
Dark Chocolate Lover’s Version
Swap white chocolate for dark chocolate in the fudge to create a richer, more intense chocolate bar.
Vegan Coconut Fudge Bars
Use coconut condensed milk alternatives and vegan chocolate for a dairy-free version without sacrificing taste.
Spiced Coconut
A pinch of cinnamon or ground cardamom stirred into the fudge adds warmth and exotic flair.
How to Serve Coconut Fudge Bars Recipe
Garnishes
Top your bars with extra toasted desiccated coconut, a sprinkle of sea salt, or a drizzle of dark chocolate for a photo-ready presentation.
Side Dishes
Pair these bars with a cup of freshly brewed coffee or a glass of chilled coconut water to keep the tropical theme alive.
Creative Ways to Present
Serving them on a rustic wooden board or layered in a glass jar makes a charming gift or party treat. Wrap individual pieces in parchment for a lovely take-home favor.
Make Ahead and Storage
Storing Leftovers
Keep bars in an airtight container in the refrigerator for up to one week to maintain freshness and texture.
Freezing
Wrap bars individually in parchment paper and freeze in a sealed container for up to 2 months. Thaw in the fridge overnight before serving.
Reheating
Enjoy cold or let sit at room temperature for 10-15 minutes to soften slightly. Reheating is not recommended as it can affect texture and shine.
FAQs
Can I use regular chocolate chips instead of chopped white chocolate?
For best texture and smoothness, use chopped blocks rather than chips. Chips contain stabilizers that prevent melting cleanly.
What if I don’t have coconut extract?
You can increase the amount of desiccated coconut or skip the extract altogether, but the flavor won’t be as pronounced.
Is the peppermint extract necessary?
Not at all! It’s optional and adds a refreshing undertone. Feel free to leave it out if you prefer classic coconut fudge flavor.
Can I make these bars gluten-free?
Yes! Substitute the cookie base with gluten-free chocolate biscuits and ensure all other ingredients are certified gluten-free.
How do I store these bars without the chocolate coating?
The bars without coating can be stored chilled in an airtight container for up to 3 days but are best coated right before serving.
Can I double the recipe?
Absolutely! Just double all ingredients and use a larger pan, or make two batches for a party.
Why does my chocolate coating look dull?
Overheating or cooling chocolate too quickly can cause dullness. Melt gently and let it set at room temperature for a shiny finish.
How long do these bars last at room temperature?
Since these bars contain dairy and chocolate coating, it’s best to keep them refrigerated and consume within a week for freshness.
Final Thoughts
This Coconut Fudge Bars Recipe is a treasure trove of textures and flavors that come together beautifully to create a dessert you’ll revisit time and time again. Whether for a family gathering, holiday party, or an indulgent treat just because, these bars bring joy with every bite. The effortless combination of a crunchy cookie base, coconut-infused fudge, and silky chocolate coating makes for a beautifully satisfying sweet experience.
Have you tried this Coconut Fudge Bars Recipe? I’d love to hear how it turned out! Leave a comment below. If you loved this recipe, please share it with friends and family. Happy cooking! 😊
PrintCoconut Fudge Bars Recipe
These Coconut Fudge Bars combine a crunchy chocolate cookie base with a smooth, glossy coconut and white chocolate filling, finished with a milk chocolate coating. Infused with coconut and peppermint extracts, they offer a delightful blend of creamy, rich, and refreshing flavors, perfect for a sweet treat or festive dessert.
- Prep Time: 15 minutes
- Cook Time: 15 minutes
- Total Time: 35 minutes plus overnight chilling
- Yield: 32 bars 1x
- Category: Dessert
- Method: Stovetop
- Cuisine: American
Ingredients
Base
- 250 g unfilled chocolate cookies (~8¾ oz)
- 100 g unsalted butter, melted (3½ oz)
Filling
- 1 can sweetened condensed milk (395 g / 14 oz)
- 360 g white chocolate, chopped (approx. 12¾ oz)
- 2 tablespoons unsalted butter
- 1 teaspoon coconut extract
- 2 teaspoons peppermint extract (optional)
- 130 g desiccated coconut (1 ½ cups)
Coating
- 300 g milk chocolate (10½ oz)
- 50 g dark chocolate (~1¾ oz) for drizzling
Instructions
- Prepare the Base: Line an 8-inch square tin with baking paper for easy removal. Crush the chocolate cookies into fine crumbs using a blender, food processor, or by placing them in a ziplock bag and crushing with a rolling pin. Mix the crumbs thoroughly with the melted butter until well combined.
- Form the Base Layer: Press the cookie and butter mixture firmly and evenly into the base of the prepared tin. Place it in the fridge to chill and set while you prepare the filling.
- Make the Coconut Filling: In a medium heavy-based saucepan over low heat, combine the sweetened condensed milk, chopped white chocolate, and 2 tablespoons of butter. Stir constantly until the mixture becomes smooth and glossy.
- Add Flavors and Coconut: Remove the saucepan from heat and stir in the desiccated coconut, coconut extract, and peppermint extract if using. Mix thoroughly to ensure even distribution.
- Set the Filling: Pour the coconut filling over the chilled cookie base, spreading it out evenly. Return the tin to the fridge and chill overnight to allow the filling to firm up.
- Prepare Chocolate Coating: Melt the milk chocolate in the microwave in 30-second increments, stirring well between each interval until completely smooth and glossy.
- Cut Bars into Portions: Remove the set slice from the tin and cut into 32 bars by first quartering and then cutting each quarter into 8 pieces for even-sized bars.
- Coat Bars in Milk Chocolate: Line a large baking sheet with baking paper and place a wire rack on top. Drop each bar into the melted milk chocolate and use two forks to fully coat the bar. Transfer the coated bar onto the wire rack to allow excess chocolate to drip off.
- Drizzle Dark Chocolate: Optional step: Melt the dark chocolate and drizzle it over the top of each coated bar for an elegant finishing touch. Allow to set briefly.
- Chill to Set: Once all bars are coated, line the base of a container with baking paper. Carefully transfer bars from the wire rack to the container, avoiding letting them set on the rack to prevent sticking. Refrigerate for a couple of hours to allow the chocolate coating to fully set.
- Serve and Enjoy: Once set, the coconut fudge bars are ready to serve. Store any leftovers in the refrigerator to keep fresh.
Notes
- Use chopped white chocolate rather than chocolate chips in the filling for a smoother texture.
- The peppermint extract is optional, but adds a lovely refreshing flavor which complements the coconut.
- Be careful when coating bars with chocolate to avoid sticking; transferring to baking paper immediately after coating helps.
- Chilling overnight is essential for the filling to firm properly.
- These bars keep well in the fridge for up to one week and can be frozen for longer storage.
Keywords: coconut fudge bars, chocolate cookie base, white chocolate coconut filling, peppermint extract, no bake, fridge set chocolate dessert


