
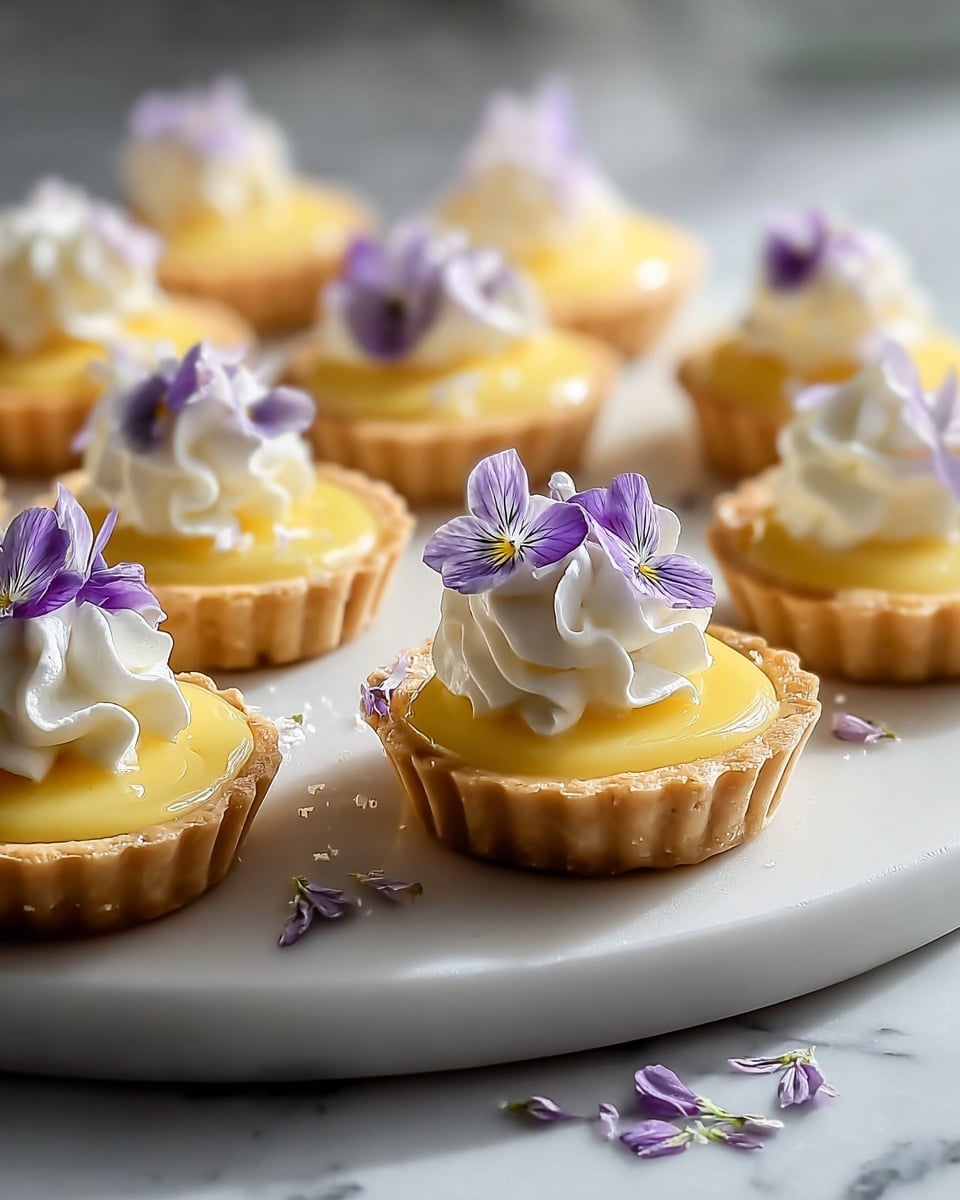
Delightful Mini Lemon Tart with Lilac Meringue for Spring Bliss Recipe
The sweet, citrusy scent of fresh lemon curls through the air, inviting you into a springtime dream filled with delicate flavors and pretty pastel hues. Imagine biting into a crisp, buttery mini tart shell, followed by a burst of tangy lemon filling, all crowned with a fluffy lilac meringue kissed by a golden torch finish. This Delightful Mini Lemon Tart with Lilac Meringue for Spring Bliss Recipe isn’t just a treat—it’s a celebration of the season’s freshest essence, perfect for impressing friends or savoring a moment of pure joy.
Why You’ll Love This Delightful Mini Lemon Tart with Lilac Meringue for Spring Bliss Recipe
- Bright, refreshing flavor: The vibrant lemon filling harmonizes perfectly with the light sweetness of the lilac meringue for an unforgettable taste experience.
- Simple pantry staples: Using everyday ingredients like all-purpose flour, eggs, and lemon juice means you can create a gourmet-looking dessert without hunting down exotic items.
- Great for gatherings: These 12 charming mini tarts serve a crowd beautifully, making them an elegant choice for spring parties or afternoon teas.
- Visual showstopper: The lilac-tinted meringue, elegantly piped and toasted, topped with edible lilac flowers, brings a stunning presentation that will wow every guest.
- Customizable perfection: From the tart shell to the meringue flavor and color, you can easily experiment to make these your own springtime masterpiece.
Why This Delightful Mini Lemon Tart with Lilac Meringue for Spring Bliss Recipe Works
The secret to this dessert’s magic lies in a few simple yet refined techniques. Starting with a chilled tart dough crafted from cold butter and flour, the recipe ensures a crumbly, buttery shell that holds up beautifully. The lemon filling cooks gently over medium heat, thickening to a luscious, tangy custard that contrasts with the light meringue topping. The lilac meringue itself is a showstopper: blending egg whites, sugar, and cream of tartar, then whipping them into glossy, stiff peaks with a hint of violet food coloring. Lastly, that gentle torching adds complexity, giving the meringue just the right hint of warm caramelization. These steps together craft an elegant balance of textures and flavors beautifully suited for spring.
Ingredients You’ll Need
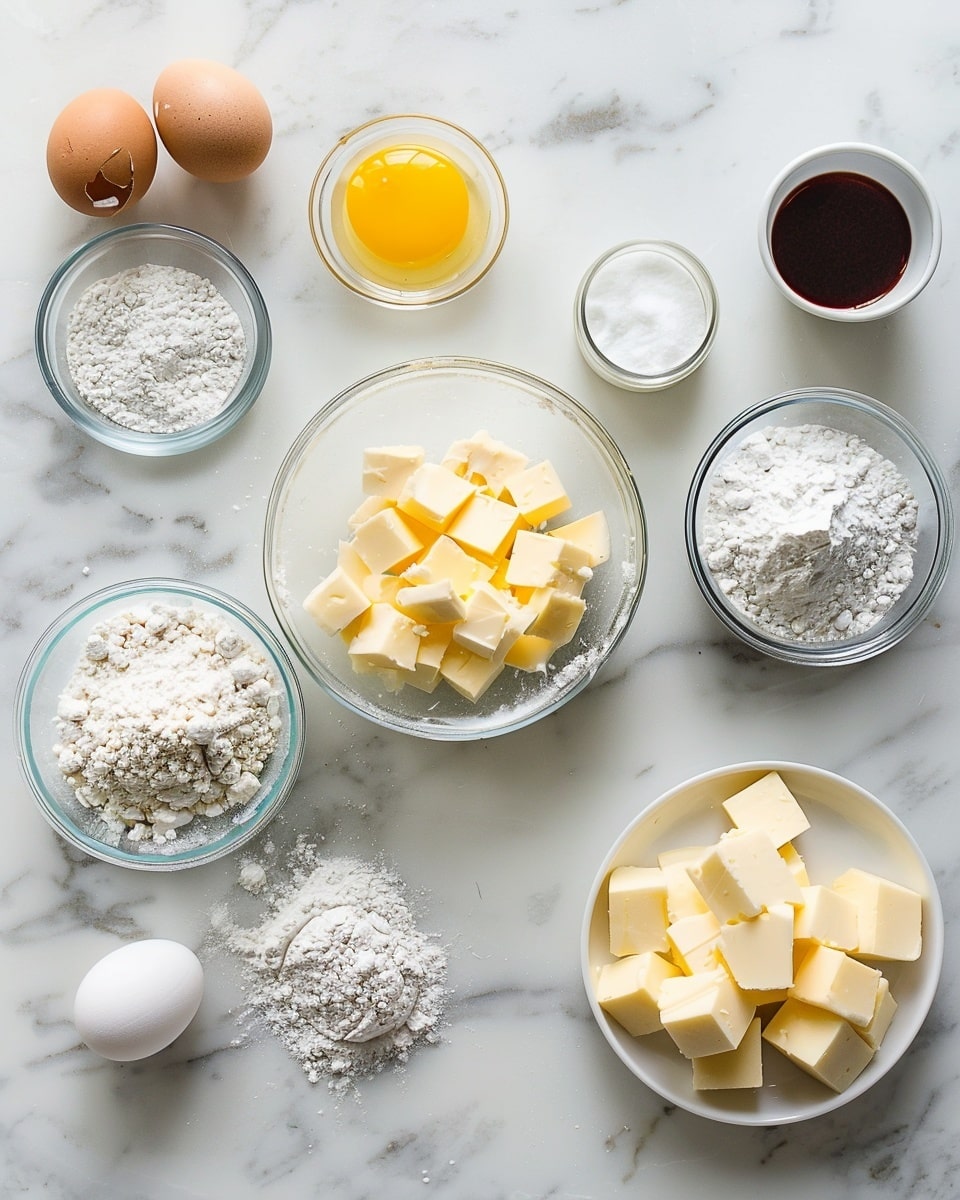
Get ready to gather some wonderfully fresh and classic ingredients that come together to create this stunning dessert. From the flaky tart dough to the fragrant lemon filling and the colorful meringue, every component sings with spring in mind.
- 1 cup All-purpose flour: The backbone of the crisp tart shell, providing structure with a tender crumb.
- 1/4 cup Powdered sugar: Adds subtle sweetness to the dough for balanced flavor.
- 1/2 cup Unsalted butter (Cold and cubed): The cold butter flakes into the flour for a delicate, buttery crust.
- 1 large Egg yolk: Binds the dough together and enriches its texture.
- 2 tbsp Cold water: Helps bring the dough together without warming the butter.
- 1/2 cup Fresh lemon juice: Packs the lemon filling with natural brightness.
- 1 tbsp Lemon zest: Boosts the citrus aroma and depth of flavor.
- 3/4 cup Granulated sugar: Sweetens both the lemon filling and meringue for harmony.
- 3 large Eggs: Create the silky custard base in the lemon filling.
- 2 tbsp Unsalted butter (Cubed): Adds creaminess to the lemon custard as it cools.
- 3 large Egg whites: The foundation of the meringue, whipped to airy perfection.
- 3/4 cup Granulated sugar: Sweetens and stabilizes the meringue.
- 1/4 tsp Cream of tartar: Enhances volume and keeps the meringue stable.
- 1 tsp Vanilla extract: Adds a gentle warmth to the meringue’s profile.
- 1 drop Violet food coloring: Creates that enchanting lilac hue on the meringue topping.
- 12 Edible lilac flowers: The perfect graceful garnish celebrating springtime beauty.
Ingredient Substitutions & Tips
- All-purpose flour: Swap for almond flour for a gluten-free twist, adjusting liquids as needed.
- Butter: Use plant-based butter to make this recipe vegan-friendly while maintaining the flaky texture.
- Fresh lemon juice: Can be replaced with bottled lemon juice in a pinch, but fresh is best for brightness.
- Violet food coloring: Substitute with natural ube powder or omit coloring altogether for a classic white meringue.
👨🍳 Pro Tips for Perfect Results
- Keep ingredients cold: Cold butter and water help ensure a flaky tart crust.
- Use pie weights: Prevent the tart shells from puffing up during blind baking.
- Stir constantly during lemon filling: This prevents curdling and ensures a smooth custard.
- Whisk meringue over simmering water: Dissolves sugar fully for glossy, stable peaks.
- Chill tarts before meringue: Cold filling helps the meringue hold its shape longer.
How to Make Delightful Mini Lemon Tart with Lilac Meringue for Spring Bliss Recipe
Step 1: Prepare the Dough
Begin by pulsing the all-purpose flour and powdered sugar in your food processor until combined. Toss in the cold butter cubes and pulse until the mixture breaks down into a crumbly texture. Bring in the egg yolk and cold water, pulsing just enough for the dough to come together. Wrap the dough and chill it for 30 minutes—the resting time helps the butter firm up again, making rolling out a breeze.
💡 Pro Tip: Don’t overwork the dough to keep it tender and flaky.
Step 2: Bake the Tart Shells
While your dough chills, preheat the oven to 350°F (175°C). Once chilled, roll out the dough and gently press it into mini tart pans. Use a fork to prick the base to prevent swelling. Line each shell with parchment paper and fill with pie weights to hold the shape. Bake for 10 to 12 minutes until you see a golden crust forming around the edges. Let the shells cool completely—crispy shells make the perfect base for the lemon filling.
💡 Pro Tip: Save the pie weights to reuse for future tart baking.
Step 3: Make the Lemon Filling
In a saucepan over medium heat, whisk together fresh lemon juice, lemon zest, granulated sugar, and eggs. Stir without stopping for 8 to 10 minutes as the mixture thickens into a smooth custard. Remove from heat and whisk in cubed butter until velvety. Pour the filling evenly into your cooled tart shells, then place them in the fridge to chill for 1 hour, allowing the filling to set perfectly.
💡 Pro Tip: Use fresh lemon zest right before adding to release maximum aroma.
Step 4: Prepare the Lilac Meringue
Set a heatproof bowl over a pot of simmering water and combine egg whites, granulated sugar, and cream of tartar. Whisk gently until the sugar dissolves and the mixture feels warm. Remove the bowl and beat vigorously with an electric mixer until stiff, glossy peaks form—around 5 to 7 minutes. Stir in vanilla and a drop of violet food coloring to paint the meringue with the soft lilac shade. Pipe it onto the chilled tarts using a star tip for that pretty fluted effect.
💡 Pro Tip: Make sure no water gets into the egg whites; it will prevent them from whipping properly.
Step 5: Toast the Meringue
For a finishing flourish, gently toast the meringue tips with a kitchen torch until just golden. This adds subtle caramel notes and a beautiful contrast to the lilac shade, finishing off your Delightful Mini Lemon Tart with Lilac Meringue for Spring Bliss Recipe with style.
💡 Pro Tip: Be careful not to over-torch, or the meringue will scorch instead of crisp.
Common Mistakes to Avoid
Learn from these common pitfalls:
- Not chilling the dough enough: This can lead to difficult rolling and tough tart shells.
- Skipping pie weights: Your tart shell may puff up or lose its shape.
- Overcooking lemon filling: Can cause curdling and a grainy texture.
- Undissolved sugar in meringue: Results in gritty texture and unstable peaks.
- Adding food coloring before whipping: May hinder egg whites from reaching stiff peaks.
- Toasting meringue too aggressively: Turns it bitter rather than beautifully golden.
Delicious Variations to Try
Once you’ve mastered the classic Delightful Mini Lemon Tart with Lilac Meringue for Spring Bliss Recipe, consider experimenting with these enticing twists to keep the springtime fun going strong:
Lavender Meringue
Swap violet coloring for a touch of natural lavender essence in the meringue to deepen floral notes and complement the lemon perfectly.
Mixed Berry Filling
Add fresh raspberries or blueberries into the lemon filling before chilling to introduce bursts of vibrant berry flavor and color.
Coconut Crust
Incorporate shredded coconut into your tart dough for an exotic, nutty layer of flavor that pairs beautifully with citrus and lilac.
Rose Water Meringue
Replace vanilla with a few drops of rose water for a fragrant twist that feels like a garden in bloom on your palate.
For a delightful contrast, serve this tart alongside our 7 Bento Cake Ideas: Trendy Treats You Can Make Easily Recipe to impress guests with complementary sweet surprises.
How to Serve Delightful Mini Lemon Tart with Lilac Meringue for Spring Bliss Recipe
Garnishes
Adorn your mini tarts with fresh edible lilac blooms or delicate mint leaves to enhance the visual appeal and add fresh herbal notes.
Side Dishes
Pair these tarts with light herbal teas like chamomile or a crisp sparkling water infused with cucumber and lemon for a refreshing balance.
Creative Ways to Present
Arrange the tarts on a vintage cake stand or place them inside pretty pastel cupcake liners for a charming, Instagram-worthy springtime display. Alongside, you could offer a cheesecake option such as our creamy Best Cheesecake Recipe for guests craving a richer dessert.
Make Ahead and Storage
Make-Ahead Instructions
Prepare the tart shells and lemon filling up to 1 day in advance. Keep the shells and filling chilled separately for maximum freshness before assembling and piping the meringue.
Storage
Store finished tarts tightly covered in the refrigerator for up to 2 days to keep the meringue stable and the lemon filling fresh.
Freezing
Freeze tart shells before filling for up to one month. Lemon filling and meringue are best made fresh to preserve texture and flavor.
Reheating
The tarts are meant to be enjoyed chilled; avoid reheating to maintain the integrity of the meringue and crisp shell.
Expert Tips for Success
- Use fresh lemons: Their zest and juice bring the brightest, most natural flavor to your dessert.
- Beat egg whites in a clean bowl: Any grease can prevent perfect meringue peaks.
- Chill the filling thoroughly: This helps the meringue set beautifully without melting.
- Pipe meringue with flair: Using a star tip adds pretty texture and visual interest.
- Don’t rush the torching: Light, even strokes create the signature golden tips without burning.
- Sift powdered sugar for the dough: This keeps the crust silky and tender.
- Serve at room temperature: Let the tarts sit for a few minutes after taking out of the fridge to allow flavors to bloom.
Frequently Asked Questions
Can I make these tarts gluten-free?
Yes! Substitute the all-purpose flour with almond flour or a gluten-free blend, but be mindful the texture may be slightly different and adjust liquid ratios as needed.
How do I store leftover meringue tarts?
Keep them covered in an airtight container in the fridge and consume within 2 days for best flavor and texture.
Can I use other edible flowers for garnish?
Absolutely! Try violets, pansies, or rose petals for visually appealing and safe alternatives.
What if I don’t have a kitchen torch?
You can briefly place the tarts under a preheated broiler for 1–2 minutes, watching carefully to avoid burning the meringue.
Is the lemon filling cooked or raw?
The filling is gently cooked on the stove to create a smooth custard, ensuring both safety and luscious texture.
Can I prepare the meringue a day ahead?
It’s best to pipe and toast the meringue just before serving to maintain its fluffy texture and visual appeal.
How to get stiff peaks in meringue?
Use fresh egg whites at room temperature and beat using an electric mixer until the mixture is glossy and the peaks stand upright without collapsing.
Final Thoughts
Creating these Delightful Mini Lemon Tart with Lilac Meringue for Spring Bliss Recipe is like inviting a burst of sunshine and floral whimsy into your kitchen. Each bite is a joyful harmony of crisp crust, zesty lemon, and cloud-like meringue that carries the season’s spirit beautifully. This recipe is perfect for sharing with loved ones, adding a touch of elegance to your table while making sweet memories. So gather your ingredients, breathe in that fresh lemon aroma, and enjoy the art of springtime baking!
Related Recipes You’ll Love
If you enjoyed this recipe, you’ll also love these delicious recipes:
- Mini Fruit Tarts with Vanilla Pudding and Fresh Fruit Recipe – Brighten your dessert spread with these colorful tarts made from fresh fruit and creamy vanilla pudding.
Delightful Mini Lemon Tart with Lilac Meringue for Spring Bliss Recipe

This delightful Mini Lemon Tart with Lilac Meringue combines a buttery, crisp tart shell with a tangy lemon filling, topped with a beautifully colored lilac meringue, perfect for a spring celebration.
- Prep Time: 25 minutes
- Cook Time: 20 minutes
- Total Time: 2 hours 15 minutes
- Yield: 12 servings 1x
- Category: Dessert
- Method: Baking
- Cuisine: French-inspired
- Diet: Vegetarian
Ingredients
For the Tart Dough
- 1 cup All-purpose flour
- 1/4 cup Powdered sugar
- 1/2 cup Unsalted butter (Cold and cubed)
- 1 large Egg yolk
- 2 tbsp Cold water
For the Lemon Filling
- 1/2 cup Fresh lemon juice
- 1 tbsp Lemon zest
- 3/4 cup Granulated sugar
- 3 large Eggs
- 2 tbsp Unsalted butter (Cubed)
For the Lilac Meringue
- 3 large Egg whites
- 3/4 cup Granulated sugar
- 1/4 tsp Cream of tartar
- 1 tsp Vanilla extract
- 1 drop Violet food coloring
- 12 Edible lilac flowers
Instructions
- How to Make Mini Lemon Tart with Lilac Meringue
- Prepare the Dough: In a food processor, pulse together the flour and powdered sugar. Add the cold butter, pulsing until the mixture is crumbly. Mix in the egg yolk and cold water until the dough comes together. Chill for 30 minutes.
- Bake the Tart Shells: Preheat your oven to 350°F (175°C). Roll out the chilled dough and press it into mini tart pans, pricking the base with a fork. Line with parchment and fill with pie weights. Bake for 10–12 minutes until golden brown. Let cool completely.
- Make the Lemon Filling: In a saucepan, whisk together the lemon juice, lemon zest, sugar, and eggs. Cook over medium heat, stirring constantly until thickened, about 8–10 minutes. Once thickened, remove from heat and whisk in cubed butter until smooth. Allow to cool slightly, then pour into tart shells. Chill for 1 hour to set.
- Prepare the Lilac Meringue: In a heatproof bowl over simmering water, combine egg whites, sugar, and cream of tartar. Whisk until warm and the sugar dissolves. Remove from heat and beat with an electric mixer until stiff peaks form, about 5–7 minutes. Add vanilla and a few drops of violet food coloring to achieve the lilac hue. Pipe onto the chilled tarts using a star tip.
- Toast the Meringue: Gently use a kitchen torch to lightly toast the tips of the meringue until they are golden.
Notes
- Chill the dough to help it firm up, making it easier to roll and shape.
- Use pie weights to prevent the tart shells from puffing when baking.
- Be careful not to overcook the lemon filling; constant stirring ensures smoothness.
- The meringue is best toasted with a kitchen torch for a delicate finish.
Keywords: mini lemon tart, lilac meringue tart, spring dessert, lemon tart recipe, floral meringue
