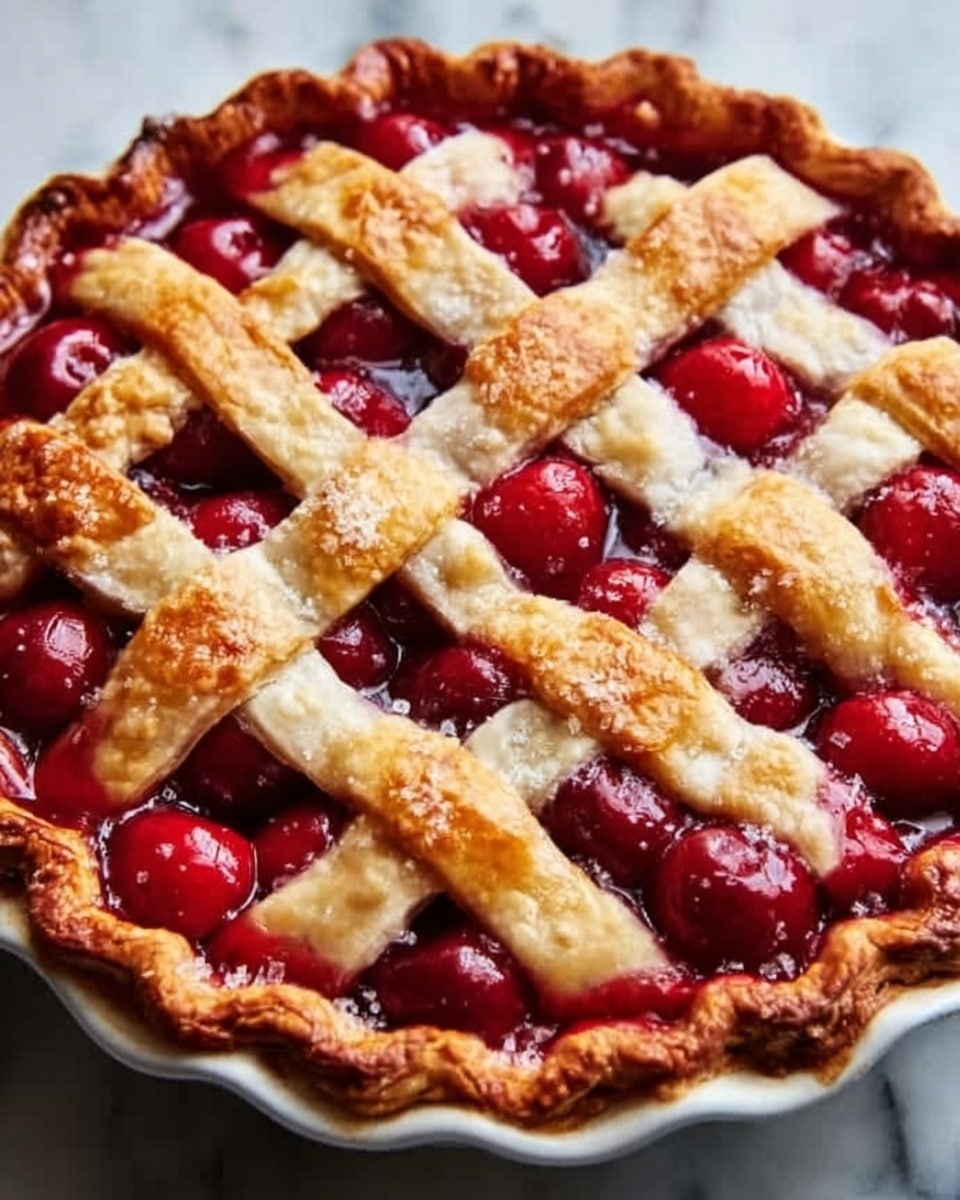
Fresh Cherry Pie Recipe
I never thought I’d find a Fresh Cherry Pie Recipe easier than this, but here it is: juicy, vibrant cherries bubbling with just the right touch of sweetness and nestled inside a golden, flaky crust that practically melts in your mouth. Just imagining the inviting aroma wafting from the oven gets my mouth watering every time I make it. Whether it’s a special gathering or a cozy night in, this pie promises a comforting, homemade dessert experience bursting with pure cherry goodness.
Why You’ll Love This Fresh Cherry Pie Recipe
- Bursting with Flavor: The luscious homemade cherry filling combines fresh cherries, lemon juice, and vanilla extract for a perfect balance of sweet and tangy.
- Simple Ingredients: Using pantry staples like all-purpose flour, granulated sugar, and cornstarch alongside fresh cherries makes this recipe approachable and satisfying.
- Crafted for Flakiness: Chilling the buttery dough before rolling ensures a flaky, tender crust every time, elevating your cherry pie to bakery-worthy status.
- Perfect for Sharing: This recipe yields 8 generous servings, making it an excellent centerpiece for family dinners or celebrations.
- Patience Rewards: Though it takes around 1 hour and 55 minutes total, the time invested—including chilling and baking—results in a pie that’s definitely worth the wait.
Why This Fresh Cherry Pie Recipe Works
This recipe employs a classic baking method that guarantees success. The key is simmering fresh cherries with cornstarch and sugar to create a luscious, thickened filling that clings beautifully to the crust without sogginess. Chilling the dough for a minimum of 30 minutes is another secret—cold butter in the dough forms flaky layers as it bakes. The top crust secured with slits allows steam to escape, keeping the pie looking golden and enticing after baking in a preheated 425°F oven. These carefully timed steps ensure your Fresh Cherry Pie Recipe comes out perfectly every time.
Ingredients You’ll Need
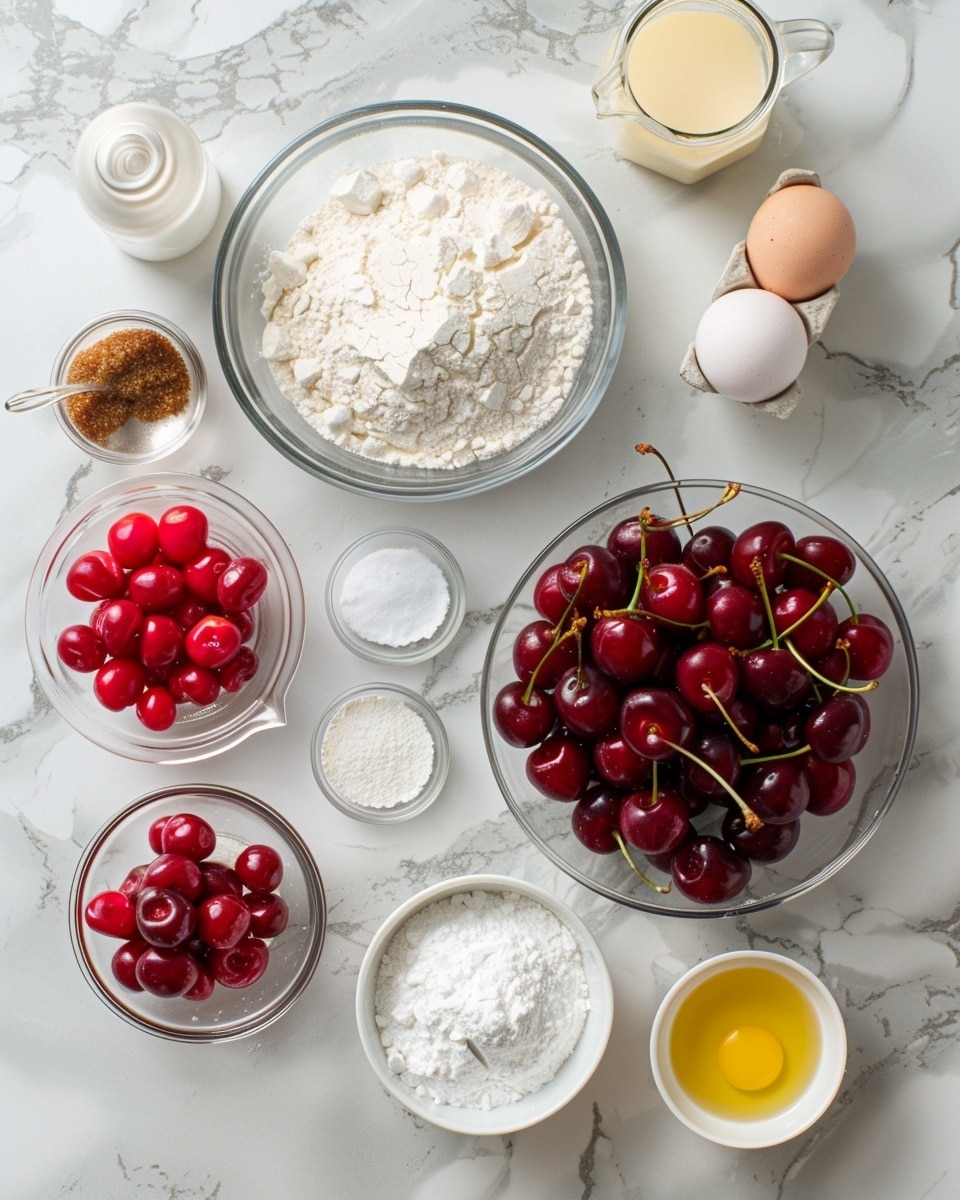
Gather these vibrant, fresh ingredients to craft the perfect cherry pie, plus a few staple pantry items that form the backbone of that flaky crust.
- 6 cups fresh cherries, pitted: The star of the show, bursting with juicy sweetness and a hint of tartness that defines this classic dessert.
- 1 tablespoon fresh lemon juice: Adds a bright zing that elevates the cherry filling’s flavor complexity.
- 1/2 teaspoon vanilla extract: Infuses warmth and depth into the filling.
- 3/4 cup granulated sugar: Balances the tart cherries with just the right touch of sweetness.
- 2 tablespoons cornstarch: Thickens the cherry juices to a beautifully glossy, sliceable filling.
- 2 and 1/2 cups all-purpose flour: Forms the base of the buttery crust, providing structure and tenderness.
- 1 cup unsalted butter, cold and cubed: Essential for creating that flaky, melt-in-your-mouth crust texture.
- 1/4 cup cold water: Brings the dough together without warming the butter, preserving flakiness.
- 1 large egg, beaten (for egg wash): Gives the crust a glossy, golden finish when baked.
Ingredient Substitutions & Tips
- Fresh cherries: If fresh are not in season, frozen cherries (thawed and drained) can substitute, but fresh always provides the brightest flavor and texture.
- Unsalted butter: You can use salted butter but reduce added salt in the dough slightly.
- Cold water: Substitute with an ice cube slowly incorporated to keep dough chilled.
- Vanilla extract: A splash of almond extract can add a lovely, complementary flavor twist.
👨🍳 Pro Tips for Perfect Results
- Keep everything cold: Chill your butter, water, and dough to ensure a flaky crust.
- Don’t rush the filling: Let the cherry mixture simmer until thickened for perfect texture.
- Use a rimmed baking sheet: Place your pie on one to catch any drips during baking.
- Let the pie cool fully: This helps the filling set up for clean, beautiful slices.
- Seal the edges tightly: Prevent leaks and keep your pie looking flawless.
How to Make Fresh Cherry Pie Recipe
Step 1: Prepare cherry filling
Begin by heating fresh, pitted cherries with lemon juice, vanilla extract, sugar, and cornstarch in a saucepan over medium heat. Let it gently simmer for about 10 minutes until the filling thickens and the cherries soften. You’ll notice how the mixture transforms into a glossy, luscious cherry sauce packed with flavor.
💡 Pro Tip: Stir frequently to prevent sticking and ensure even thickening.
Step 2: Preheat oven and prepare pie plate
While your filling cools, set your oven to a toasty 425°F (220°C). Butter your 9-inch pie plate generously to keep the crust from sticking and to add a hint of richness.
💡 Pro Tip: Using a metal or glass pie plate affects baking time slightly; keep an eye on your crust’s color.
Step 3: Make the dough
In a large bowl, whisk together all-purpose flour and granulated sugar, then cut in cold cubed butter using your fingers, a pastry cutter, or forks until the mixture resembles coarse crumbs. Slowly drizzle in cold water, just enough to bring the dough together. Divide into two balls, wrap tightly in plastic, and chill for at least 30 minutes. This step is crucial for that coveted flaky texture.
💡 Pro Tip: Avoid overworking the dough to keep it tender and flaky.
Step 4: Roll bottom crust
On a floured surface, roll out one dough ball into a circle large enough to fit your pie plate. Gently transfer it to your prepared pie plate and press it down evenly, trimming any excess dough over the edges.
💡 Pro Tip: Rolling between two sheets of parchment paper helps prevent sticking.
Step 5: Assemble pie
Pour the cooled cherry filling into your crust. Then roll out the second ball of dough and carefully lay it atop the pie. Seal the edges by crimping them together, and cut slits in the top crust to let steam escape during baking, which keeps your pie from getting soggy.
💡 Pro Tip: Brush any leftover egg wash inside the sealed edges for a golden-brown finish.
Step 6: Apply egg wash and bake
Give the top crust a beautiful shine by brushing it with beaten egg. Place the pie on a rimmed baking sheet, then bake for about 60 minutes or until the crust turns a gorgeous golden brown. Once baked, allow the pie to cool thoroughly on a wire rack before slicing.
💡 Pro Tip: If the edges brown too quickly, shield them with foil halfway through baking.
Common Mistakes to Avoid
Learn from these common pitfalls:
- Rushing dough chilling: Skipping the 30-minute chill can result in a crumbly, tough crust.
- Using unripe cherries: Tart, under-ripe cherries lack sweetness, impacting the filling’s flavor.
- Not thickening the filling properly: Insufficient simmering leaves a runny pie that won’t slice well.
- Overfilling the pie: Can cause the filling to bubble over and create a mess in your oven.
- Failing to vent the top crust: Keeps steam trapped, leading to soggy crust and potentially bursting edges.
- Cutting into the pie too soon: Prevents the filling from setting, resulting in a sloppy slice.
Delicious Variations to Try
Once you’ve mastered this classic Fresh Cherry Pie Recipe, why not experiment with a few delightful twists?
Mixed Berry Cherry Pie
Combine fresh cherries with blueberries and raspberries for a colorful, juicy medley that adds complexity and bursts of flavor with every bite.
Almond Cherry Pie
Add a teaspoon of almond extract to your filling and sprinkle sliced almonds on the crust for a nutty aroma and crunch that perfectly complements the cherries.
Spiced Cherry Pie
Introduce warming spices like cinnamon and nutmeg to the filling for a cozy, comforting dessert ideal for cooler months.
Mini Fruit Tarts with Vanilla Pudding and Fresh Fruit
If you’re looking for a stunning accompaniment or alternative, try our Mini Fruit Tarts with Vanilla Pudding and Fresh Fruit Recipe—a fresh, elegant way to showcase seasonal fruits alongside creamy vanilla pudding.
How to Serve Fresh Cherry Pie Recipe
Garnishes
Top slices with a dollop of freshly whipped cream or a scoop of rich vanilla ice cream to add creamy contrast to the tart cherry filling. Garnish with a sprinkle of toasted almond slivers or a light dusting of powdered sugar for a beautiful finishing touch.
Side Dishes
This Fresh Cherry Pie pairs wonderfully with a simple green salad for a summer meal, or alongside a hot cup of coffee or spiced tea to round out an afternoon treat.
Creative Ways to Present
Serve your cherry pie in quaint individual ramekins or mini pie tins for personal portions that impress your guests. For a fun twist, layer warmed pie slices with spoonfuls of mascarpone cheese or cream cheese spread to create a decadent dessert parfait.
For a full meal, pair your pie with our Best Cheesecake Recipe for a dessert duo that will impress any crowd.
Make Ahead and Storage
Make-Ahead Instructions
You can prepare the pie dough up to two days in advance—simply wrap it tightly in plastic wrap and chill in the refrigerator. The cherry filling can also be made a day ahead; just keep it covered in the fridge. Assemble and bake when ready.
Storage
Store leftover Fresh Cherry Pie in the refrigerator, covered loosely with foil or plastic wrap, for up to 3 days. The flavors deepen beautifully as it rests!
Freezing
This pie freezes well either baked or unbaked. Wrap securely in plastic wrap and foil, and freeze for up to 2 months. Thaw overnight in the fridge before baking or serving.
Reheating
To enjoy warm pie slices, reheat in a 350°F oven for about 15 minutes. This helps refresh the crust’s crispness and gently warms the filling without drying it out.
Expert Tips for Success
- Use fresh, ripe cherries whenever possible for the best flavor and texture.
- Keep your hands cool when handling pastry dough to prevent melting the butter prematurely.
- Roll dough evenly to avoid thick or uneven spots that can affect baking times.
- Seal and crimp edges tightly to trap filling and prevent leakage while baking.
- Brush with egg wash just before baking for that perfect golden, glossy crust.
- Place pie on a baking sheet to catch overflow and keep your oven clean.
- Allow pie to cool completely before slicing for clean, neat pieces.
Frequently Asked Questions
Can I use frozen cherries instead of fresh?
Yes, but thaw and drain them well to avoid a watery filling. Fresh cherries deliver the best flavor and texture for this recipe.
How do I prevent a soggy bottom crust?
Make sure to cool the filling completely before assembling and bake on a preheated oven for even heat. Using a rimmed baking sheet also helps catch drips and keeps the crust crisp.
Can I make the pie dough ahead of time?
Absolutely! Wrapping the dough tightly and chilling it in the fridge for up to two days enhances the crust’s flakiness.
What if my filling bubbles over during baking?
Place the pie on a rimmed baking tray to catch any spills. Also, avoid overfilling and ensure you’ve cut ventilation slits on the top crust to let steam escape.
How long should I let the pie cool before serving?
Allow at least 2 hours for the filling to set properly to achieve clean slices, but it also tastes fantastic slightly warm with ice cream.
Can I add other fruits to the cherry filling?
Yes! Mixing in berries or stone fruits can add fun flavor layers, just be mindful of added moisture that may affect baking time.
Is this recipe suitable for vegetarians?
Yes, this Fresh Cherry Pie Recipe uses no animal-based gelatin or meat ingredients, making it a perfect vegetarian dessert option.
Final Thoughts
This Fresh Cherry Pie Recipe captures the essence of warm kitchens and happy gatherings, combining the juicy burst of fresh cherries with a tender, buttery crust—a classic that never goes out of style. Making this pie is not just about the final dessert but the joyful process—the aroma filling your home, the anticipation as it bakes, and the smiles when it’s served. Invite your loved ones to share in this delicious tradition, and savor every bite of your homemade cherry delight.
Related Recipes You’ll Love
If you enjoyed this recipe, you’ll also love these delicious recipes:
- Best Cheesecake Recipe – Foodarohub – Rich, creamy, and endlessly customizable, this cheesecake is a surefire crowd-pleaser for any dessert table.
- Mini Fruit Tarts with Vanilla Pudding and Fresh Fruit Recipe – Foodarohub – Delicate and fresh, these tarts brighten any occasion with vibrant fruit atop silky vanilla pudding.
Related Recipes You’ll Love
If you enjoyed this recipe, you’ll also love these delicious recipes:
- Magic Lemon Custard Cake Recipe – Foodarohub – A zesty and creamy lemon custard cake that’s perfect for those who love bright, citrusy desserts with a tender crumb.
Fresh Cherry Pie Recipe

This Fresh Cherry Pie features a luscious homemade cherry filling simmered to perfection and encased in a buttery, flaky double crust, creating a delightful dessert perfect for any occasion.
- Prep Time: 40 minutes
- Cook Time: 1 hour 10 minutes
- Total Time: 2 hours 20 minutes
- Yield: 8 servings 1x
- Category: Dessert
- Method: Baking
- Cuisine: American
- Diet: Vegetarian
Ingredients
Filling
- 6 cups fresh cherries, pitted
- 1 tablespoon fresh lemon juice
- 1/2 teaspoon vanilla extract
- 3/4 cup granulated sugar
- 2 tablespoons cornstarch
Crust
- 2 and 1/2 cups all-purpose flour
- 1 cup unsalted butter, cold and cubed
- 1/4 cup cold water
- 1 large egg, beaten (for egg wash)
Instructions
- Make the filling: In a saucepan over medium heat, combine fresh cherries, lemon juice, vanilla extract, granulated sugar, and cornstarch. Simmer for about 10 minutes until thickened. Remove from heat and let cool completely.
- Prepare oven and pie plate: Preheat your oven to 425°F (220°C) and butter a 9-inch pie plate.
- Make the crust: In a large mixing bowl, whisk together flour and granulated sugar. Cut in the cold butter until crumbly. Gradually add cold water to form the dough. Divide into two balls, wrap in plastic wrap, and chill for at least 30 minutes.
- Roll out bottom crust: Roll out one ball of dough on a floured surface to fit your pie plate; transfer to the prepared plate.
- Assemble the pie: Pour cooled cherry filling into the crust. Roll out the second ball of dough, place over the filling, seal edges by crimping together, and cut slits for ventilation.
- Finish and bake: Brush the top crust with beaten egg for shine. Bake on a rimmed baking sheet for about 60 minutes or until golden brown. Allow cooling before serving.
Notes
- Chilling the dough for at least 30 minutes helps to create a flakier crust.
- Cooling the filling completely before assembling prevents a soggy crust.
- Use a rimmed baking sheet to catch any spills during baking.
Keywords: cherry pie recipe, homemade cherry pie, fresh cherry dessert, flaky pie crust, summer fruit pie