
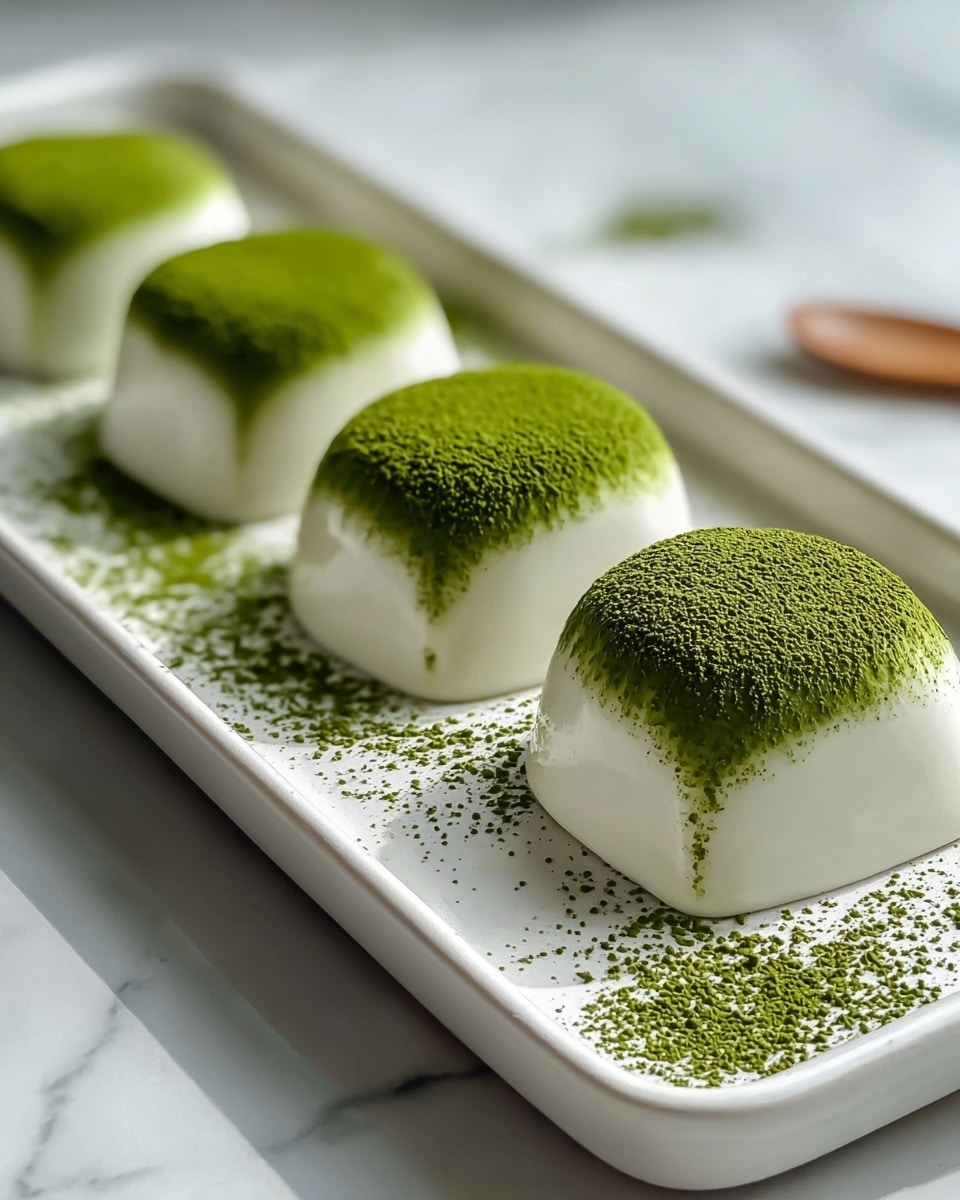
Homemade Matcha Cheesecake Daifuku Recipe
Picture this: a tender, pillowy mochi embracing a luscious, creamy center infused with the delicate earthiness of matcha. The delightful contrast between the chewy exterior and the smooth, rich cheesecake filling creates an unforgettable bite that dances on your palate. This Homemade Matcha Cheesecake Daifuku Recipe is a luscious fusion of textures and flavors that will wow your senses and leave you craving more.
Why You’ll Love This Homemade Matcha Cheesecake Daifuku Recipe
- Exquisite Flavor Fusion: The harmonious blend of bitter, aromatic matcha with the silky tang of cheesecake creates an indulgent treat you won’t find anywhere else.
- Simple Ingredients: You only need a handful of pantry staples like glutinous rice flour, cream cheese, and matcha powder—perfect for whipping up this dessert even on a whim.
- Perfect Textural Contrast: From the chewy, tender mochi dough to the velvety, dreamy filling, every bite is an exciting interplay of softness and richness.
- Impressive Presentation: These elegant daifuku make stunning little desserts for parties, gifts, or a special treat that will impress friends and family alike.
- Carefully Timed Process: Although the total making time is around 3 hours and 10 minutes, much of this is passive freezing and chilling, allowing you to relax while the magic happens.
Why This Homemade Matcha Cheesecake Daifuku Recipe Works
This recipe shines thanks to two key techniques: first, the smooth matcha cheesecake filling that’s whipped until luxuriously thick and then frozen ensures the center holds perfectly within the mochi shell. Second, steaming the glutinous rice flour mixture produces that signature translucent, elastic dough crucial for the chewy texture everyone craves. The gentle kneading with melted butter adds softness and a subtle richness to the dough, bringing balance to the overall mouthfeel. These thoughtful steps combined with patience in chilling and assembling guarantee a flawless homemade daifuku that’s simply irresistible.
Ingredients You’ll Need
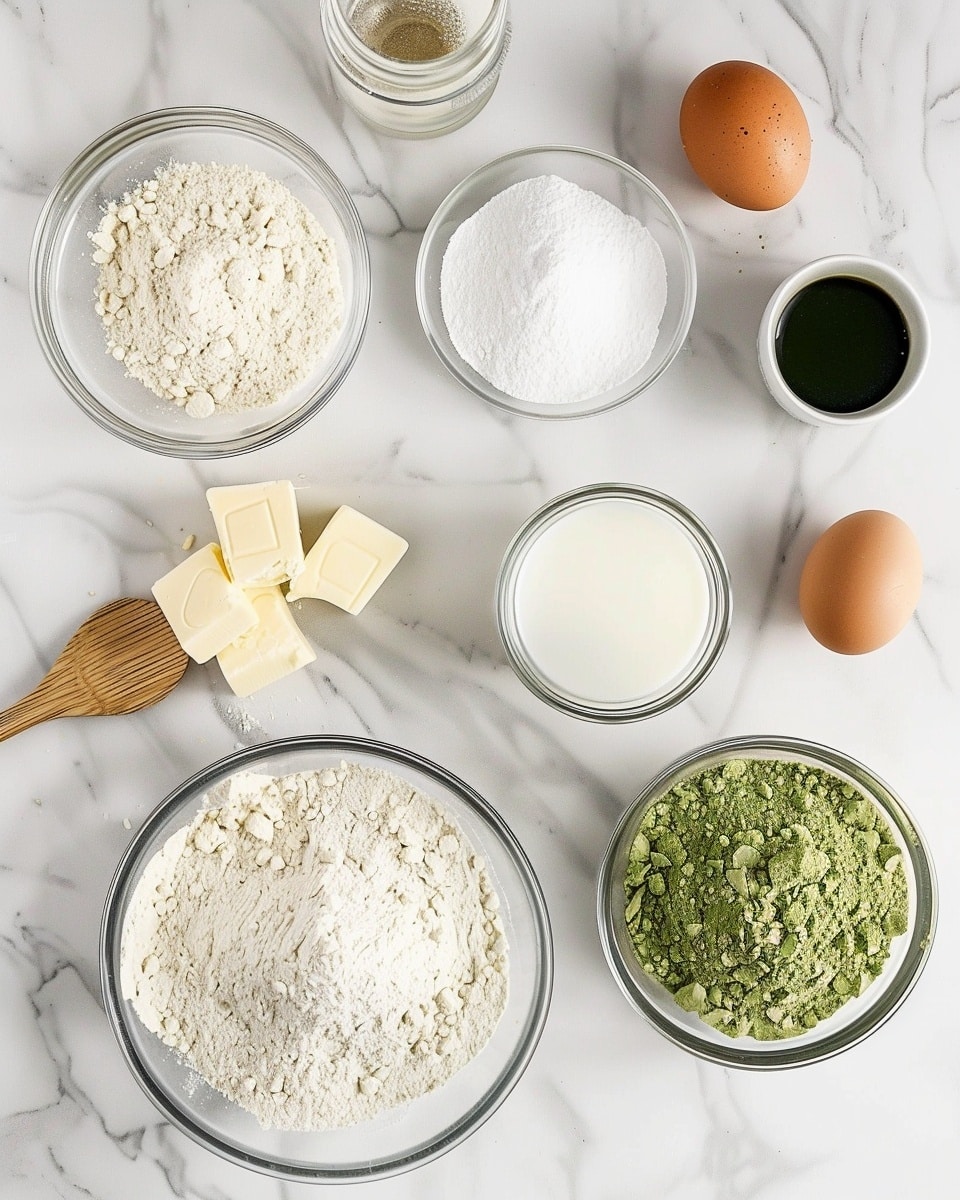
Gather a few key star ingredients that tell a story of traditional Japanese sweets with a creamy twist—a little bit of matcha magic meeting classic cheesecake elegance.
- 8 oz Cream Cheese (Ensure it is softened): This creamy base gives the cheesecake filling its luscious richness.
- 1/2 cup Granulated Sugar (Adjust according to taste): Sweetness that balances the earthy matcha beautifully.
- 2 tbsp Matcha Powder (Use high-quality matcha): The heart of the recipe, imparting that vibrant green hue and refined flavor.
- 1 cup Heavy Cream (Chill before use): For a silky-smooth, whipped filling that holds its shape.
- 1 cup Glutinous Rice Flour (Essential for chewy texture): Creates the iconic soft mochi exterior.
- 1/4 cup Cornstarch (Reduces stickiness): Keeps the mochi manageable and delightfully tender.
- 1/2 cup Whole Milk (Incorporates moisture): Helps make the mochi dough soft without heaviness.
- 2 tbsp Unsalted Butter (Melt into dough): Adds richness and a subtle smoothness to the chewy exterior.
- 1/4 cup Cooked Glutinous Rice Flour/Cornstarch (For dusting): Prevents sticking while shaping your daifuku.
- 2 tbsp Optional Matcha Powder (For additional dusting): For that extra touch of elegance and color on top.
Ingredient Substitutions & Tips
- Cream Cheese: You can use mascarpone for an even creamier filling or a dairy-free cream cheese alternative for a vegan twist.
- Heavy Cream: Coconut cream works well here if you need a dairy-free option and adds a subtle tropical nuance.
- Matcha Powder: Always go for ceremonial-grade or culinary-grade matcha for the brightest flavor and color; avoid gimmicky brands with fillers.
- Unsalted Butter: Use a plant-based butter substitute if you prefer to keep it vegan or dairy-free without sacrificing richness.
👨🍳 Pro Tips for Perfect Results
- Use chilled heavy cream: It whips better and thickens your filling for that perfect scoopable texture.
- Strain the milk mixture: This keeps your mochi dough silky and lump-free—essential for smoothness.
- Work quickly when shaping: Mochi can get sticky fast, so dust generously with cooked rice flour or cornstarch.
- Freeze the cheesecake filling: This keeps your daifuku center intact without melt-through during assembly.
- Don’t skip refrigerating the finished daifuku: It helps the flavors meld and enhances chewiness.
How to Make Homemade Matcha Cheesecake Daifuku Recipe
Step 1: Preparation
Blend the softened cream cheese and granulated sugar until perfectly smooth. Then stir in the vibrant matcha powder, mixing thoroughly so every bite bursts with that green tea goodness. Finally, whisk in chilled heavy cream, watching the mixture thicken into a luscious filling. Pipe dollops onto plastic wrap and tuck them into your freezer for at least 2 hours until completely solid.
💡 Pro Tip: Use a piping bag or a small spoon to create uniform dollops for easy wrapping later on.
Step 2: Make the Dough
Combine glutinous rice flour, cornstarch, and sugar in a big bowl. Gradually pour in the whole milk while straining it through a fine sieve to beat out any lumps. This silky-smooth batter then needs steaming for about 20 minutes—keep an eye out as it turns translucent, signaling the mochi dough is ready for the next step.
💡 Pro Tip: Cover the steaming bowl with plastic wrap to prevent water droplets from spoiling the dough’s texture.
Step 3: Knead Dough
When the dough is still warm and inviting, mix in the melted unsalted butter for an extra touch of richness. Knead it gently until the dough becomes smooth, pliable, and slightly elastic—a perfect balance that’s soft but easy to handle.
💡 Pro Tip: If the dough is too sticky, dust your hands with cornstarch to make kneading easier without drying it out.
Step 4: Assembling
Divide the dough into 40g balls—you’ll want uniform pieces for consistent size and cooking. Flatten each ball into a disc about ¼-inch thick, making sure the center is a bit thicker than the edges so it can hold the filling beautifully.
💡 Pro Tip: Using plastic wrap under the dough helps shape and transfer the discs easily.
Step 5: Fill Mochi
Place each frozen cheesecake dollop squarely in the center of your mochi disc. Carefully pinch the edges of the dough up and around to seal the filling completely, making sure no gaps peek through. After shaping, dust each daifuku generously with cooked glutinous rice flour to prevent sticking, then lay them gently on a tray.
💡 Pro Tip: Handle the dough gently to avoid tearing and leakage of the filling.
Step 6: Refrigerate
Pop the assembled daifuku into the fridge for at least 30 minutes. This resting period is crucial—it lets all those tempting flavors mingle while giving the mochi the perfect chewiness that makes this dessert so addictive.
💡 Pro Tip: Serve chilled for a refreshing texture contrast between tender dough and creamy center.
Step 7: Finishing Touch
Optionally, sprinkle a little extra matcha powder over the daifuku for an elegant finish and an intensified green tea aroma that will greet your guests beautifully.
💡 Pro Tip: Use a fine-mesh sieve to dust matcha evenly without clumps.
Common Mistakes to Avoid
Learn from these common pitfalls:
- Skipping the freezing step: Without freezing the filling, it can melt and make the mochi soggy during assembly.
- Not dusting enough flour: Mochi dough is naturally sticky; without ample dusting, it’s frustrating to work with and tears easily.
- Oversteaming the dough: Too much steaming makes the mochi overly sticky and difficult to shape.
- Using low-quality matcha: A dull matcha powder masks the signature vibrant color and earthy flavor.
- Neglecting to refrigerate after assembly: The flavors won’t meld, and the chewy texture suffers.
- Pressing dough too thin: If edges aren’t thick enough during assembly, filling can leak and mochi won’t hold shape.
Delicious Variations to Try
Once you’ve mastered this classic, why not mix things up a bit?
Strawberry Matcha Cheesecake Daifuku
Add a small whole strawberry to your matcha cheesecake filling for a juicy surprise that pairs beautifully with the green tea’s earthiness.
Black Sesame Twist
Incorporate black sesame paste into the cheesecake filling for a nutty twist that complements the mochi texture perfectly.
Matcha Panna Cotta Filling
Try substituting the filling with a chilled Matcha Panna Cotta Recipe – Foodarohub for a lighter, silky contrast to the chewy dough.
Coconut Cream Filling
Replace heavy cream with coconut cream and add shredded coconut for a tropical spin that enhances the chewy mochi exterior.
Classic Cheesecake Variation
Switch out matcha powder from the filling and try a plain cheesecake flavor—if you love cheesecake, our Best Cheesecake Recipe – Foodarohub can inspire your daifuku centers!
How to Serve Homemade Matcha Cheesecake Daifuku Recipe
Garnishes
Sprinkle some toasted sesame seeds, edible gold flakes, or additional sifted matcha powder over your daifuku to elevate the visual appeal and add a subtle flavor boost.
Side Dishes
Pair these delights with a warm cup of freshly brewed green tea or genmaicha to complement and enhance the matcha notes.
Creative Ways to Present
Arrange the daifuku on a decorative slate board dusted lightly with matcha powder, placing small edible flowers or fresh mint leaves in between for a stunning dessert platter.
Make Ahead and Storage
Make-Ahead Instructions
You can prepare the cheesecake filling and freeze it up to 2 days in advance. The mochi dough can also be steamed and kept warm, but assembling fresh just before serving is best.
Storage
Refrigerate assembled daifuku in an airtight container; they will stay fresh and chewy for up to 3 days.
Freezing
Freezing the filled daifuku is possible but may slightly alter the texture. If freezing, wrap individually in plastic wrap and consume within 1 month for best quality.
Reheating
Allow frozen daifuku to thaw overnight in the refrigerator, then serve chilled. Avoid microwaving as it can ruin the delicate mochi texture.
Expert Tips for Success
- Use plastic wrap while piping the filling: It ensures neat portions that’re easy to handle.
- Work in small batches: Mochi dough firms quickly so divide and shape promptly.
- Maintain consistent dough thickness: This keeps the daifuku sizes uniform for even cooking.
- Sift your matcha powder: Helps avoid clumps and creates a smooth blend in both dough and filling.
- Keep your workspace dusted: Flour or cornstarch on surfaces prevents sticking and tearing.
- Chill heavy cream thoroughly before whipping: Cold cream whips faster and forms firmer peaks for stable filling.
Frequently Asked Questions
Can I make this recipe vegan?
Yes! Substitute cream cheese with a vegan alternative, use coconut cream instead of heavy cream, and replace butter with a plant-based spread. Just be sure the matcha powder is pure and free from additives.
Why is my mochi dough sticky and hard to handle?
Sticky dough usually means not enough dusting. Be generous with cooked glutinous rice flour or cornstarch on your hands and workspace to prevent sticking. Also, don’t oversteam the dough, which can make it overly sticky.
How should I store leftover daifuku?
Store them in an airtight container in the refrigerator for up to 3 days. For longer storage, freezing is possible, but texture can change slightly.
Can I prepare the cheesecake filling without freezing?
Freezing the filling solidifies it, making it easier to work with inside the mochi and preventing melting or leakage. So, freezing is highly recommended.
What kind of matcha powder is best?
Use high-quality ceremonial or culinary-grade matcha powder. Avoid blends or flavored matcha to ensure a vibrant green color and authentic taste.
Is it possible to bake the cheesecake filling instead of freezing?
This recipe relies on the chilled, unbaked cheesecake filling for proper texture inside the mochi. Baking would alter its consistency and is not recommended here.
Can I make the mochi dough ahead of time?
Yes, you can steam the dough ahead but keep it wrapped and warm to avoid drying. Best to assemble shortly after making for optimal texture.
Final Thoughts
There’s something truly magical about crafting your own Homemade Matcha Cheesecake Daifuku Recipe. The delicate balance of silky matcha-filled cheesecake and the tender chew of fresh mochi creates a treat that feels both luxurious and comforting. Whether you’re serving these at a celebration or enjoying a quiet moment with tea, this dessert captures the pure joy of beloved Japanese flavors and textures. I hope you’ll delight in making and sharing these little green treasures as much as I do!
Related Recipes You’ll Love
If you enjoyed this recipe, you’ll also love these delicious recipes:
- Matcha Panna Cotta Recipe – Foodarohub – A silky, elegant dessert highlighting matcha in a creamy panna cotta that makes for a perfect palate cleanser or light treat.
- Best Cheesecake Recipe – Foodarohub – Discover the ultimate classic cheesecake with a rich, smooth filling and crisp crust, great for fans of decadent desserts.
Related Recipes You’ll Love
If you enjoyed this recipe, you’ll also love these delicious recipes:
- New York Cheesecake Recipe – Foodarohub – Dive into this iconic creamy cheesecake topped with sour cream, sweet, and perfect for any occasion demanding a crowd-pleaser.
Homemade Matcha Cheesecake Daifuku Recipe

This Homemade Matcha Cheesecake Daifuku combines a chewy, glutinous mochi exterior with a creamy, rich matcha-flavored cheesecake filling, delivering a delightful fusion of textures and flavors.
- Prep Time: 20 minutes
- Cook Time: 20 minutes
- Total Time: 3 hours 10 minutes
- Yield: 8 servings 1x
- Category: Dessert
- Method: Steaming
- Cuisine: Japanese
- Diet: Vegetarian
Ingredients
Filling
- 8 oz Cream Cheese (Ensure it is softened)
- 1/2 cup Granulated Sugar (Adjust according to taste)
- 2 tbsp Matcha Powder (Use high-quality matcha)
- 1 cup Heavy Cream (Chill before use)
Dough
- 1 cup Glutinous Rice Flour (Essential for chewy texture)
- 1/4 cup Cornstarch (Reduces stickiness)
- 1/2 cup Whole Milk (Incorporates moisture)
- 2 tbsp Unsalted Butter (Melt into dough)
For Dusting
- 1/4 cup Cooked Glutinous Rice Flour/Cornstarch (For dusting)
- 2 tbsp Optional Matcha Powder (For additional dusting)
Instructions
- Preparation Blend the softened cream cheese and granulated sugar until smooth. Add the matcha powder and mix well, then whisk in the heavy cream until the filling thickens. Pipe dollops onto plastic wrap and freeze for at least 2 hours until solid.
- Steaming the Dough In a large bowl, combine glutinous rice flour, cornstarch, and sugar. Gradually mix in the whole milk while straining to create a smooth, lump-free batter. Steam this mixture for about 20 minutes until translucent.
- Kneading Once the dough is steamed, stir in the melted unsalted butter while it’s still warm. Knead until the dough is smooth and elastic; it should be warm but manageable to touch.
- Assembling Divide the dough into 40g balls, flatten each ball into a disc shape about ¼-inch thick, ensuring the center is slightly thicker than the edges.
- Filling Place a frozen cheesecake ball in the center of each mochi disc. Carefully pinch the edges of the dough together to seal the filling completely. Dust with extra glutinous rice flour and place on a tray.
- Chilling Refrigerate the assembled daifuku for at least 30 minutes before serving to help the flavors meld beautifully and enhance the chewy texture.
- Optional Dusting Optional: Dust finished daifuku with additional matcha powder for an extra touch of flavor and elegance.
Notes
- Adjust granulated sugar according to taste.
- Use high-quality matcha powder for best flavor.
- Chilling the heavy cream before use helps achieve proper filling texture.
- Dusting with glutinous rice flour or cornstarch helps prevent sticking.
- Freezing the filling for at least 2 hours is essential to maintain shape inside the daifuku.
- Refrigerate the assembled daifuku for 30 minutes to enhance chewy texture and flavor melding.
Keywords: Matcha Cheesecake Daifuku, homemade mochi, matcha dessert, chewy mochi dessert, Japanese sweets
