
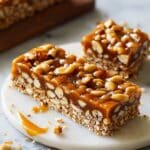
Honey Nut Bars Recipe
Picture this: the warm scent of honey mingling with toasted nuts and a hint of orange zest filling your kitchen, promising a wholesome treat that’s both crunchy and chewy. These Honey Nut Bars are pure comfort wrapped in golden brown perfection, making every bite feel like a little celebration of natural sweetness and nutty goodness. Whether you need a grab-and-go snack or a cozy nibble with your tea, this recipe hits every note just right.
Why You’ll Love This Honey Nut Bars Recipe
- Rich, natural flavors: The blend of cashews, almonds, pecans, and shredded coconut creates a flavor symphony that’s enhanced perfectly by honey and a touch of warm spices like cinnamon and ginger.
- Simple ingredients: Made with pantry staples and natural sweeteners, this snack is wholesome and nourishing without any complicated additives.
- Perfect size and servings: This recipe yields 16 bars, ideal for portion control, snacking throughout the week, or sharing with friends and family.
- Textural delight: The careful chopping of nuts to around 1/4 inch ensures every bar is satisfyingly crunchy, yet easy to bite through.
- Made in around 1 hour and 5 minutes: With 15 minutes prep, 20 minutes baking, and some cooling time, these bars come together with a leisurely yet efficient rhythm.
Why This Honey Nut Bars Recipe Works
This Honey Nut Bars recipe shines thanks to the balance of texture and flavor, achieved by finely chopping the nuts and combining them with shredded coconut and fragrant orange zest. Baking at a moderate 350°F allows the honey to caramelize slightly, binding everything into a golden bar without burning the nuts or coconut. The parchment paper lining—left with flaps—serves double duty, letting you easily lift and compress the bars while they cool, ensuring they hold together perfectly. These thoughtful little steps guarantee a bar that’s both delicious and sturdy enough for a quick snack on the go.
Ingredients You’ll Need
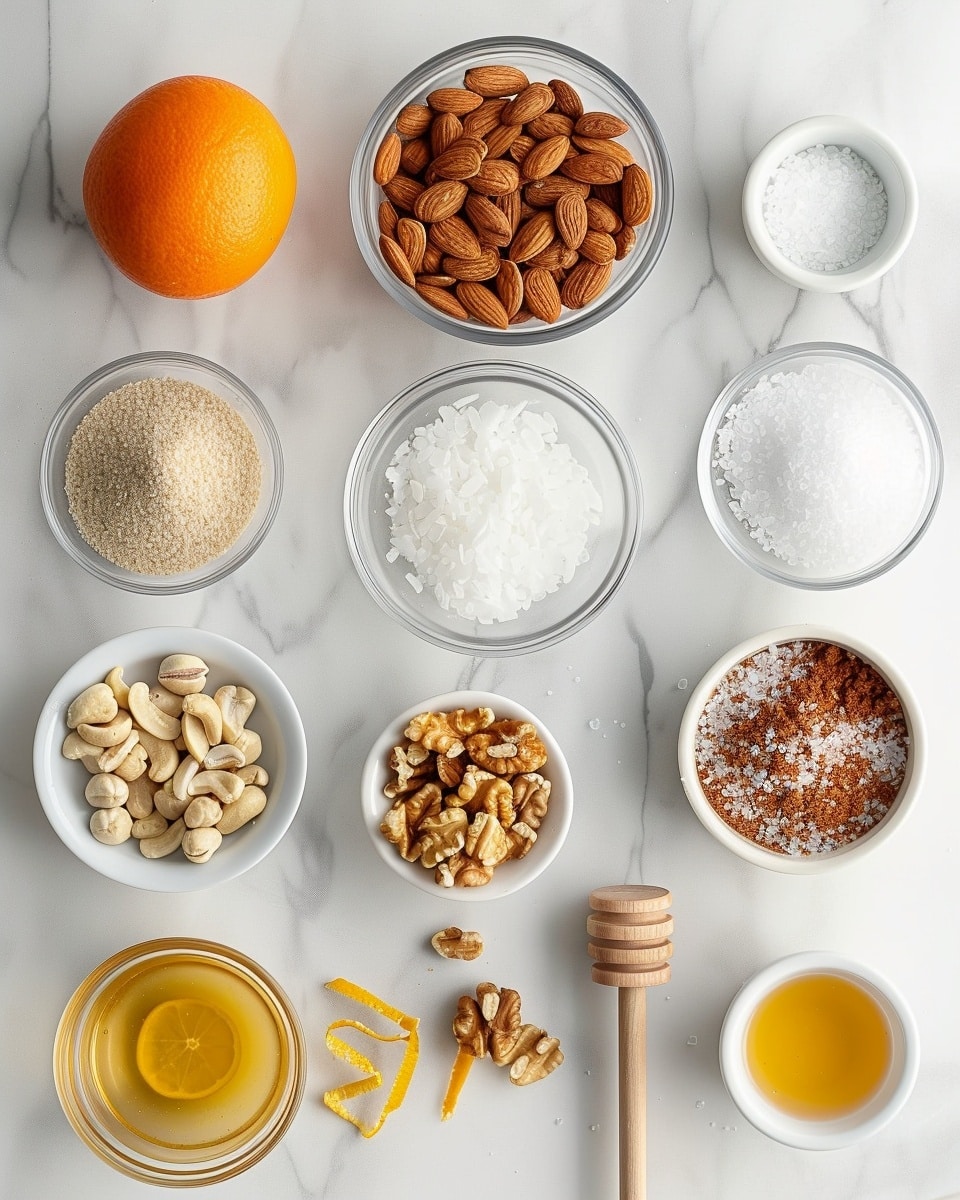
Gather a parade of wholesome ingredients that work magic together: crunchy nuts, warm spices, and golden honey come together to form a beautifully textured and flavorful bar.
- 1 cup Cashews (chopped): Adds creamy crunch with a slightly sweet, buttery flavor.
- 1 cup Almonds (chopped): Brings a firm crunch and slightly woody taste to balance the mix.
- 1/2 cup Pecans (chopped): Offers a richer, softer nutty note that complements the other nuts beautifully.
- 1 cup Unsweetened Shredded Coconut: Introduces a subtle tropical sweetness and chewy texture.
- 1 tsp Pure Vanilla Extract: Infuses warmth and floral depth.
- 1 tsp Zest Half a Navel Orange: Brightens every mouthful with fresh citrusy aroma.
- 1/2 tsp Sea Salt: Balances sweetness and enhances nutty flavors.
- 1/2 tsp Ground Ginger: Adds a hint of spicy warmth for complexity.
- 1/2 tsp Ground Cinnamon: Brings comfort and subtle sweetness.
- 1/2 cup Honey (as natural sweetener): Binds the bars and adds natural, fragrant sweetness.
Ingredient Substitutions & Tips
- Cashews: Swap for walnuts or macadamia nuts if you prefer a different flavor or texture.
- Honey: Use maple syrup or agave nectar for a vegan-friendly alternative; keep in mind it might affect the texture slightly.
- Orange zest: Lemon zest can provide a sharper citrus note if navel oranges aren’t available.
- Shredded coconut: Toasted coconut flakes work great to deepen the nutty flavor.
👨🍳 Pro Tips for Perfect Results
- Chop nuts evenly: Aim for uniform pieces about 1/4 inch for consistent baking and texture.
- Use fresh orange zest: Adds bright, zesty notes that make these bars pop with flavor.
- Don’t overbake: Watch carefully—golden brown is what you want, not dark brown.
- Press firmly: When spreading the mixture in the pan, press firmly to avoid crumbly bars.
- Cool completely with weight: Use the parchment flaps to compress bars while cooling for best firmness.
How to Make Honey Nut Bars Recipe
Step 1: Preparation Steps
Preheat your oven to 350°F, transforming your kitchen into a cozy workspace. Line an 8×8 baking pan with parchment paper, leaving flaps over the edges—it’s a little trick that will make lifting the bars effortless later on.
💡 Pro Tip: Use parchment paper rather than foil for easier bar removal and less sticking.
Step 2: Chop Nuts
Finely chop your almonds and cashews until each piece is about 1/4 inch. This size hits a perfect balance between crunchiness and chewiness, giving your bars that satisfying texture in every bite.
💡 Pro Tip: Pulse briefly in a food processor to avoid turning nuts into powder, or chop by hand for more control.
Step 3: Mix Dry Ingredients
In a large bowl, combine all dry ingredients except the honey. Stir them well so the spices, salt, nuts, and coconut mingle beautifully. Then drizzle in the honey and mix again until every morsel is coated with that natural sweetness.
💡 Pro Tip: Using a spatula lets you fold gently, keeping texture intact.
Step 4: Spread Mixture
Transfer the mixture into your lined pan and press down firmly to create an even, compact layer. This helps the bars hold together and bake uniformly.
💡 Pro Tip: Use the back of a flat spatula or your hand (clean and slightly damp) to press firmly.
Step 5: Bake
Bake the bars for 20 minutes. Keep an eye on them to ensure they turn a lovely golden-brown hue—you want that toasty look without dark edges.
💡 Pro Tip: Rotate the pan halfway through baking for even color and texture.
Step 6: Cool Slightly
Remove the bars from the oven and let them cool slightly in the pan. Use the parchment flaps to apply gentle pressure on top. This step is essential because it sets the bars as they cool.
💡 Pro Tip: Cooling with weight prevents crumbly bars later on.
Step 7: Lift Bars
After about 30 minutes of cooling, use those handy parchment flaps to lift the solidified block out of the pan, then flip it onto another piece of parchment paper for easy handling.
💡 Pro Tip: If the bars seem a little soft, chill briefly in the fridge before flipping.
Step 8: Reshape Bars
Once flipped, press the bars gently back into a square shape if needed. This step keeps the edges neat, which is especially helpful for slicing even bars.
💡 Pro Tip: A clean ruler or straight edge can guide gentle reshaping.
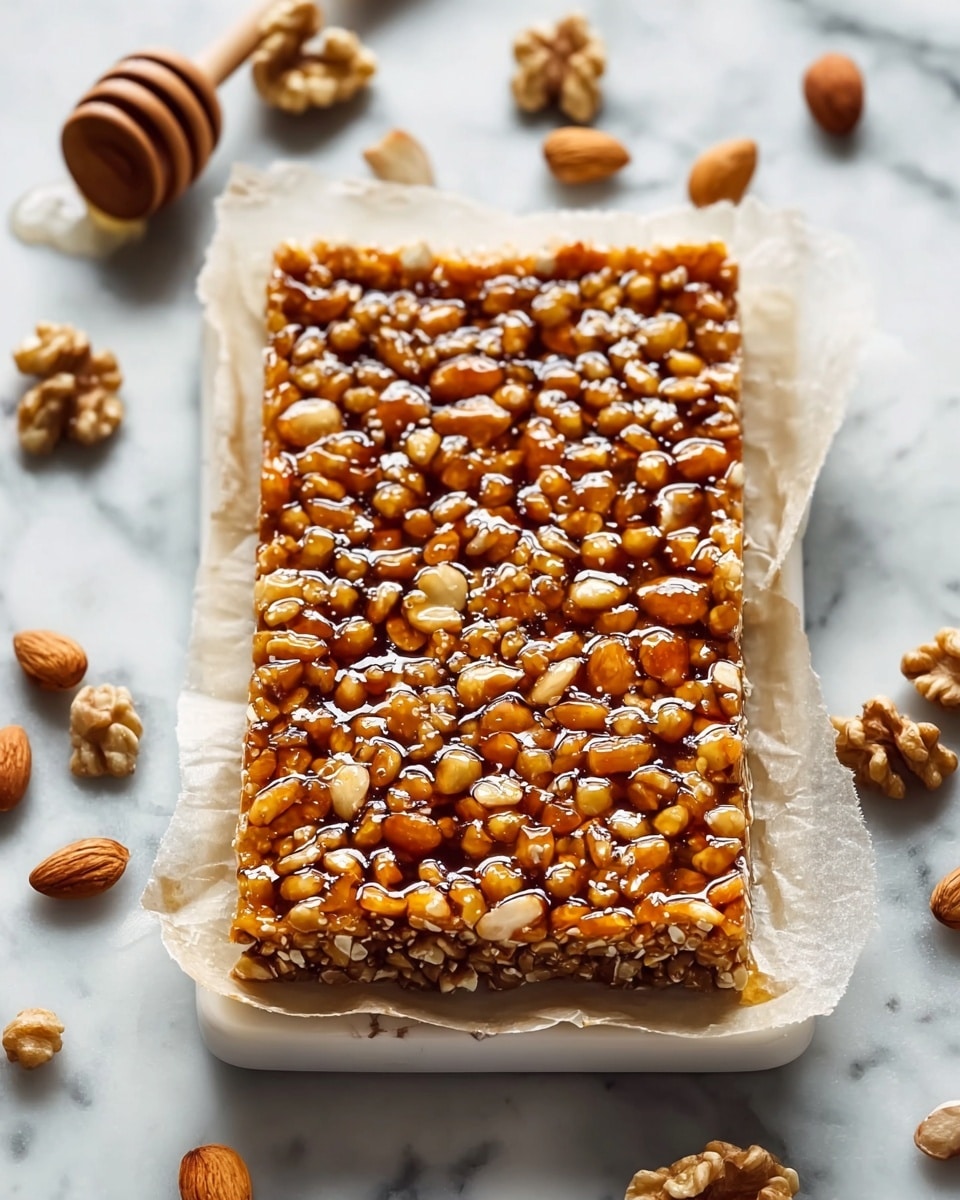
Step 9: Slice Bars
When the bars have cooled fully, cut them into 16 equal pieces, measuring roughly 2 by 2 inches each. Each bar is perfectly portioned for snacking or packing into your lunchbox.
💡 Pro Tip: Use a sharp knife warmed under hot water and wiped dry for clean cuts.
Step 10: Wrap and Store
Wrap each bar individually in parchment paper to avoid sticking and keep everything fresh. These bars stay delicious for up to two weeks.
💡 Pro Tip: Store wrapped bars in an airtight container at room temperature or refrigerate for longer freshness.
Common Mistakes to Avoid
Learn from these common pitfalls:
- Under-chopping nuts: Large nut pieces can make bars crumbly and harder to cut.
- Overbaking: Leaving bars in too long results in a burnt taste and dry texture.
- Not pressing firmly: Loose packing makes the bars fall apart when sliced or handled.
- Skipping cooling with weight: Bars may break apart without compressing as they cool.
- Cutting bars while warm: Warm bars are softer and tend to crumble or squish when sliced.
- Using sweetened shredded coconut: Extra sweetness can throw off the balance.
Delicious Variations to Try
Once you’ve mastered the classic Honey Nut Bars recipe, branch out with these tasty twists to keep your snack game exciting and versatile:
Chocolate Drizzle
Once cooled and sliced, drizzle melted dark chocolate over the bars for a decadent touch that pairs beautifully with the natural honey sweetness.
Seed Mix
Swap some nuts for pumpkin, sunflower, or chia seeds, adding a different crunch and a nutritional boost to your bars.
Dried Fruit Twist
Add chopped dried apricots, cranberries, or raisins to the dry mix for a fruity surprise hidden among the nuts.
Citrus Boost
Try replacing orange zest with lemon or lime zest to brighten the flavor profile and lend a zesty zing.
Coconut Toast
Toast the shredded coconut before mixing to amp up the toasty aroma and flavor in every bite.
Nut Butter Swirl
After pressing the mixture into the pan, swirl some almond or peanut butter on top before baking for a marbled flavor effect.
Looking for more wholesome snack inspiration? Try our Healthy Banana Peanut Butter Snack with Chocolate Dipping Recipe for a naturally sweet pairing that complements these bars perfectly.
How to Serve Honey Nut Bars Recipe
Garnishes
Sprinkle a pinch of flaky sea salt or a dash of cinnamon on top to elevate the bars’ flavor. A few toasted coconut flakes or extra chopped nuts also make a lovely garnish before serving.
Side Dishes
These bars are wonderful paired with a warm cup of herbal tea or a smooth latte. For a wholesome snack, serve alongside fresh fruit slices or a small bowl of Greek yogurt with honey drizzle.
Creative Ways to Present
For a stunning snack platter, arrange the bars on a rustic wooden board with clusters of nuts and small bowls of honey for dipping. They also pack beautifully into lunchboxes when wrapped individually.
Try serving these bars alongside crunchy bites like our Crispy Cottage Cheese Chips Recipe for a delightful snack spread that balances sweet and savory.
Make Ahead and Storage
Make-Ahead Instructions
You can prepare these bars up to two days in advance. Bake, cool, and slice them, then store wrapped at room temperature or in the fridge until ready to serve.
Storage
Store individually wrapped bars in an airtight container or resealable bag. They keep well for up to 2 weeks, maintaining their fresh taste and satisfying texture.
Freezing
Yes, you can freeze these bars! Place them wrapped in airtight containers or freezer bags. They freeze well for up to 3 months. Thaw at room temperature before serving.
Reheating
If you like your bars a little warm, pop them in a microwave for 10-15 seconds or warm gently in an oven at low heat for a couple of minutes.
Expert Tips for Success
- Use quality honey: The flavor of honey is prominent—choose a good, pure variety for best taste.
- Toast nuts optionally: Lightly toasting nuts before chopping can deepen flavors.
- Line pan securely: Use enough parchment paper with flaps for easy bar removal and handling.
- Chill after cooling: Refrigerating bars after they cool helps them firm up even more.
- Cut with a hot knife: For clean, neat slices, warm your knife under hot water and dry before each cut.
- Store in a cool place: To keep bars fresh longer, avoid humid or warm spots.
- Customize spices: Adjust cinnamon and ginger according to your taste to make it uniquely yours.
Frequently Asked Questions
Can I use other nuts in this Honey Nut Bars Recipe?
Absolutely! Feel free to substitute with walnuts, macadamia nuts, or pistachios, keeping in mind the flavor and texture may vary slightly.
Is it necessary to use parchment paper for baking?
Using parchment paper with flaps is highly recommended because it helps lift the bars out easily and aids in compressing while cooling to keep them intact.
Can I make this recipe vegan?
Yes, replace honey with maple syrup or agave nectar, though the bars may be a bit softer in texture.
How long do Honey Nut Bars last?
When stored properly wrapped in parchment paper and kept in an airtight container, they last up to 2 weeks at room temperature or longer refrigerated.
Can I add dried fruits or chocolate chips?
Definitely! Adding dried fruits like cranberries or raisins or some dark chocolate chips can add lovely bursts of flavor and sweet surprises.
Do I need to refrigerate these bars?
Refrigeration isn’t required if you plan to eat them quickly; however, refrigerating can extend their shelf life and keep them firm.
How should I cut the bars for neat pieces?
Make sure the bars have completely cooled, and use a hot, sharp knife to cut for clean edges without crumbling.
Final Thoughts
There is something truly special about homemade snacks that bring together nature’s best flavors in such a simple, satisfying way. This Honey Nut Bars Recipe wraps wholesome nuts, coconut, warm spices, and honey into each golden bite, inviting you to enjoy a nourishing treat anytime. Whether you’re packing them for a busy day or sharing with loved ones, these bars offer a comforting crunch and a natural sweetness that feels like a little gift from the kitchen. Dive in, savor every bite, and let these bars become your new favorite go-to snack.
Related Recipes You’ll Love
If you enjoyed this recipe, you’ll also love these delicious recipes:
- 1 Ingredient Keto Cottage Cheese Chips Recipe – Foodarohub – A simple and crunchy snack made with just one ingredient, perfect for quick keto-friendly munching.
Honey Nut Bars Recipe
These delicious Honey Nut Bars combine a mix of chopped nuts, shredded coconut, and natural honey to create a perfectly sweet and crunchy snack that’s easy to make and perfect for any time of day.
- Prep Time: 15 minutes
- Cook Time: 20 minutes
- Total Time: 1 hour 5 minutes
- Yield: 16 servings 1x
- Category: Snack
- Method: Baking
- Cuisine: American
- Diet: Gluten Free, Vegetarian
Ingredients
Ingredients
- 1 cup Cashews (chopped)
- 1 cup Almonds (chopped)
- 1/2 cup Pecans (chopped)
- 1 cup Unsweetened Shredded Coconut
- 1 tsp Pure Vanilla Extract
- 1 tsp Zest Half a Navel Orange
- 1/2 tsp Sea Salt
- 1/2 tsp Ground Ginger
- 1/2 tsp Ground Cinnamon
- 1/2 cup Honey (as natural sweetener)
Instructions
- Preparation Steps Preheat the oven to 350°F. Line an 8×8 baking pan with parchment paper, allowing the flaps to hang over the sides.
- Chop Nuts Chop the almonds and cashews into small pieces by hand or using a processor, aiming for pieces about 1/4″ in size.
- Mix Ingredients Mix all dry ingredients (except honey) in a large bowl. Stir until everything is thoroughly combined. Then, pour in the honey and ensure everything is coated well.
- Prepare for Baking Spread the mixture into your lined baking dish, pressing down firmly to pack it in evenly.
- Bake Bake in the preheated oven for 20 minutes, ensuring they turn golden brown and not dark brown.
- Cool Slightly Cool the bars slightly after removing them from the oven, using the parchment flaps to compress them while cooling completely.
- Remove and Flip Lift the bars from the pan using the parchment paper flaps after about 30 minutes of cooling and flip them onto another piece of parchment.
- Reshape Reshape the bars back into a square shape if necessary and gently press down.
- Slice Slice into 16 equal pieces, each measuring 2″ x 2″ once they are fully cool.
- Store Wrap each bar individually in parchment paper to prevent sticking together. Enjoy fresh within 2 weeks!
Notes
- Ensure bars turn golden brown and not dark brown while baking for best texture.
- Use parchment paper flaps to compress bars while cooling to maintain shape.
- Wrap bars individually to keep them from sticking together.
- Consume within 2 weeks for optimal freshness.
Keywords: Honey nut bars, healthy snack bars, homemade nut bars, gluten free snacks, natural sweetener bars


