
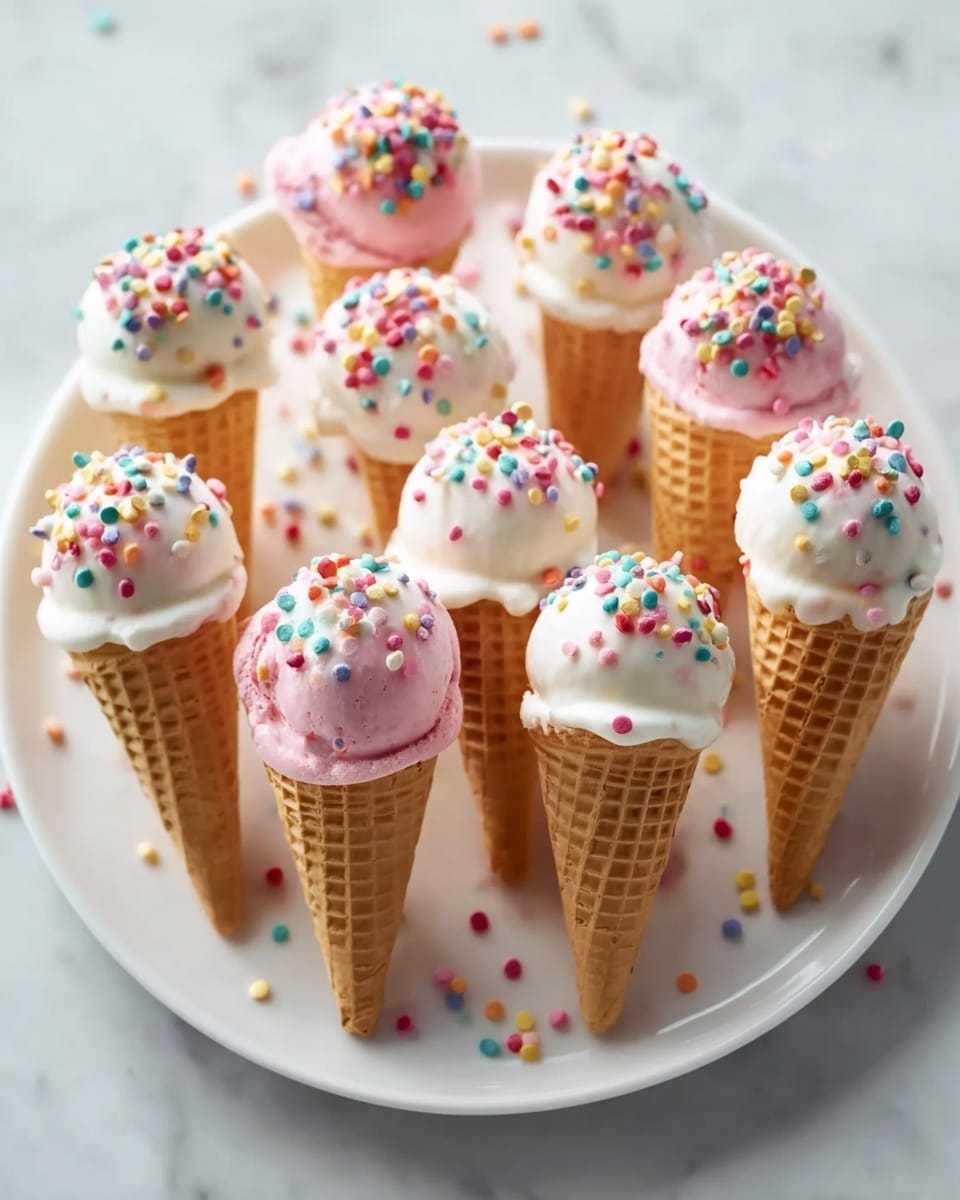
Ice Cream Cone Cake Pops – Fun Treats for Any Celebration Recipe
I never thought I’d find a recipe as charming and delicious as these Ice Cream Cone Cake Pops – Fun Treats for Any Celebration Recipe. Imagine soft, moist Funfetti cake packed with those joyful sprinkles, shaped into adorable cake balls perched on sweet mini sugar cones, then cloaked in creamy, colorful candy coatings. The vibrant sprinkles sparkle like confetti, making every bite a celebration in itself. These little bites are sure to bring smiles to any party, combining eye-catching flair with irresistible flavors.
Why You’ll Love This Ice Cream Cone Cake Pops – Fun Treats for Any Celebration Recipe
- Delightfully Delicious: Moist Funfetti cake meets creamy vanilla frosting, creating a rich, sweet base that melts in your mouth and satisfies any dessert craving.
- Simple Ingredients: From one box of cake mix to sprinkles, frosting, and mini cones, this recipe uses pantry staples that keep things easy but exciting.
- Perfect for Sharing: With a yield of 12 servings, these cake pops are ideal for birthdays, baby showers, or casual gatherings—guaranteed to impress without stress.
- Eye-Catching Presentation: The pastel candy coatings drizzled with chocolate or pink wafers are topped with a festive sprinkle combo, making each pop a mini masterpiece.
- Customizable Creativity: Swap vanilla almond bark for chocolate, experiment with your favorite frosting, or try edible glitter instead of rainbow sprinkles to personalize your treat.
Why This Ice Cream Cone Cake Pops – Fun Treats for Any Celebration Recipe Works
This recipe shines because of its clever technique and smart ingredient pairings. Baking up a moist Funfetti cake provides a flavorful, colorful base that is easy to crumble and mix with creamy vanilla frosting, transforming cake crumbs into a dough-like mixture perfect for shaping. Freezing the cake balls before assembly helps them hold firm on the mini sugar cones when dipped in melted candy coating. Using vanilla almond bark creates that smooth, glossy finish and acts as a sturdy shell to hold the sprinkles and drizzle decorations in place. The baking method ensures the cake has the right texture to scoop easily, helping make assembly a joyful—and mess-free—activity.
Ingredients You’ll Need
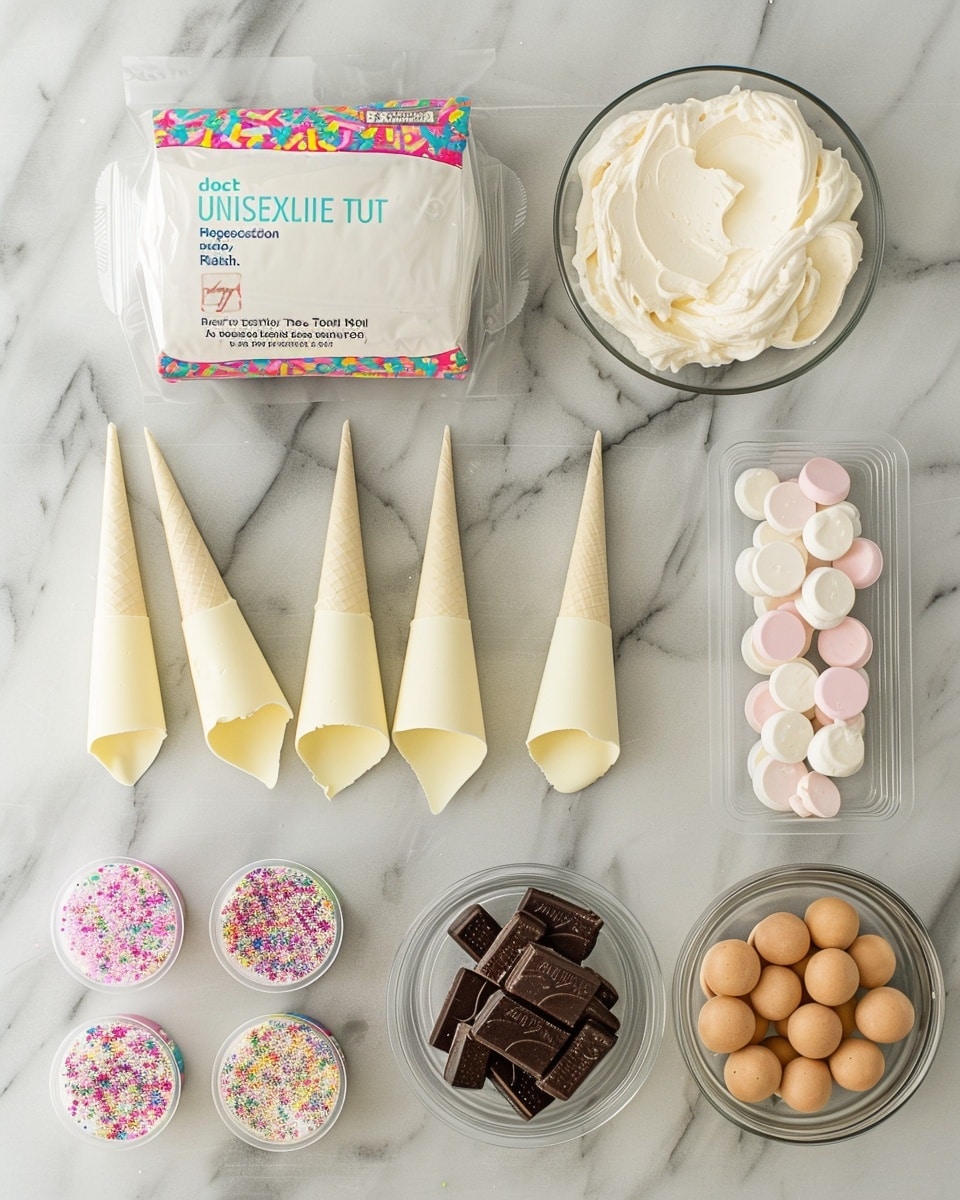
Let’s gather all the vibrant, cheerful ingredients that will bring these cake pops to life! Everything from the fun-packed Funfetti cake mix to the glow of colorful sprinkles adds personality and joy to this recipe.
- 1 box Funfetti Cake Mix: The star providing moist, sweet cake bursting with colorful sprinkles inside.
- 1 container Vanilla Frosting (or cream cheese frosting for a twist): Binds the crumbled cake into a perfect dough while adding creamy sweetness.
- 12 pieces Mini Cup Cones (sugar cones for a sweeter bite): These serve as the fun and edible holders for each cake pop.
- 1 pack Vanilla Almond Bark (or chocolate bark for a different taste): Creates a smooth, shiny coating that seals the cake ball to the cone.
- 1 pack Chocolate Melting Wafers: Optional drizzling for a delicious touch of rich chocolate flair.
- 1 pack Pink Melting Wafers (or any color for decoration): Add a playful, colorful drizzle to elevate the festive look.
- 1 cup Large Round Sprinkles (for festive topping): Classic sprinkle shapes that add texture and nostalgia.
- 1 cup Rainbow Sprinkles (or edible glitter as an alternative): Bright and dazzling, these add sparkle to each joyful bite.
Ingredient Substitutions & Tips
- Funfetti Cake Mix: You can try a white or yellow cake mix and fold in sprinkles yourself to control the density of color spots.
- Vanilla Frosting: For a tangier taste, swap with cream cheese frosting; it enhances the flavor while keeping that perfect dough consistency.
- Mini Cup Cones: Regular sugar cones or waffle cones trimmed to size also work well and add variety in texture.
- Vanilla Almond Bark: Chocolate bark makes for a richer finish, while white bark colored with food dye lets you customize your pops.
👨🍳 Pro Tips for Perfect Results
- Use Quality Cake Mix: Picking a trusted box mix ensures moistness and consistent results every time.
- Freeze Cake Balls Firmly: Freezing for about 30 minutes is key for easier dipping and prevents the cake pops from falling apart.
- Dip Cones Carefully: When dipping cones into melting candy bark, coat only the open edge to maximize adherence without mess.
- Room Temperature Frosting: Helps the frosting blend smoothly with crumbled cake for that perfect dough texture.
- Decorate Quickly: Add sprinkles right after coating before the bark sets for better stick and beautiful coverage.
How to Make Ice Cream Cone Cake Pops – Fun Treats for Any Celebration Recipe
Step 1: Preheat and Bake
Kick things off by warming your oven to 350°F. Follow the box instructions to bake your Funfetti cake, then allow it to cool entirely. This cooling is crucial so your cake crumbles nicely without turning into mush.
💡 Pro Tip: Cooling your cake completely avoids frosting melting later on.
Step 2: Mix Cake and Frosting
Here’s my secret to the perfect cake pop dough: crumble the cooled cake into a big bowl, scoop in the vanilla frosting, and stir it until you have a soft, pliable mixture that holds together when pressed.
💡 Pro Tip: Use your hands to feel the right consistency, adding tiny amounts of frosting if it’s too dry.
Step 3: Form Cake Balls
Take about 2 tablespoons of the mixture and roll it between your palms until smooth and round. This hands-on moment is fun! Lay the formed balls on a tray and freeze them for approximately 30 minutes to set.
💡 Pro Tip: Freeze so the cake balls stay put during assembly and coating.
Step 4: Assemble Cake Pops
Dip the open end of each mini cup cone into melted candy melts to create a sticky base, then gently press a frozen cake ball onto each dipped cone. This step locks the cake to the cone base securely.
💡 Pro Tip: Work quickly after dipping to avoid the melts hardening before assembly.
Step 5: Coat Cake Pops
Dip each assembled cone and cake ball into melted vanilla almond bark, letting the excess drip off naturally. This coating forms the smooth, glossy outer shell that makes these pops so irresistible.
💡 Pro Tip: Work over parchment paper to catch drips and make cleanup easy.
Step 6: Decorate
Time to get creative! Drizzle melted chocolate wafers or pink wafers in your favorite patterns and sprinkle the large round and rainbow sprinkles generously while the coating is still wet for sparkle and crunch.
💡 Pro Tip: Use a fork or spoon for quick and easy drizzle control.
Step 7: Set
Allow the decorated cake pops to harden completely—either resting at room temperature or chilling briefly in the fridge if you’re in a hurry. When set, these treats are ready to dazzle any celebration.
💡 Pro Tip: Refrigeration accelerates the hardening without sacrificing texture.
Common Mistakes to Avoid
Learn from these common pitfalls:
- Skipping the Freeze: If cake balls aren’t firm, they may fall apart during dipping and decorating.
- Too Much Frosting: Adding excess frosting makes the mixture too sticky, causing lumpy pops.
- Dipping in Thick Bark: Melted bark too thick can result in chunky coatings; thin with a little shortening or microwave again briefly.
- Waiting Too Long to Decorate: Sprinkles won’t stick well if you wait for the coating to harden first.
- Overhandling Cake Balls: Excess heat from hands can make the cake soft and messy; use cool hands and a light touch.
- Using Moist Cake: Warm or moist cake can cause the frosting to melt and ruin the dough’s texture.
Delicious Variations to Try
Once you’ve mastered the classic Ice Cream Cone Cake Pops – Fun Treats for Any Celebration Recipe, mix things up with these crowd-pleasing twists:
Chocolate Lovers’ Dream
Swap the vanilla almond bark for rich chocolate bark and drizzle with white melting wafers. Use chocolate sprinkles or crushed nuts to add texture and decadence.
Berry Bliss
Add freeze-dried raspberry powder to the frosting mix, and decorate with pink melting wafers and dried edible rose petals for a fruity floral flair.
Birthday Bash Rainbow
Use multiple colors of melting wafers for drizzling, and top with a blend of rainbow nonpareils and edible glitter to amplify that party vibe.
Citrus Zest Surprise
Incorporate lemon zest into the frosting mix and decorate with yellow-orange tinted bark and candied citrus peel bits for a bright taste.
Sprinkle Swap
Try edible glitter or sugar crystals instead of sprinkles for an elegant shimmer, perfect for weddings or upscale events.
Sweet Sandwich Treat
Serve alongside our Churro French Toast Ice Cream Sandwich Recipe – Foodarohub for a complete dessert spread that will wow your guests with a variety of sweet textures and flavors.
How to Serve Ice Cream Cone Cake Pops – Fun Treats for Any Celebration Recipe
Garnishes
Brighten your display with edible flowers, a dusting of powdered sugar, or vibrant sprinkles matching your party theme. Fresh mint or small berries add a refreshing and beautiful contrast.
Side Dishes
Pair your cake pops with cold glasses of milk, fruity lemonade, or delicate tea. For adult gatherings, a sweet sparkling mocktail can complement these festive treats perfectly.
Creative Ways to Present
Arrange the cake pops standing tall in a decorative foam base wrapped in colorful tissue paper or nestled in a clear vase filled with sprinkles or candy beads. For kid parties, include little flags or themed toppers to match the occasion.
Make Ahead and Storage
Make-Ahead Instructions
You can bake and prepare the cake balls up to two days in advance. Keep them refrigerated and assembled just before coating and decorating to ensure freshness.
Storage
Store the finished cake pops upright in an airtight container in the refrigerator for up to 5 days to maintain their texture and flavor.
Freezing
Wrap the cake balls tightly in plastic wrap and freeze for up to one month. Thaw in the fridge before assembling and coating.
Reheating
These treats are best enjoyed chilled or at room temperature. Avoid microwaving as it can cause the candy coating to melt unevenly.
Expert Tips for Success
- Use a cooling rack during the dipping process for excess coating to drip cleanly.
- Keep candy melts warm by microwaving in short bursts to prevent hardening mid-use.
- Work in small batches for dipping and decorating to maintain freshness and control.
- Use disposable piping bags or ziploc bags with a snipped corner for precise drizzle decoration.
- Rotate sprinkles and decorations based on seasonal or party themes for versatile appeal.
- Practice patience with setting times; allowing full hardening gives the best texture and presentation.
- Keeps tools and hands cool to avoid cake ball melting during shaping.
Frequently Asked Questions
Can I make these cake pops gluten-free?
Yes, by swapping the Funfetti cake mix for a gluten-free version, you can still enjoy these festive treats without gluten.
What if I don’t have mini cones?
Regular sugar cones cut to size or sturdy waffle cones make excellent substitutes and add unique textures.
Can I prepare the cake balls ahead of time?
Absolutely. You can assemble and freeze the cake balls up to a month in advance for convenience.
Is cream cheese frosting a good alternative?
Yes! Cream cheese frosting adds a delightful tang and richness, making the cake pops even more flavorful.
How do I keep the sprinkles from sliding off?
Sprinkle decorations should be added right after dipping while the coating is still wet to ensure they stick well.
Can I use other types of coating besides almond bark?
Chocolate bark or colored candy melts are perfect alternatives to customize flavors and colors for your cake pops.
How do I store leftover cake pops?
Keep them in an airtight container in the refrigerator for up to 5 days to maintain freshness and deliciousness.
Final Thoughts
Making these Ice Cream Cone Cake Pops – Fun Treats for Any Celebration Recipe is like crafting little bursts of joy and color that light up any gathering. The playful combination of soft, sprinkle-speckled cake nestled on crunchy sugar cones, wrapped in glossy candy shells, brings a unique charm to your dessert table. Whether it’s a festive birthday or a simple get-together, sharing these pops creates smiles and sweet memories. I can’t wait for you to try making them and watch your loved ones’ faces light up with every bite!
Related Recipes You’ll Love
If you enjoyed this recipe, you’ll also love these delicious recipes:
- Best Cheesecake Recipe – Foodarohub – A creamy, rich dessert that’s perfect for impressing guests with luscious texture and flavor.
- Churro French Toast Ice Cream Sandwich Recipe – Foodarohub – Indulge in a warm cinnamon-sugar French toast sandwich paired with cold ice cream for a cozy treat.
Related Recipes You’ll Love
If you enjoyed this recipe, you’ll also love these delicious recipes:
- Decadent Caramel Cake with Homemade Caramel and Fluffy Vanilla Buttercream Recipe – Foodarohub – Dive into layers of rich caramel and airy vanilla frosting that perfectly complement each other in this classic American dessert.
Ice Cream Cone Cake Pops – Fun Treats for Any Celebration Recipe

These Ice Cream Cone Cake Pops are a fun and festive treat perfect for any celebration, combining colorful sprinkles and delicious cake bites served in mini cones.
- Prep Time: 20 minutes
- Cook Time: 30 minutes
- Total Time: 1 hour 20 minutes
- Yield: 12 servings 1x
- Category: Dessert
- Method: Baking
- Cuisine: American
- Diet: Vegetarian
Ingredients
Ingredients
- 1 box Funfetti Cake Mix
- 1 container Vanilla Frosting (or cream cheese frosting for a twist)
- 12 pieces Mini Cup Cones (sugar cones for a sweeter bite)
- 1 pack Vanilla Almond Bark (or chocolate bark for a different taste)
- 1 pack Chocolate Melting Wafers (for optional drizzling)
- 1 pack Pink Melting Wafers (or any color for decoration)
- 1 cup Large Round Sprinkles (for festive topping)
- 1 cup Rainbow Sprinkles (or edible glitter as an alternative)
Instructions
- How to Make Preheat the oven to 350°F and bake the Funfetti cake according to package instructions. Allow it to cool completely.
- Mix Cake and Frosting Crumble the cooled cake into a large mixing bowl, add in the vanilla frosting, and mix until dough-like.
- Form Cake Balls and Freeze Scoop 2-tablespoon portions and roll into smooth balls. Freeze for about 30 minutes.
- Attach Cake Balls to Cones Dip the open end of each cone into melted candy melts, then press a cake ball onto the dipped end.
- Coat with Almond Bark Coat each cone and cake ball in melted vanilla almond bark and let excess drip off.
- Decorate Drizzle with melted chocolate or pink wafers, and top with sprinkles.
- Set Decorations Allow decorations to harden completely. If short on time, refrigerate briefly.
Notes
- For a twist, use cream cheese frosting instead of vanilla frosting.
- Use sugar cones for a sweeter bite.
- You can substitute chocolate bark for a different taste.
- If short on time, refrigerate briefly to harden decorations faster.
Keywords: Ice Cream Cone Cake Pops, Funfetti Cake Pops, Cake Pops Recipe, Party Dessert, Celebratory Treats

