
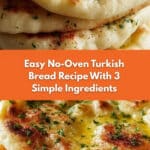
No-Oven Turkish Bread (Bazlama) with Just 3 Ingredients Recipe
“`html
If you’ve ever dreamed of making soft, pillowy bread without the hassle of an oven, this No-Oven Turkish Bread (Bazlama) with Just 3 Ingredients Recipe is an absolute game-changer. It captures the rustic charm and chewy tenderness of traditional bazlama using only a handful of simple ingredients and a stovetop pan, making it accessible for anyone, anywhere. Whether you’re craving a perfect bread for scooping up dips, wrapping your favorite fillings, or simply enjoying fresh from the pan, this recipe will quickly become one of your favorite kitchen secrets.
Ingredients You’ll Need
What makes the No-Oven Turkish Bread (Bazlama) with Just 3 Ingredients Recipe so amazing is how straightforward the ingredients list is—each component plays a vital role in delivering that ideal texture, flavor, and appearance without overwhelming complexity.
- Bread flour or all-purpose flour (500g / 4 cups): Provides the chewy, soft texture bazlama is famous for; bread flour adds extra springiness but all-purpose flour works beautifully.
- Warm milk (160ml / 2/3 cup): Adds richness and tenderness while helping the crust develop a lovely golden hue.
- Warm water (160ml / 2/3 cup): Hydrates the dough perfectly, ensuring it’s smooth and easy to handle.
- Instant dry yeast (10g / 1.5 tbsp): The magic behind the bread’s airy rise and those signature little pockets of lightness.
- Sugar (10g / 1 tbsp): Feeds the yeast so the dough rises beautifully and adds a touch of gentle sweetness.
- Salt (8g / 0.8 tbsp): Balances the flavors, rounding out the taste and enhancing the bread’s subtle savory notes.
- Melted unsalted butter or olive oil (20g) – optional: Brushed on top after cooking to add shine and a rich, inviting finish.
- Chopped parsley – optional: A fresh sprinkle on your finished bread adds color and a bright, herbal kick.
How to Make No-Oven Turkish Bread (Bazlama) with Just 3 Ingredients Recipe
Step 1: Bloom the Yeast
Begin by mixing your warm milk and warm water in a large bowl, ensuring they’re pleasantly warm (not hot) to awaken the yeast without killing it. Sprinkle in the sugar and instant yeast, then stir gently. Watching the mixture foam up after a few minutes is like seeing a little spark of life—it means the yeast is primed and ready to work its magic in your bread.
Step 2: Mix and Knead the Dough
Next, add your flour and salt directly into the yeast mixture. Stir with a strong spoon or knead with your hands until the dough comes together. It might feel sticky initially, but don’t let that deter you. Knead for about 8 to 10 minutes until the dough becomes smooth, elastic, and springs back at your touch. This process builds the gluten network that gives bazlama its signature chewy texture.
Step 3: Proof the Dough
Cover your dough with a clean towel or plastic wrap and place it somewhere warm to rise. Within about an hour, it will have roughly doubled in size and feel light and airy—this is where the foundation for soft, fluffy bread is laid, and the anticipation starts to build!
Step 4: Divide and Shape
Turn your risen dough out onto a lightly floured surface and divide it into six equal pieces. Shape each into a smooth ball, then cover them lightly to prevent drying. Roll each ball into a roughly 18-centimeter round about 5 millimeters thick. Don’t fuss over perfection—these rustic rounds charm with their handmade look.
Step 5: Cook on the Stovetop
Heat a heavy pan, ideally a cast iron skillet, over medium heat. Place a dough round in the pan and watch as bubbles begin to form—this signals the bread puffing up and cooking through. Flip when the underside is golden and bubbly. When your bazlama inflates like a balloon, reduce the heat slightly to finish cooking inside without burning. Keep finished breads wrapped in a towel while you cook the rest to maintain their warmth and softness.
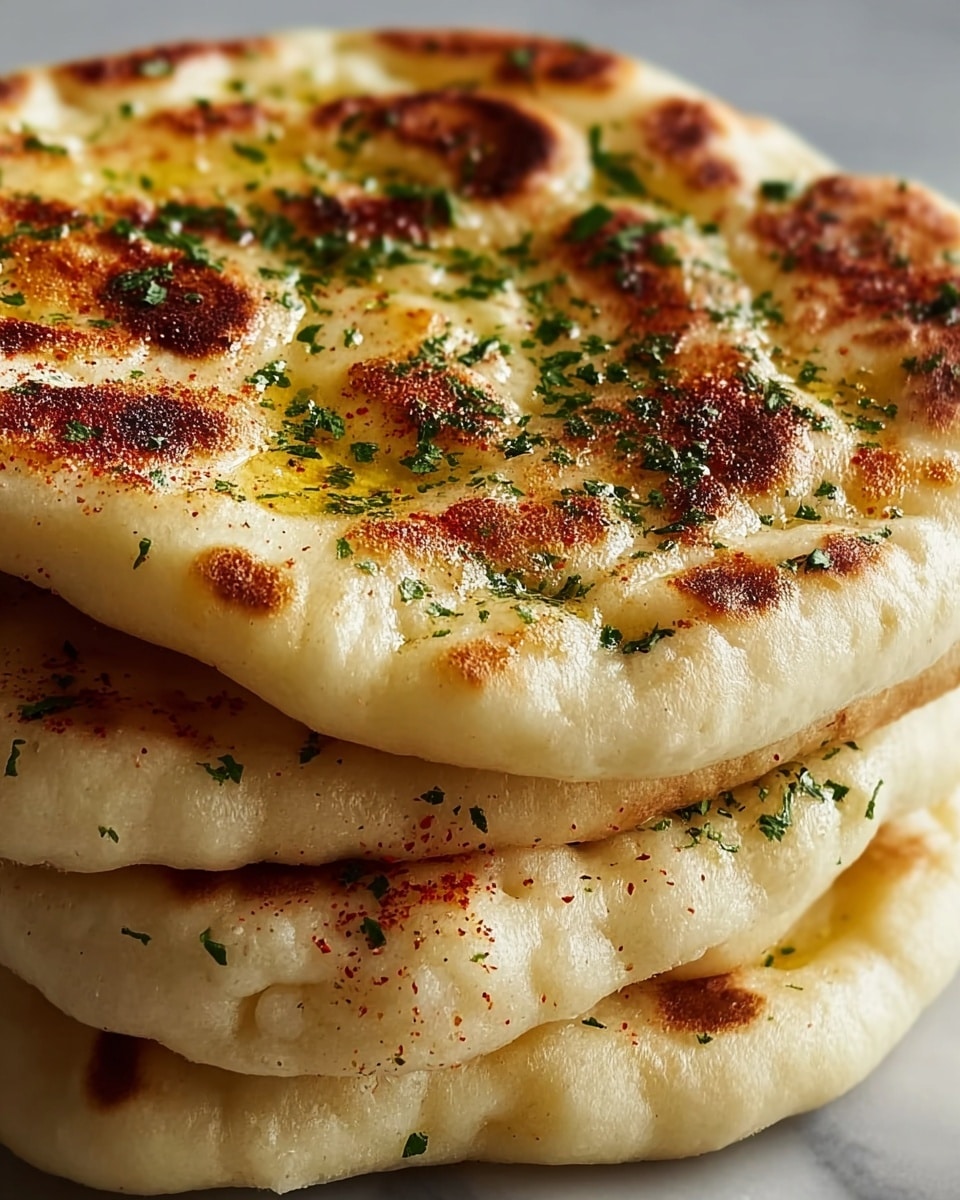
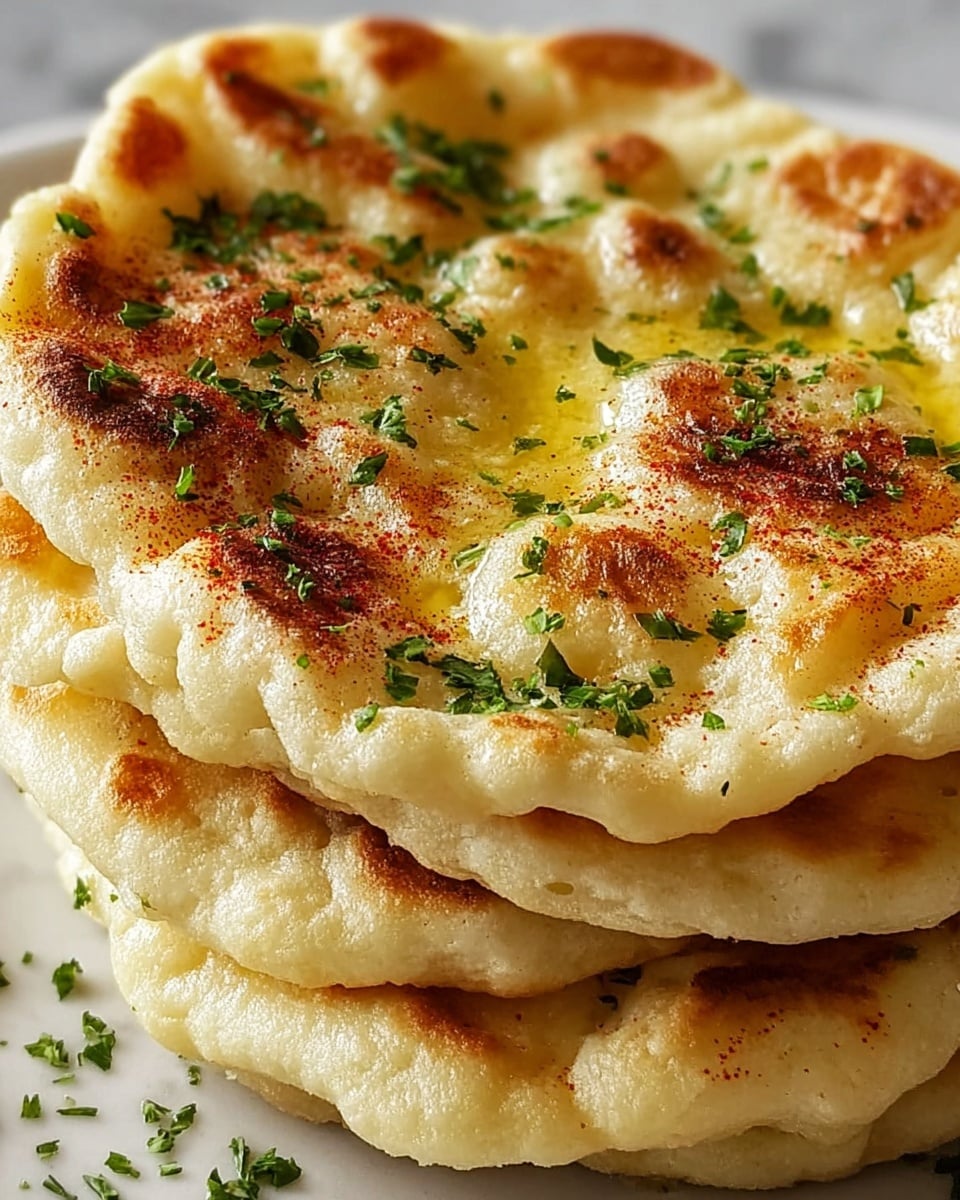
Step 6: Brush, Finish, and Enjoy
Once cooked, brush your bread with melted butter or olive oil if you like for a shiny, flavorful finish. A sprinkle of freshly chopped parsley adds an alluring pop of green and freshness. Now comes the truly best part: tearing into your warm, homemade No-Oven Turkish Bread (Bazlama) with Just 3 Ingredients Recipe and savoring the soft, chewy bite!
How to Serve No-Oven Turkish Bread (Bazlama) with Just 3 Ingredients Recipe
Garnishes
A simple brush of butter or olive oil is perfect for adding richness, but don’t hesitate to sprinkle herbs like parsley, za’atar, or sumac for vibrant color and bursts of flavor. A light dusting of sesame or nigella seeds can also bring delightful texture and a hint of nuttiness.
Side Dishes
This bread pairs beautifully with a wide variety of dishes. Think creamy hummus, tangy yogurt dips, smoky grilled meats, or hearty stews. Its soft texture makes it ideal for scooping up sauces or wrapping around kebabs and fresh vegetables for a quick and satisfying meal.
Creative Ways to Present
Try cutting your bazlama into wedges and serving them as part of a mezze platter alongside olives, cheeses, and roasted vegetables. You can also use it as a base for open-faced sandwiches, layering on spreads, herbs, and your favorite proteins. For a fun twist, wrap it around fillings like spiced chicken or falafel to create an impromptu flatbread wrap that’s guaranteed to impress.
Make Ahead and Storage
Storing Leftovers
Leftover bazlama stays soft and delicious when stored in an airtight container or tightly wrapped in foil at room temperature for up to 2 days. If you notice it starting to firm up, a quick reheat can bring back that freshly made softness.
Freezing
You can freeze the cooked bread by wrapping individual rounds tightly in plastic wrap and placing them in a freezer-safe bag. Frozen that way, your bazlama will keep for up to 2 months, ready to thaw whenever a bread craving strikes.
Reheating
To revive your stored No-Oven Turkish Bread (Bazlama) with Just 3 Ingredients Recipe, reheat it gently in a dry skillet over low-medium heat for a minute or two on each side. You’ll restore its warmth and pliability without drying it out. A brief steam in the microwave with a damp napkin can also soften it back up quickly.
FAQs
Do I have to use bread flour for bazlama?
No, all-purpose flour works just fine and produces delicious results; bread flour will just give the bread a slightly chewier texture, but both are great choices depending on what you have on hand.
Can I make this bread without yeast?
Unfortunately, yeast is key to getting the airy, soft texture that defines bazlama. Without it, the bread won’t rise or develop those signature pockets, so it’s best not to skip the yeast.
Is it okay to use cow’s milk or plant-based milk?
Whole cow’s milk works wonderfully because of its fat content, but you can substitute plant-based milks like almond or oat milk if you prefer. Just make sure they are unsweetened and warm for best yeast activation.
How do I know when the bread is cooked through?
You’ll notice golden spots and bubbles on the surface, and when flipped, the bread should puff up like a balloon. If it puffs and no longer feels doughy, it’s perfectly cooked.
Can I add herbs or spices to the dough?
Absolutely! Adding finely chopped fresh herbs like rosemary or thyme, or a pinch of ground cumin, can add wonderful flavor twists. Just mix them into your dough before kneading.
Final Thoughts
This No-Oven Turkish Bread (Bazlama) with Just 3 Ingredients Recipe is a true kitchen treasure—simple, quick, and irresistibly tasty. It invites you to create homemade bread with minimal fuss and maximum joy. I can’t wait for you to try it, share it, and make it your own comfort food staple!
“`
PrintNo-Oven Turkish Bread (Bazlama) with Just 3 Ingredients Recipe
No-Oven Turkish Bread (Bazlama) is a simple, rustic flatbread made with just a few basic ingredients, cooked on the stovetop for a soft, pillowy texture and golden crust. This easy recipe captures the essence of traditional Anatolian bread without needing an oven, making it accessible for home cooks seeking fresh, warm bread perfect for wrapping, dipping, or eating plain.
- Prep Time: 15 minutes
- Cook Time: 15 minutes
- Total Time: 1 hour 30 minutes
- Yield: 6 flatbreads 1x
- Category: Bread
- Method: Stovetop
- Cuisine: Turkish
- Diet: Vegetarian
Ingredients
Main Ingredients
- 500g (4 cups) bread flour or all-purpose flour
- 160ml (2/3 cup) warm milk
- 160ml (2/3 cup) warm water
- 10g (1.5 tbsp) instant dry yeast
- 10g (1 tbsp) sugar
- 8g (0.8 tbsp) salt
Optional Toppings
- 20g melted unsalted butter or olive oil (for brushing)
- Chopped parsley (for garnish)
Instructions
- Bloom the Yeast: Combine warm milk and warm water in a large bowl. Stir in sugar and sprinkle instant dry yeast on top. Mix gently and let sit for a few minutes until the mixture becomes frothy, indicating the yeast is active.
- Mix and Knead the Dough: Add flour and salt to the yeast mixture. Stir with a sturdy spoon or use your hands until a shaggy dough forms. Knead for 8 to 10 minutes on a lightly floured surface until the dough is smooth, elastic, and no longer sticky to fingers.
- Proof the Dough: Cover the bowl with a plastic wrap or clean towel. Set it in a warm location and let the dough rise for about 1 hour, or until doubled in size and fluffy.
- Divide and Shape: Turn the dough onto a work surface. Cut into 6 equal portions using a bench scraper or knife. Roll each piece into a ball and cover loosely to prevent drying. Roll each ball into a flat round shape about 18 cm (7 inches) wide and 5 mm (0.2 inches) thick.
- Cook on the Stovetop: Heat a thick-bottomed pan or cast iron skillet over medium heat. Place one dough round into the pan and cook until bubbles form and the underside is golden and bubbly, then flip it. When the bread puffs up like a balloon, reduce the heat to cook through without burning. Repeat with remaining rounds and keep cooked bread wrapped in a clean towel to stay warm and soft.
- Brush, Finish, and Enjoy: Optionally brush the hot bread with melted butter or olive oil for a glossy finish. Sprinkle with chopped parsley for freshness and color. Serve warm and enjoy tearing or stuffing the bread.
Notes
- Use bread flour for a springier texture, though all-purpose flour works well too.
- Make sure liquids are warm, not hot, to activate yeast without killing it.
- Kneading properly is key to developing gluten for chewiness.
- Keep the dough covered to avoid drying during proofing and shaping.
- A thick-bottomed pan like cast iron ensures even cooking without burning.
- If the bread isn’t puffing up, lower the heat and cook longer to encourage steam pockets.
- Optional butter or oil brushing enhances flavor and appearance but can be omitted for a lighter bread.
Keywords: Bazlama, Turkish bread, no oven bread, stovetop flatbread, simple bread recipe, Anatolian bread, homemade bread


