
Oven-Baked Crunchy Chicken Tenders for a Guilt-Free Treat Recipe
Picture this: the irresistible aroma of perfectly seasoned chicken tenders baking in the oven, the golden crunch beckoning from the tray, promising a mouthwatering bite that’s both crispy and tender. There’s something so comforting about homemade chicken tenders—guilt-free, oven-baked, and speckled with just the right seasoning to ignite your taste buds. Whether you’re feeding a hungry family or craving a cozy snack, this recipe delivers a sensational crunch and juicy interior with none of the fuss or mess of deep frying.
Why You’ll Love This Oven-Baked Crunchy Chicken Tenders for a Guilt-Free Treat Recipe
- Simple Ingredients: Uses common pantry staples you likely already have, making it budget-friendly and accessible.
- Perfect for Weeknights: Minimal hands-on time means you can whip up a wholesome dinner without stress.
- Impressive Presentation: These golden tenders look restaurant-quality but require none of the fancy plating skills.
- Customizable: Easily tailor your seasoning, dipping sauces, or even swap chicken cuts to satisfy everyone’s cravings.
Why This Oven-Baked Crunchy Chicken Tenders for a Guilt-Free Treat Recipe Works
This recipe shines because of its smart layering of flavors and textures combined with a simple brining process that locks in juiciness. Brining tenderizes the chicken while enhancing its natural flavor, so each bite bursts with moistness. Toasting the panko breadcrumbs beforehand adds an unbeatable crispy exterior, creating that crunch that feels indulgent yet is made guilt-free by baking instead of frying. The batter, enriched with vibrant spices and the perfect balance of flour and eggs, clings beautifully, ensuring every tender is coated evenly and baked to a golden finish. These carefully orchestrated steps elevate this simple dish into a standout meal that’s both healthy and delectable.
Ingredients You’ll Need
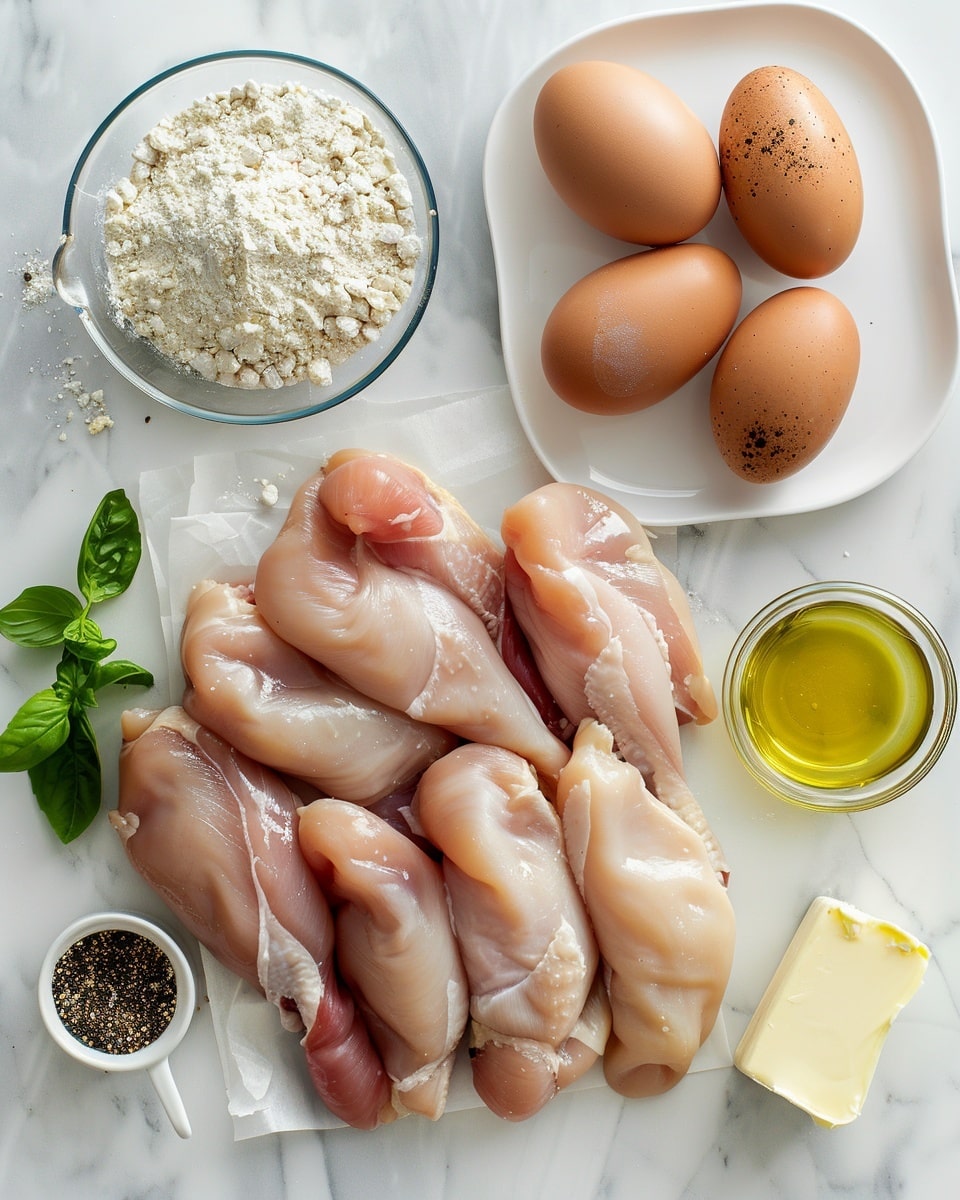
You’ll be delighted by how straightforward and essential the ingredients list is, keeping this recipe wonderfully approachable and delicious.
- Chicken Tenderloins (1 pound): The star ingredient for tender, juicy bites that cook quickly and evenly.
- Salt (1.5-3 teaspoons): For brining, enhances flavor and moisture retention.
- Onion Powder (1 teaspoon): Adds subtle savory sweetness to the batter.
- Garlic Powder (1 teaspoon): Infuses warmth and depth to every tender.
- Ground Black Pepper (1 teaspoon): Injects a mild spice kick for balance.
- Panko Breadcrumbs (1 cup): Toasted to a crunchy perfection, they provide an irresistible crisp texture.
- Plain Flour (1/2 cup): Forms the batter base, helping the coating adhere flawlessly.
- Eggs (2 large): Binds the ingredients and gives richness to the batter.
- Water (1/4 cup): Adjusts the batter consistency for the perfect coating.
- Oil (1 tablespoon): Used to toast breadcrumbs and add golden color and crunch.
Ingredient Substitutions & Tips
- Chicken Tenderloins: You can swap with boneless skinless chicken breasts, sliced into strips.
- Panko Breadcrumbs: Regular breadcrumbs work, though panko delivers the signature crunch; gluten-free panko is an option too.
- Eggs: For a vegan version, use flax eggs (1 tablespoon ground flaxseed mixed with 3 tablespoons water per egg).
- Plain Flour: Substitute with gluten-free flour blends if you need a gluten-free alternative.
👨🍳 Pro Tips for Perfect Results
- Brine Wisely: Don’t skip the brine—it locks in moisture and seasons the chicken deeply.
- Toast Your Panko: Toasting buttery breadcrumbs before coating gives unbeatable crunch that stays crisp after baking.
- Consistency is Key: Adjust the batter’s thickness with water to ensure it clings well without dripping.
- Don’t Crowd the Pan: Arrange tenders spaced out on the baking sheet for even heat circulation and crisping.
- Serve Immediately: These tenders are best enjoyed fresh from the oven for maximum crunch and juiciness.
How to Make Oven-Baked Crunchy Chicken Tenders for a Guilt-Free Treat Recipe
Step 1: Brine the Chicken
Combine salt with chicken tenderloins and refrigerate for 30 to 40 minutes to let the salt work its magic, tenderizing the meat and infusing flavor. After brining, rinse and pat dry thoroughly to ensure the batter sticks perfectly later.
💡 Pro Tip: Use cold water for rinsing to keep the chicken chilled and firm for the next steps.
Step 2: Toast the Breadcrumbs
Preheat your oven to 180°C (350°F). Toss the panko breadcrumbs with oil and spread them evenly on a baking tray. Roast for 8 to 10 minutes, stirring once halfway through to toast evenly and deepen the flavor. This step guarantees a crispy, golden crust.
💡 Pro Tip: Keep a close eye on them—they can go from perfectly toasted to burnt quickly.
Step 3: Prepare the Batter
In a bowl, whisk together eggs, water, plain flour, onion powder, garlic powder, and ground black pepper until smooth and lump-free. This batter creates the perfect sticky coating for the breadcrumbs to cling to the chicken.
💡 Pro Tip: If the batter is too thick, add a splash more water for easier coating.
Step 4: Coat the Chicken
Dip each brined chicken tenderloin into the batter, ensuring it’s fully covered. Then dredge generously in toasted panko breadcrumbs, pressing lightly so the crumbs adhere well. Place each coated tender on a parchment-lined baking sheet, spaced evenly.
💡 Pro Tip: For extra thick coating, repeat the batter and panko step once more.
Step 5: Bake the Tenders
Slide your tray into the preheated oven and bake for 10 to 12 minutes. The tenders should turn golden brown and pass the test for doneness—juices running clear and internal temperature reaching 165°F (74°C).
💡 Pro Tip: Halfway through, flip the tenders to crisp up both sides evenly.
Step 6: Serve and Enjoy
Remove from oven and let cool briefly before serving with your favorite dipping sauces such as sweet chili or ranch. Bask in the crunchy, juicy goodness with every bite—it’s comfort food elevated.
💡 Pro Tip: Serve immediately to savor maximum crunchiness.
Common Mistakes to Avoid
Learn from these common pitfalls:
- Skipping the Brine: Your chicken may turn out dry and bland without prepping it properly.
- Using Untoasted Panko: The crumbs won’t have that signature crunch and may be soggy after baking.
- Batter Too Thick or Thin: Too thick and it clumps; too thin and coating slips off. Strike a good balance.
- Crowding the Baking Sheet: Tenders cook unevenly and don’t crisp up well when crowded.
- Not Flipping Midway: One side could overbrown while the other stays pale and soft.
- Overbaking: Chicken can dry out quickly if left too long in the oven.
Delicious Variations to Try
Once you’ve mastered the classic Oven-Baked Crunchy Chicken Tenders for a Guilt-Free Treat Recipe:
Spicy Harissa Chicken Tenders
Add a tablespoon of harissa paste to the batter for smoky heat that elevates every bite wonderfully.
Lemon-Herb Infusion
Incorporate lemon zest and fresh chopped herbs like parsley and thyme into the batter for a bright, fresh flavor profile.
Parmesan-Crusted Tenders
Mix grated Parmesan cheese with your toasted panko crumbs to add a savory, nutty dimension that’s utterly addictive.
Smoky Paprika Crunch
Sprinkle smoked paprika into the flour and panko mix for a deep, aromatic flavor with a gentle smoky note.
Middle Eastern Inspired
Season the batter with sumac and ground cumin for a tangy, earth-inspired twist perfect with a yogurt-based dipping sauce.
Crunchy Coconut Chicken Tenders
Substitute half the panko with shredded unsweetened coconut for a tropical crunch paired beautifully with sweet chili sauce.
How to Serve Oven-Baked Crunchy Chicken Tenders for a Guilt-Free Treat Recipe

Garnishes
Fresh parsley or cilantro sprigs, lemon wedges for a citrusy zing, and a sprinkle of flaky sea salt bring elegance and extra flavor to the plate.
Side Dishes
Pair these tenders with rainbow slaw, crispy sweet potato fries, or a vibrant garden salad for a satisfying, balanced meal.
Creative Ways to Present
Serve tenders on a rustic wooden board with various dipping sauces in small bowls for a family-style feast. Or layer them on buns with fresh lettuce and tomato to transform into crunchy chicken sandwiches that wow.
Make Ahead and Storage
Storing Leftovers
Store cooled chicken tenders in an airtight container in the refrigerator for up to 3 days to maintain freshness.
Freezing
Freeze uncooked, breaded tenders on a parchment-lined tray until solid, then transfer to a freezer-safe bag for up to 1 month. Bake from frozen, adding a few extra minutes to cooking time.
Reheating
Reheat leftovers in a preheated oven at 180°C (350°F) for 8-10 minutes to revive crispness without drying out the juicy interior. Avoid microwaving to prevent sogginess.
FAQs
Can I use chicken breasts instead of tenderloins?
Absolutely! Just slice the chicken breasts into strips similar in size to tenderloins to ensure even cooking.
Is this recipe gluten-free?
You can make it gluten-free by swapping plain flour and panko breadcrumbs with gluten-free alternatives.
Can I make this recipe vegan?
Use flax eggs as a substitute for eggs and plant-based milk for water if desired. Choose a plant-based ‘chicken’ alternative if preferred.
How long do the chicken tenders last in the fridge?
They stay fresh for up to 3 days when properly stored in an airtight container.
Do I have to brine the chicken?
While optional, brining is highly recommended for maximum juiciness and seasoning depth.
Can I bake the tenders on a wire rack?
Yes! Using a wire rack over a baking sheet helps air circulate for extra crispiness all around.
What dipping sauces go best with these tenders?
Sweet chili, ranch, honey mustard, or a tangy garlic aioli are all fantastic choices.
Can I prepare the tenders ahead of time before baking?
You can bread them in advance and refrigerate for a couple of hours, but bake just before serving for peak crunch.
Final Thoughts
There’s something truly special about homemade oven-baked chicken tenders that bring everyone to the table with smiles. This Oven-Baked Crunchy Chicken Tenders for a Guilt-Free Treat Recipe delivers the perfect harmony of juicy, tender chicken encased in a satisfyingly crunchy coating without the guilt of frying. It’s a recipe worth keeping in your weekly rotation for quick dinners, friendly gatherings, or whenever you crave that unbeatable comfort food.
Have you tried this Oven-Baked Crunchy Chicken Tenders for a Guilt-Free Treat Recipe? I’d love to hear how it turned out! Leave a comment below. If you loved this recipe, please share it with friends and family. Happy cooking! 🍗✨
PrintOven-Baked Crunchy Chicken Tenders for a Guilt-Free Treat Recipe

These Oven-Baked Crunchy Chicken Tenders are a guilt-free, crispy treat perfect for a delicious meal or snack. Brined for tenderness, coated in a flavorful batter, and baked to golden perfection with toasted panko breadcrumbs, they deliver all the crunch without deep frying.
- Prep Time: 45 minutes
- Cook Time: 20 minutes
- Total Time: 1 hour 5 minutes
- Yield: 4 servings 1x
- Category: Main Course
- Method: Baking
- Cuisine: American
Ingredients
Chicken and Brine
- 1 pound Chicken Tenderloins (Boneless skinless chicken breasts can be used as a substitute)
- 1.5–3 teaspoons Salt (Amount can vary; recommended between)
Batter
- 2 large Eggs (Can substitute with a flax egg for a vegan option)
- 1/4 cup Water (Adjust for desired batter thickness)
- 1/2 cup Plain Flour (All-Purpose) (Gluten-free flour may be used as a substitute)
- 1 teaspoon Onion Powder
- 1 teaspoon Garlic Powder
- 1 teaspoon Ground Black Pepper
Breading
- 1 cup Panko Breadcrumbs (Toasting enhances crispness)
- 1 tablespoon Oil (Can use olive oil, vegetable oil, or melted butter)
Instructions
- Brine the Chicken: Mix salt with the chicken tenderloins thoroughly, then refrigerate for 30 to 40 minutes to help tenderize and season the meat. After brining, rinse the chicken under cold water and pat dry completely with paper towels.
- Toast the Breadcrumbs: Preheat your oven to 180°C (350°F). Toss the panko breadcrumbs with the tablespoon of oil evenly, spread them out on a baking sheet, and bake for 8 to 10 minutes until they turn golden and crispy. This step enhances the crunchiness for the final dish.
- Prepare the Batter: In a bowl, whisk together the eggs, water, plain flour, onion powder, garlic powder, and ground black pepper until the mixture is smooth and well combined. This batter creates a flavorful coating for the chicken tenders.
- Coat the Chicken: Dip each chicken tenderloin into the batter, ensuring it is fully coated, then dredge it in the toasted panko breadcrumbs until well-covered on all sides.
- Bake the Tenders: Line a baking sheet with parchment paper and arrange the coated chicken tenders on it in a single layer. Bake in the preheated oven for 10 to 12 minutes, or until the tenders are golden brown and cooked thoroughly with an internal temperature reaching 165°F (74°C).
- Serve and Enjoy: Serve the hot chicken tenders immediately with your favorite dipping sauces such as sweet chili, ranch, or honey mustard for a delicious, guilt-free feast.
Notes
- Brining helps keep the chicken juicy and flavorful.
- Toasting the panko breadcrumbs before using is essential for a crunchier texture.
- Feel free to use gluten-free flour and breadcrumbs to make the dish gluten-free.
- For a vegan option, substitute eggs with flax eggs and use plant-based alternatives for dairy ingredients.
- Make sure to pat the chicken dry after brining to ensure the batter sticks well.
- Adjust seasoning quantities based on personal preference.
Keywords: oven baked chicken tenders, crunchy chicken tenders, healthy chicken tenders, baked panko chicken, crispy chicken tenders


