
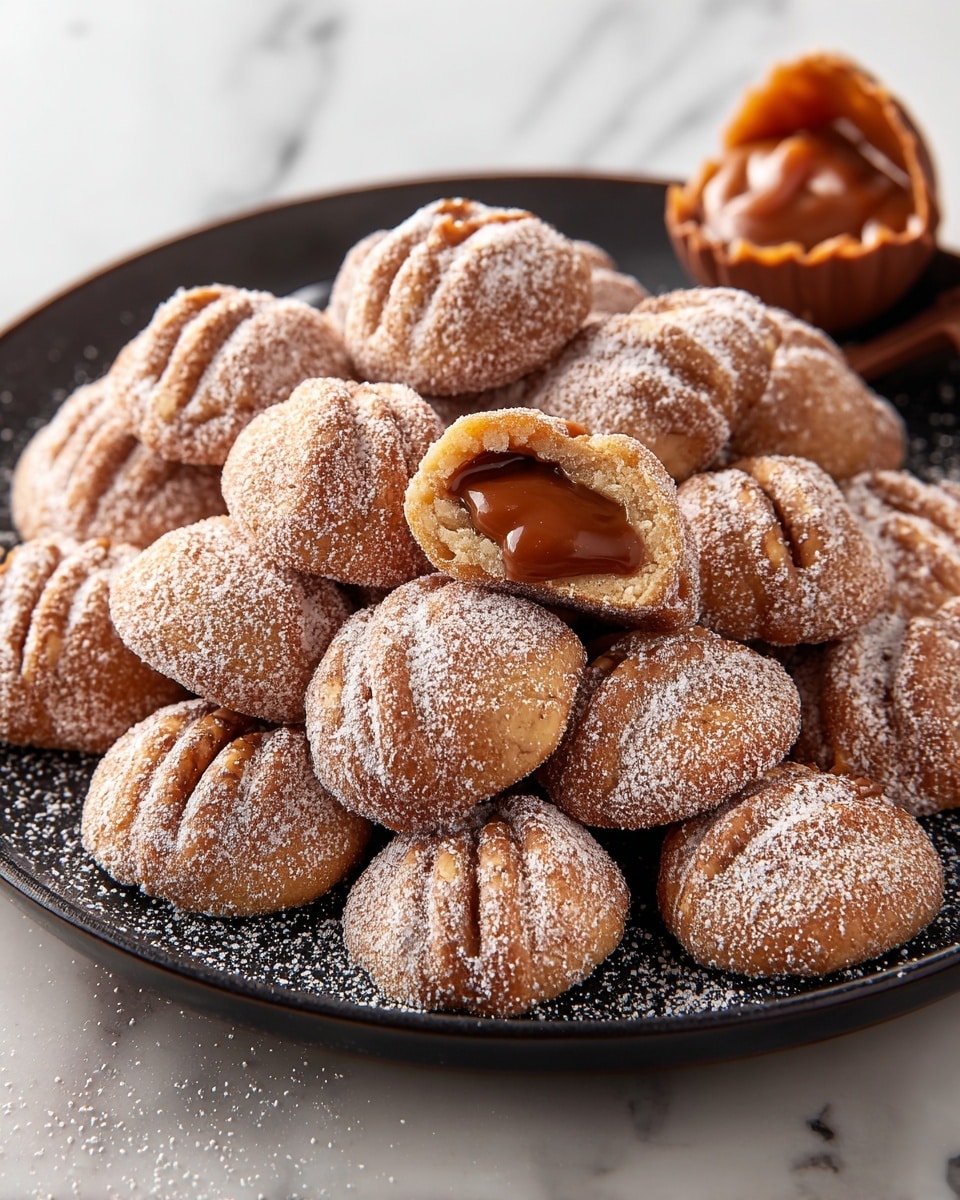
Walnut Cookies with Dulce de Leche (Oreshki) Recipe
If you’re craving a delightful treat that brings together a crisp, buttery shell with a luscious, creamy filling, this Walnut Cookies with Dulce de Leche (Oreshki) Recipe is an absolute must-try. These charming, bite-sized cookies mimic little walnut shells, filled to perfection with sweet, caramel-like dulce de leche, creating a harmonious balance of texture and flavor that’s sure to captivate your taste buds and impress anyone lucky enough to share them with you.

Ingredients You’ll Need
The beauty of this Walnut Cookies with Dulce de Leche (Oreshki) Recipe lies in its simple yet carefully chosen ingredients. Each one plays a starring role — from the buttery richness to the subtle tang that brightens the dough — ensuring the perfect cookie every time.
- Eggs (3): Provide structure and a tender crumb to the cookies.
- Sugar (1 cup): Adds sweetness and helps to create a golden color when baked.
- Unsalted butter (16 Tbsp / 1 cup): Melted for rich, moist dough with a smooth texture.
- Baking soda (½ tsp): Reacts with lemon juice for a delicate rise and lightness.
- Half a lemon (juiced): Brightens the dough with a subtle tang and activates the baking soda.
- All-purpose flour (1 cup, unbleached): Provides the main structure and body for the dough.
- Corn starch (1 cup): Ensures crispness and a tender bite in the finished cookies.
- Dulce de leche (1 can, cooked): The star filling, offering a smooth, creamy caramel flavor that’s irresistibly sweet.
How to Make Walnut Cookies with Dulce de Leche (Oreshki) Recipe
Step 1: Melt the Butter and Prepare the Egg Mixture
Start by melting your unsalted butter gently, either in the microwave or on the stove, to bring out its creamy richness. In a mixing bowl, whisk the eggs and sugar together until they’re light and combined, then slowly whisk in the warm butter. This warm mixture is the flavor and moisture base of your dough, making it wonderfully rich and tender once baked.
Step 2: Activate the Baking Soda with Lemon Juice
In a small bowl, squeeze the juice of half a lemon and add the baking soda. Let it sit for a few moments to foam up — this reaction is magical because it adds light airiness to your cookies, making them delightfully crisp rather than dense. Once foamed, gently mix this lemony soda blend into your wet ingredients.
Step 3: Combine Dry Ingredients
Next, stir in the all-purpose flour and cornstarch to the wet mixture. Using a spoon, mix thoroughly until everything is well incorporated. Your dough should have some body — not too runny — perfect for shaping in the walnut molds. This balance of flours gives your cookies their classic crisp shell with a soft bite inside.
Step 4: Cook the Cookie Shells
Heat your walnut cookie maker or mold until ready, then carefully place a quarter teaspoon of the dough into each shell. Close the machine to form the shapes, which only takes about a minute to cook. Watch as they turn a lovely golden color. Once done, remove each half carefully to cool, trimming any excess dough to keep those shells neat and walnut-like.
Step 5: Assemble the Cookies
As your cookie halves cool, place them in a bowl to keep them accessible. The fun comes next — spoon or pipe the cooked dulce de leche into each half, then sandwich two halves together. The creamy dulce de leche melds beautifully with the crispy shells, giving you those perfectly shaped walnut “nuts” you’ll be so proud to share.
How to Serve Walnut Cookies with Dulce de Leche (Oreshki) Recipe
Garnishes
Sprinkle the finished walnut cookies lightly with powdered sugar for an elegant, snowy effect that adds just a whisper of extra sweetness. Toasted finely chopped walnuts can also be dusted on the sides to enhance the nutty flavor and add a subtle crunch contrast, making the presentation even more inviting.
Side Dishes
Pair these Walnut Cookies with Dulce de Leche (Oreshki) Recipe beauties alongside a cup of strong coffee or black tea — the deep, bitter notes perfectly complement the sweetness of the cookies. For a festive touch, serve with a scoop of vanilla ice cream or fresh fruit slices to elevate this simple dessert into a memorable treat.
Creative Ways to Present
Consider arranging the cookies in a circular pattern on a wooden board or vintage platter to mimic the shape of a walnut tree cluster. You can also place each cookie in a colorful mini cupcake liner to add a pop of fun color that’s great for gatherings or gift-giving. Wrapping them in cellophane tied with a ribbon makes a charming homemade gift that anyone will adore.
Make Ahead and Storage
Storing Leftovers
Store your walnut cookies in an airtight container at room temperature to keep their shells crisp for up to 3 days. If you prefer them softer, a container with a slightly looser seal can help retain some moisture, but be mindful of humidity which might soften the shells too much.
Freezing
If you want to make these ahead for special occasions, freeze the cookie halves separately before assembling. Wrap them tightly in plastic wrap or store in a sealed freezer bag for up to 2 months. When you’re ready, thaw completely before filling with dulce de leche to maintain that perfect texture contrast.
Reheating
To refresh the crispy texture of your cookie shells after storage, gently warm them in a low oven at 275°F (135°C) for 5 minutes before filling. Be careful not to overheat, as the filling can melt or the shells could become too hard. This simple step brings back that homemade freshness as if just baked.
FAQs
Can I substitute the dulce de leche with something else?
Absolutely! While dulce de leche is traditional and delicious, you can experiment with Nutella, peanut butter, or even fruit jam for a different flavor twist. Each alternative will bring its own charm to the walnut cookies, so have fun with it!
Do I need a special walnut cookie maker?
Yes, a walnut-shaped mold or specialized cookie maker helps give these cookies their iconic shape. If you don’t have one, you can look online or at specialty kitchen stores; they’re a worthwhile investment if you love baking indulgent treats like this.
Why is cornstarch used along with flour?
Cornstarch lightens the dough and creates that delicate crispness essential for the cookie shells. It balances the gluten in the flour, so you get a perfectly tender yet firm cookie that won’t be tough or chewy.
Can I make these cookies gluten-free?
With some modifications, yes! Substitute the all-purpose flour with a gluten-free blend that includes xanthan gum and ensure your cornstarch is pure. The texture might vary slightly, but the essence of this Walnut Cookies with Dulce de Leche (Oreshki) Recipe will still shine through.
How long does it take to assemble the cookies?
Assembly is quite quick — once your shells have cooled, filling and joining two halves takes just a couple of minutes per cookie. The overall process is manageable and very rewarding as you watch the crunchy shells become little filled treats ready to enjoy.
Final Thoughts
This Walnut Cookies with Dulce de Leche (Oreshki) Recipe is one of those special delights that combine simple ingredients into something truly extraordinary. The fun of crafting these little nuts, the aroma while baking, and that perfect bite where crisp meets creamy sweetness makes it a joy to share with friends and family. I encourage you to try this recipe soon — your kitchen will thank you for the wonderful aroma, and your loved ones will thank you for the delicious memories.
PrintWalnut Cookies with Dulce de Leche (Oreshki) Recipe

These Simple Walnut Cookies with Dulce de Leche, also known as Oreshki, are delightful bite-sized treats resembling walnut shells. They feature a tender, buttery cookie exterior filled with rich, creamy dulce de leche. Perfect for special occasions or as a sweet snack, these cookies combine a traditional Eastern European homemade cookie-making technique with the irresistible caramel flavor of dulce de leche.
- Prep Time: 20 minutes
- Cook Time: 1 hour 40 minutes (including baking all cookies shells and cooling time)
- Total Time: 2 hours
- Yield: 25 servings 1x
- Category: Dessert
- Method: Baking
- Cuisine: Eastern European
Ingredients
Cookie Dough
- 3 eggs
- 1 cup sugar
- 16 Tbsp unsalted butter (1 cup), melted
- ½ tsp baking soda
- ½ lemon, juiced
- 1 cup all-purpose flour (unbleached)
- 1 cup corn starch
Filling
- 1 can cooked dulce de leche
Instructions
- Melt Butter: Begin by melting the unsalted butter either in the microwave or on the stovetop until fully liquid but not overheated.
- Combine Eggs and Sugar: In a mixing bowl, whisk together the eggs and sugar until well blended. Then gradually whisk in the melted butter to create a smooth mixture.
- Add Lemon and Baking Soda: In a small separate dish, squeeze the juice from half a lemon and add the baking soda to it. Allow this mixture to foam for a few moments, then immediately mix it into the egg and sugar bowl.
- Add Dry Ingredients: Add the all-purpose flour and corn starch to the wet ingredients. Stir gently with a spoon until a consistent dough forms that is not overly runny but pliable.
- Heat Cookie Maker: Preheat your walnut cookie maker or mold until it reaches the proper temperature for cooking the dough shells.
- Cook Cookies: Place approximately ¼ teaspoon of dough into each shell compartment of the walnut cookie maker. Close the machine and cook the shells for about one minute, or until golden brown.
- Cool and Trim: Carefully remove each walnut shell cookie and place them on a cutting board or countertop to cool quickly. If there is excess dough around the edges, trim it off cleanly.
- Fill Shells: Place the cooled cookie halves into a bowl. Using a spoon, fill each half with cooked dulce de leche. Then press two halves together to form a whole walnut-shaped cookie.
- Serve and Enjoy: Arrange the completed filled cookie walnuts on a serving plate and enjoy your homemade Oreshki treats.
Notes
- For best results, use an oreshki cookie maker, which is specifically designed for these walnut-shaped cookies.
- If you don’t have an oreshki mold, you can try using a mini muffin pan, but the shape and texture will differ.
- Allow the cookies to cool completely before filling to prevent the dulce de leche from melting or becoming too runny inside.
- Dulce de leche can be homemade or store-bought; ensure it is thick and cooked for the authentic texture.
- Store the assembled cookies in an airtight container at room temperature for up to 3 days.
Keywords: walnut cookies, oreshki, dulce de leche, Eastern European cookies, filled cookies, homemade cookie recipe


