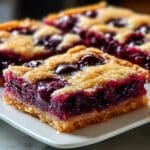
I never thought I’d find a dessert recipe easier than this, one that brings together the buttery crunch of a flaky crust and the sweet, tangy burst of cherry pie filling in perfect harmony. Just imagine pulling a warm pan from the oven, the scent of baked butter mingling with summery cherries filling the air, inviting you to savor a slice of pure comfort. These Buttery Cherry Pie Bars Recipe are a true crowd-pleaser, boasting luscious layers in every bite.
Why You’ll Love This Buttery Cherry Pie Bars Recipe
Delicious Balance of Flavors: The combination of a flaky, buttery crust with sweet cherry filling creates a tantalizing treat you’ll crave again and again.
Simple Ingredients: This recipe uses common pantry staples like flour, sugar, and butter, paired with luscious cherry pie filling—either homemade or canned.
Perfect for Sharing: Whether it’s a family dessert or a festive gathering, these bars cut into 12 generous servings, making them ideal for any occasion.
Textural Delight: The crumbly crust contrasts beautifully with the gooey cherry layer, while the almond extract lends a subtle hint of warmth.
Customizable and Flexible: Swap in brown sugar for a richer taste or fresh cherries for the filling to make it your own culinary masterpiece.
Why This Buttery Cherry Pie Bars Recipe Works
This recipe shines because it’s rooted in classic baking techniques that promise a flawless outcome. The secret lies in using cold, cubed butter cut into the flour mixture until it resembles coarse crumbs, ensuring a tender, flaky crust. Pressing half the dough firmly creates a sturdy base that holds the cherry filling without sogginess. Baking at a moderate 350°F allows the crust to turn golden and the cherry filling to bubble just right. The optional almond extract flavors the bars with a gentle, nutty note, elevating the simple ingredients to a delightful dessert experience.
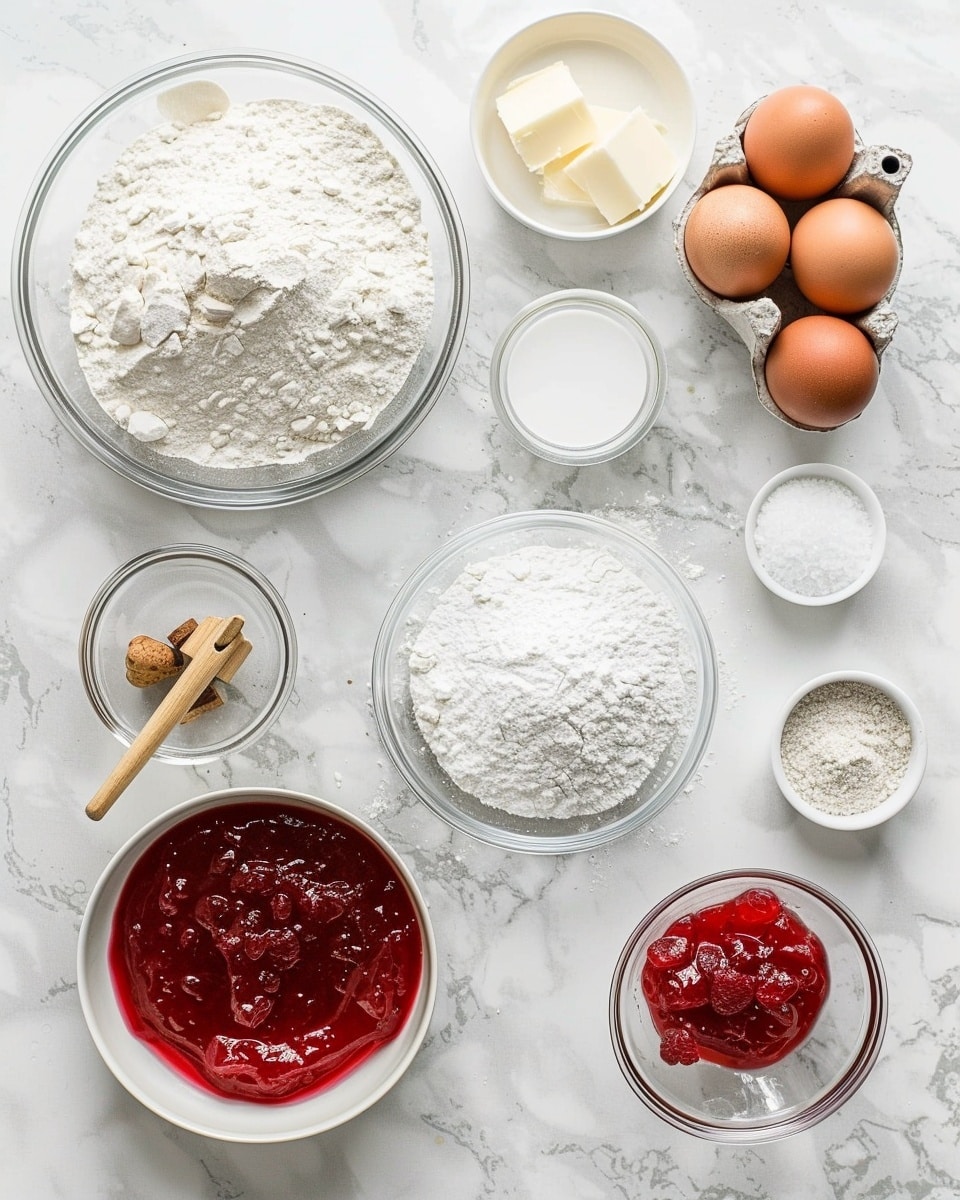
Ingredients You’ll Need
Gather these ingredients that play starring roles in making these bars utterly irresistible, combining pantry basics with a pop of cherry sweetness.
2 cups all-purpose flour: Forms the base and gives the bars their signature crumbly texture.
1/2 cup granulated sugar: Sweetens the bars just right; you can swap with brown sugar for a deeper flavor.
1/2 teaspoon baking powder: Helps the bars rise to a delightful fluffiness, keeping them light and tender.
1/4 teaspoon salt: Balances the sweetness and enhances all the flavors in the crust.
1 cup unsalted butter: Cold and cut into pieces to ensure that flaky, buttery crust everyone loves.
1 cup cherry pie filling: Use homemade or canned; fresh cherries add a vibrant, authentic flavor.
1/4 teaspoon almond extract: Optional but highly recommended for a subtle, fragrant twist.
Ingredient Substitutions & Tips
Granulated sugar: Swap for brown sugar to add a caramel-like richness to the bars.
Cherry pie filling: Fresh cherry preserves or fresh cherries simmered with sugar make an excellent alternative.
Unsalted butter: You can use salted butter but reduce additional salt by half to keep balance.
Almond extract: If you’re out, vanilla extract works great as a subtle replacement.
👨🍳 Pro Tips for Perfect Results
Keep butter cold: Chilling the butter helps create that flaky, crumbly crust texture.
Press crust firmly: This prevents the bottom from becoming too crumbly when slicing.
Even spreading: Distribute the cherry filling evenly to ensure each bite bursts with flavor.
Cool completely: Let bars cool for at least 1 hour to set properly before cutting for clean slices.
Bake until golden: Watch the top edges for a golden brown color to know it’s perfectly baked.
How to Make Buttery Cherry Pie Bars Recipe
Step 1: Preheat the Oven
Begin by setting your oven to a comforting 350°F (175°C). This gentle heat is just right for baking these bars to a golden, flaky perfection.
💡 Pro Tip: Preheating the oven ensures you get an even bake from the moment the bars go in.
Step 2: Mix Dry Ingredients
Whisk together the flour, sugar, baking powder, and salt in a large bowl until beautifully combined. This blend is the foundation for your crumbly crust and ensures every bite is balanced in flavor.
💡 Pro Tip: Whisking helps break up any lumps and aerates the mixture for better texture.
Step 3: Cut in the Butter
Add the cold, cubed butter to your dry ingredients. Use a pastry cutter, fork, or your fingertips to work it in until the mixture looks like coarse crumbs. This step gives you that flaky, buttery crust texture that melts in your mouth.
💡 Pro Tip: Work quickly to keep the butter cold for the best crumb.
Step 4: Form the Crust
Press half of this buttery mixture firmly into a greased 9×13-inch baking dish. Your firm pressing creates a sturdy base that supports the luscious cherry filling without falling apart.
💡 Pro Tip: Use a flat-bottom glass to press down evenly for a smooth crust.
Step 5: Add the Cherry Filling
Spread the cherry pie filling evenly over your crust, creating a vibrant layer of sweet and tart cherries that promises a burst of flavor with every bite.
💡 Pro Tip: Smooth the top gently with a spatula to distribute the filling uniformly.
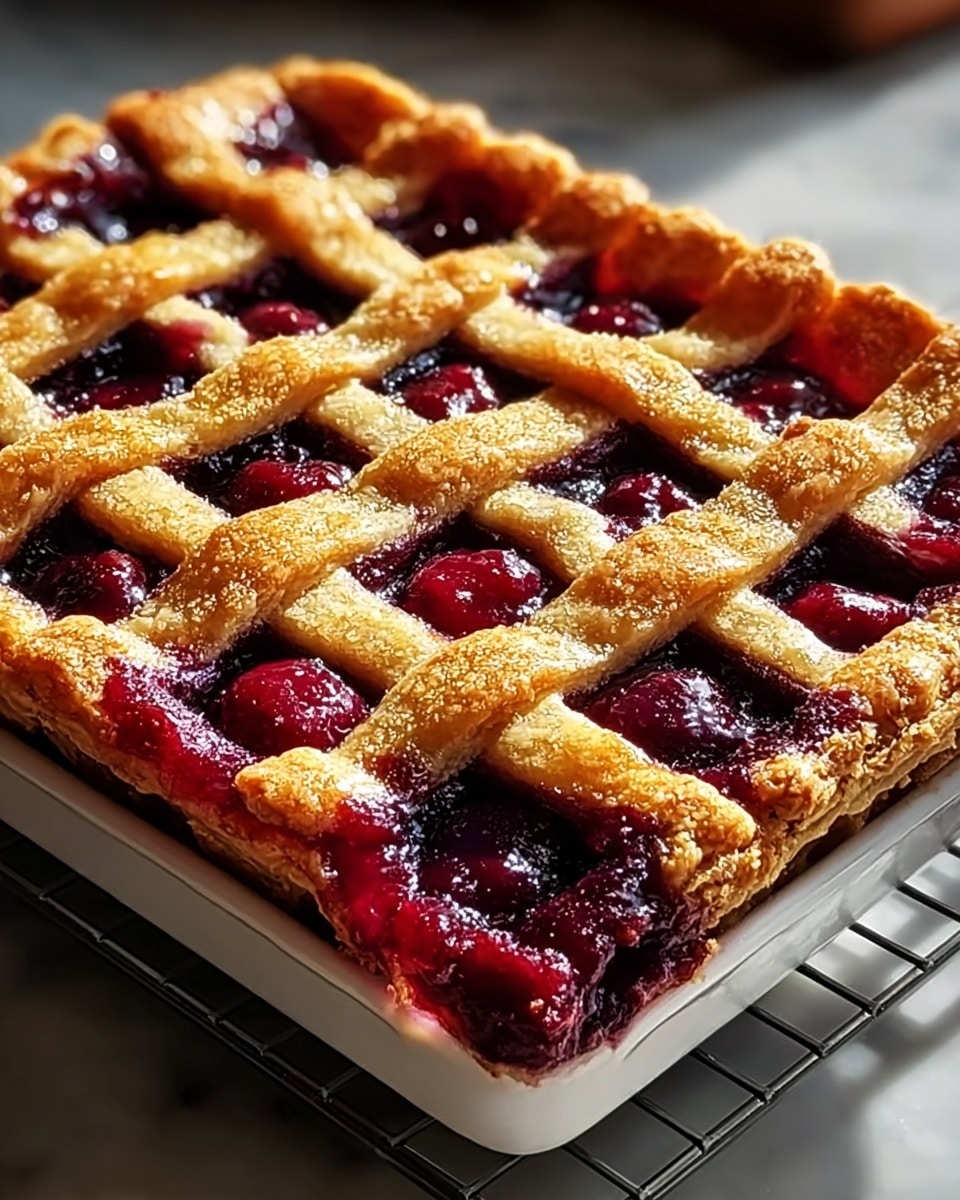
Step 6: Top with Remaining Dough
Crumble the remaining dough over the cherry layer like a buttery blanket. This generous topping will bake into a gorgeous golden crumble that complements the filling perfectly.
💡 Pro Tip: Don’t press the top dough; leave it loose for a crisp, textured finish.
Step 7: Bake
Slide your baking dish into the oven and bake for 30-35 minutes until the top is a mouthwatering golden brown. The aroma of baking butter and cherries will soon fill your kitchen, signaling that something wonderful is underway.
💡 Pro Tip: Around minute 30, keep an eye on the edges to avoid over-browning.
Step 8: Cool Completely
Once baked, set your cherry pie bars aside to cool completely in the dish for at least 1 hour. This step is crucial—it allows the cherry filling to set so you can cut perfect squares without any mess.
💡 Pro Tip: For quicker setting, refrigerate after they’ve cooled slightly.
Common Mistakes to Avoid
Learn from these common pitfalls:
Using warm butter: Soft butter will ruin the crumbly texture, resulting in a dense crust.
Not pressing the crust firmly: A loose base causes the bars to fall apart when sliced.
Skipping the cooling time: Cutting too soon makes the cherry filling runny and messy.
Uneven spreading of filling: Leads to bars with some bites lacking that cherry goodness.
Baking at too high temperature: Can cause the crust to burn before the filling sets properly.
Overmixing dough: Can develop gluten, making the bars tough instead of tender.
Delicious Variations to Try
Once you’ve mastered this classic Buttery Cherry Pie Bars Recipe, feel free to experiment and make it uniquely yours!
Blueberry and Almond Bars
Swap the cherry pie filling with fresh blueberries and add slivered almonds on top for a nutty twist.
Peach and Cinnamon Delight
Replace cherries with peach preserves and sprinkle cinnamon over the top dough before baking for a warm, comforting flavor.
Lemon Zest Cherry Bars
Add a teaspoon of lemon zest to the crust mixture for a bright citrus note that compliments the cherry filling beautifully.
Chocolate Chip Cherry Bars
Mix mini chocolate chips into the crumb topping for added indulgence and a delightful contrast of flavors.
Dust a little powdered sugar on top or add a dollop of whipped cream for extra indulgence. Fresh mint leaves also add a pop of color and freshness.
Side Dishes
Pair these bars with a scoop of vanilla ice cream or a side of freshly brewed coffee for the ultimate dessert experience.
Creative Ways to Present
Cut into neat squares or fun shapes using cookie cutters. Serve on a rustic wooden platter for a warm, inviting presentation that guests will love. For special occasions, drizzle with white chocolate or caramel sauce for an elegant touch.
You can prepare the crumb mixture and press half of it into the pan in advance. Keep it refrigerated for up to a day before adding filling and topping.
Storage
Store the baked bars in an airtight container at room temperature for up to 2 days. For longer freshness, refrigerate for up to 5 days.
Freezing
Yes! Cherry pie bars freeze well. Wrap them tightly in plastic wrap and a layer of foil, then freeze for up to 3 months.
Reheating
Warm them gently in the oven at 300°F for 10-15 minutes or microwave individual squares for about 15 seconds to enjoy their fresh-baked goodness.
Expert Tips for Success
Use fresh, cold ingredients for the best texture.
Always grease your baking dish well to prevent sticking.
Don’t rush the cooling time–it’s key for neat slicing.
Customize the sugar level based on your cherry filling’s sweetness.
Experiment with extracts like almond or vanilla to enhance flavor layers.
If using fresh cherries, cook them down slightly before spreading.
Use a serrated knife to gently cut bars for clean edges.
Frequently Asked Questions
Can I use fresh cherries instead of canned pie filling?
Absolutely! Fresh cherries can be simmered with sugar and a bit of lemon juice to create your own pie filling, giving a fresh and vibrant flavor.
Why do I need to let the bars cool completely before cutting?
Cooling allows the cherry filling to set firmly, which keeps the bars neat and prevents the filling from oozing out when sliced.
Can I make this recipe gluten-free?
You can try substituting all-purpose flour with a gluten-free blend, but results may vary. Look for blends that include xanthan gum for better texture.
Is it possible to double this recipe?
Yes! Simply double all the ingredients and use a larger baking dish, or bake in two pans to ensure even cooking.
Can I add a crumb topping to these bars?
The top dough already acts as a crumbly topping, but feel free to sprinkle some chopped nuts or oats on top for extra crunch before baking.
How long will these bars keep at room temperature?
They stay fresh for up to 2 days at room temperature when stored in an airtight container.
What’s the best way to reheat these bars?
Warm them in a preheated oven at 300°F for 10-15 minutes or microwave individual bars briefly to bring back that fresh-baked softness.
Final Thoughts
These Buttery Cherry Pie Bars Recipe are more than just dessert—they’re a joyful celebration of flavors and textures that are comfortingly nostalgic yet effortlessly modern. The buttery, crumbly crust paired with the sweet, tangy cherry pie filling creates a balance that feels like a warm hug after a long day. I invite you to bake these bars, share them with loved ones, and make lasting memories over each delicious bite. Happy baking!
Related Recipes You’ll Love
If you enjoyed this recipe, you’ll also love these delicious recipes:
These Buttery Cherry Pie Bars are perfectly sweet and fruity, featuring a flaky crumbly crust layered with vibrant cherry pie filling. They make a delightful dessert or snack that’s simple to prepare and bake.
Author:Natali
Prep Time:15 minutes
Cook Time:35 minutes
Total Time:1 hour 50 minutes
Yield:12 servings 1x
Category:Dessert
Method:Baking
Cuisine:American
Diet:Vegetarian
Ingredients
Scale
Crust and Topping
2 cups all-purpose flour (forms the base, creating that crumbly texture.)
1/2 cup granulated sugar (sweetens the bars just right; swap with brown sugar for a deeper flavor.)
1/2 teaspoon baking powder (helps the bars rise to a delightful fluffiness.)
1/4 teaspoon salt (balances sweetness and enhances flavor.)
1 cup unsalted butter (cold, cut into pieces, ensures a flaky crust.)
Filling
1 cup cherry pie filling (homemade or canned; fresh cherries add vibrant flavor.)
1/4 teaspoon almond extract (optional, for additional flavor.)
Instructions
Preheat the oven: Preheat the oven to 350°F (175°C).
Mix dry ingredients: In a large bowl, whisk together the flour, sugar, baking powder, and salt until well combined.
Add butter: Add the cold, cubed butter to the mixture. Use a pastry cutter or fork to mix until it resembles coarse crumbs.
Form crust: Firmly press half of the crumbly mixture into a greased 9×13-inch baking dish to form the crust.
Add filling: Spread the cherry pie filling evenly over the crust.
Add topping: Crumble the remaining dough over the cherry filling, covering it generously.
Bake: Bake for 30-35 minutes or until the top is golden brown.
Cool: Let the Cherry Pie Bars cool completely in the dish for at least 1 hour before slicing.
Notes
Swap granulated sugar with brown sugar for a deeper flavor.
Use fresh cherries in the pie filling for vibrant flavor.
The almond extract is optional but adds additional flavor.
Cooling completely before slicing helps the bars set properly.
Keywords: Buttery Cherry Pie Bars, Cherry Dessert Bars, Easy Fruit Bars, Sweet Cherry Bars, Homemade Cherry Pie Bars


