
Chocolate Molten Cake Recipe
I never thought I’d find a Chocolate Molten Cake recipe easier than this—yet here it is, delivering that melt-in-your-mouth moment that feels like pure indulgence with every bite. Just imagine cracking into a delicate cake exterior, revealing a lush, flowing river of rich chocolate that dances on your tongue. This dessert is a guaranteed showstopper that feels both luxurious and surprisingly doable for any occasion.
Why You’ll Love This Chocolate Molten Cake Recipe
- Unforgettable decadence: Experience the perfect balance of a tender cake casing giving way to a luscious, gooey center that chocolate lovers dream about.
- Simple, familiar ingredients: Made with kitchen staples like butter, eggs, cocoa powder, and vanilla, making it effortless to gather everything without a special trip.
- Easy baking method: This recipe uses straightforward baking techniques that will have you whisking, folding, and melting with confidence, even if you’re new to baking.
- Perfect for sharing: Designed for 4 servings, it’s a lovely dessert to impress dinner guests or savor with family over coffee or after a cozy meal.
- Flexible finishing touches: Top with powdered sugar, fresh berries, or your favorite ice cream to personalize your Chocolate Molten Cake experience.
Why This Chocolate Molten Cake Recipe Works
This Chocolate Molten Cake shines because of a few key techniques and ingredients. First, melting Ghirardelli chocolate with unsalted butter creates a silky base that infuses the cake with intense flavor. Then, the clever use of espresso powder amplifies the chocolate’s richness without adding bitterness. Whipping eggs and sugar together until fluffy is crucial for that light, airy cake texture that contrasts the gooey center. Finally, lightly folding in flour keeps the batter delicate but stable enough to bake into little individual cakes that ooze chocolate at just the right moment—baked at a high temperature for a precise 13 minutes to lock in the molten magic.
Ingredients You’ll Need
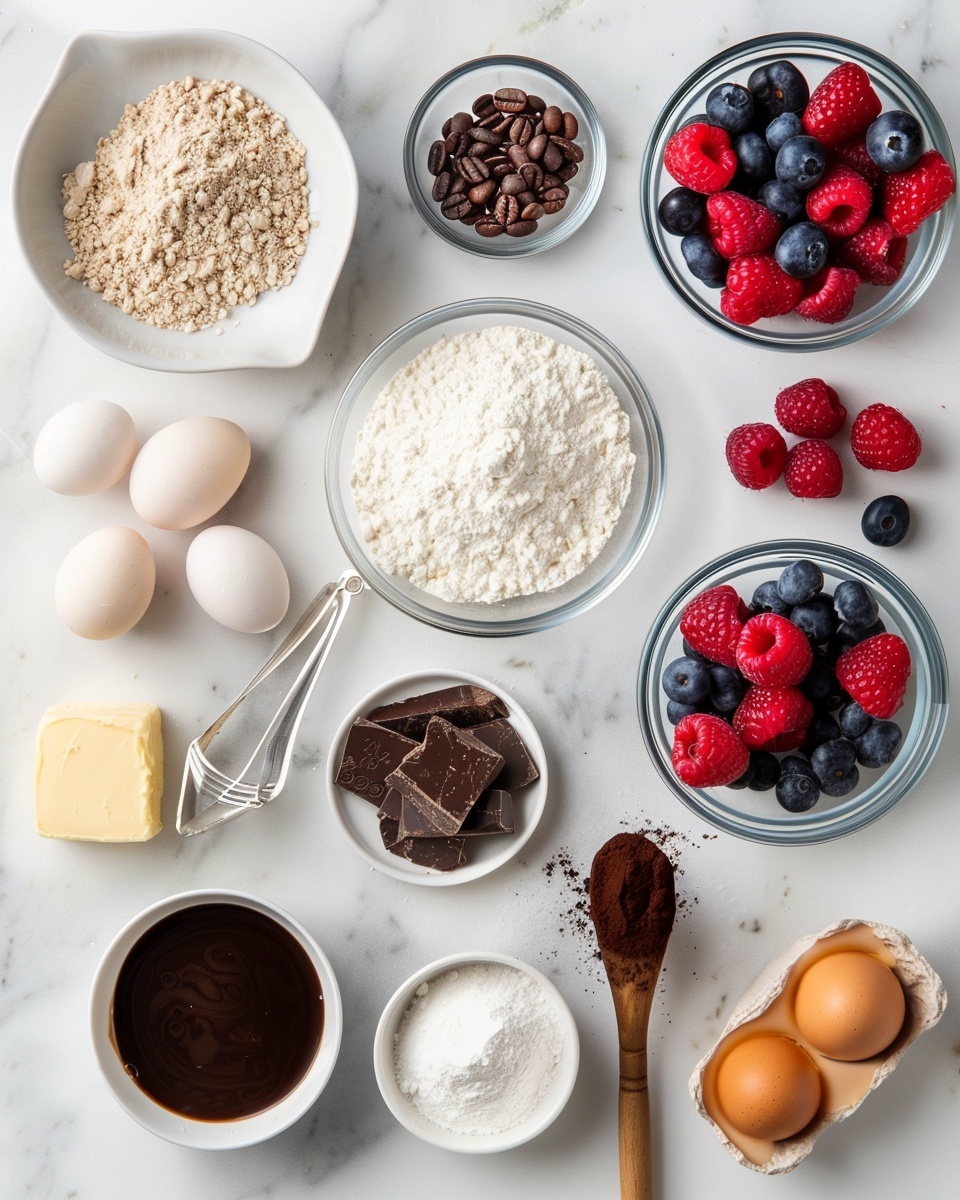
Gather a harmonious blend of ingredients that bring texture, depth, and sweetness: from the earthy richness of cocoa powder to the velvety touch of butter and the sweet pop of vanilla. Each component plays a vital role.
- 2 Tbsp. softened butter: For greasing ramekins and adding a creamy texture.
- 1-2 Tbsp. cocoa powder: To coat ramekins and intensify chocolate flavor.
- 8 oz. chocolate, roughly chopped (I use Ghirardelli): The heart of the molten center, lending deep, smooth chocolate notes.
- 8 Tbsp. butter, unsalted: Adds richness and silky mouthfeel to the cake.
- 1/2 tsp. espresso powder: Enhances chocolate flavor without overpowering.
- 2-3 eggs*, room temperature: Whipped for structure and fluffiness.
- 2-3 egg yolks*, room temperature: Adds richness and tenderness.
- 1/2 cup confectioners sugar or granulated sugar: Sweetens the batter softly.
- 1 tsp. vanilla extract: Infuses warmth and complexity.
- 1/2 tsp. salt: Balances and heightens flavor.
- 1/4 cup all purpose flour: Provides structure without heaviness.
- garnish: powdered sugar, berries, whipped cream, ice cream, chocolate sauce, cocoa powder – to elevate presentation and flavor.
Ingredient Substitutions & Tips
- Chocolate: Swap Ghirardelli with any good-quality bittersweet or semisweet chocolate bar for slightly different flavor notes.
- Butter: Use European-style butter for extra creaminess or vegan butter for a dairy-free twist (though texture may vary).
- Espresso powder: If unavailable, a strong brewed espresso or coffee liquid can substitute, just reduce other liquid carefully.
- Sugar: Powdered sugar ensures smooth batter but granulated sugar works fine for a slightly different texture.
👨🍳 Pro Tips for Perfect Results
- Use room temperature eggs: This helps the egg mixture reach maximum volume when whipped, creating that perfect lift.
- Grease and dust ramekins well: Cocoa powder or flour inside the ramekin prevents sticking and ensures stunning unmolding.
- Watch your bake time: Baking 9-13 minutes is key to getting that toasty edge and melt-in-the-middle core.
- Let the cakes rest briefly: Two minutes of cooling helps the cakes hold shape but keeps that ooey-gooey surprise inside.
- Don’t overfold the flour: Just combine to preserve the airy texture; overmixing can lead to dense cakes.
How to Make Chocolate Molten Cake Recipe
Step 1: Preheat the oven
Get your oven sizzling to a whopping 450°F to ensure your cakes bake fast enough to keep that molten center beautifully runny.
💡 Pro Tip: Preheating thoroughly helps form the perfect crust on top while the inside stays gooey.
Step 2: Prep the ramekins
Grease 4 six-ounce ramekins with softened butter, then dust them evenly with cocoa powder. This combo not only prevents sticking but also adds a subtle chocolate touch on the edges of your cake.
💡 Pro Tip: Use a parchment-lined baking sheet to catch any drips and make transferring easier.
Step 3: Melt the chocolate and butter
In a microwave-safe bowl, melt chopped chocolate and 8 tablespoons of unsalted butter in short bursts of 20-30 seconds. Stir between intervals for a silky, glossy texture. Stir in the espresso powder to boost that rich cocoa flavor.
💡 Pro Tip: Avoid overheating—melting slowly preserves the smoothness and prevents burning.
Step 4: Beat the egg mixture
Using a stand mixer with a whisk attachment, whip powdered sugar, eggs, egg yolks, vanilla, and salt at high speed. You’ll see the mixture turn pale, airy, and fluffy in about 3-4 minutes—this airiness is the secret to the cake’s light crumb.
💡 Pro Tip: Scrape down the bowl halfway to ensure even mixing.
Step 5: Stir in chocolate
Gently fold the warm chocolate mixture into the egg foam. Don’t speed through this step; tenderly mixing preserves the fluffy texture you’ve just created while fully incorporating those luscious chocolate notes.
💡 Pro Tip: A gentle hand here makes all the difference in the final cake’s lightness.
Step 6: Fold in flour
Sprinkle the flour over the batter and carefully fold it in using a rubber spatula. Watch for a smooth, thick batter without any pockets of dry flour. Resist the urge to overmix—just enough to combine.
💡 Pro Tip: Overfolding can deflate your batter, making the cake dense.
Step 7: Bake
Divide batter evenly among the prepared ramekins—using a cookie scoop saves time and ensures consistency. Bake them for 9 to 13 minutes; look for firm edges and a center that still jiggles slightly. Every oven bakes differently, so lean more on visual cues than exact timing.
💡 Pro Tip: Keep an eye on your cakes after 9 minutes to ensure gooey perfection without overbaking.
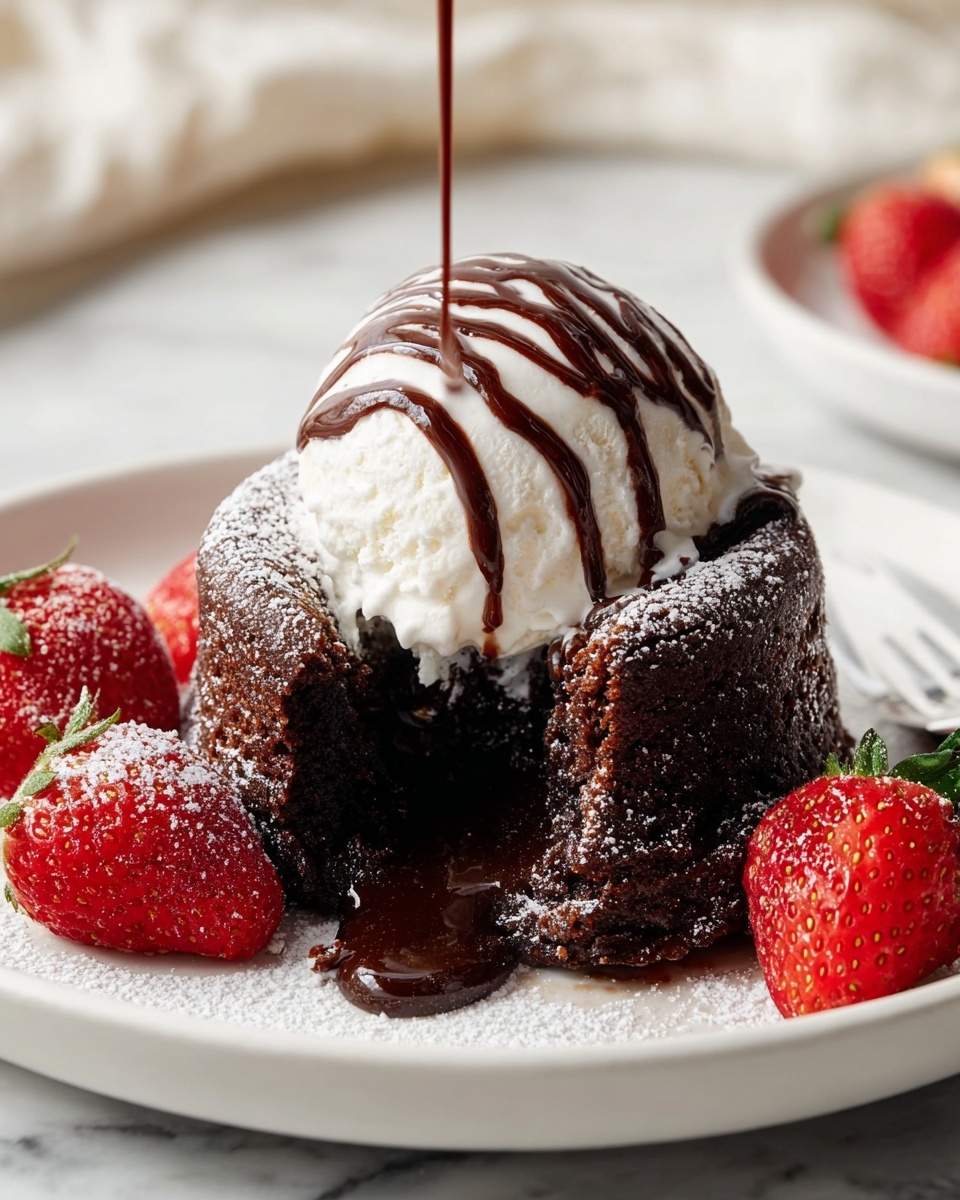
Step 8: Cool
Let your molten cakes sit in the ramekins for about 2 minutes to settle. Run a butter knife gently around the edges to release them, then invert onto pretty serving plates. The sooner you serve, the more the molten center shines.
💡 Pro Tip: Don’t wait too long; the centers solidify the longer they sit.
Step 9: Serve
Dust the tops with powdered sugar, add fresh berries and a scoop of ice cream or softly whipped cream, then dig in! This is the moment where all your patience pays off in silky, chocolate bliss.
💡 Pro Tip: Add a drizzle of warm chocolate sauce or a sprinkle of cocoa powder for an extra touch of elegance.
Common Mistakes to Avoid
Learn from these common pitfalls:
- Under-baking: Leads to a too-runny center that won’t hold shape when inverted.
- Over-baking: Results in a dry, cakey center losing the molten magic.
- Skipping ramekin greasing or dusting: Causes sticking and difficult unmolding.
- Using cold eggs: Can prevent the egg mixture from whipping properly, yielding dense cakes.
- Overmixing flour: Deflates the batter, making the cake heavy and tough.
- Melting chocolate too fast: May scorch the chocolate, ruining the texture and flavor.
Delicious Variations to Try
Once you’ve mastered the classic Chocolate Molten Cake recipe, why not experiment with these tempting twists?
Salted Caramel Molten Cake
Add a teaspoon of salted caramel sauce inside the batter before baking for a gooey surprise that contrasts beautifully with the rich chocolate.
Peanut Butter Swirl
Gently swirl natural peanut butter into the batter for a nutty, creamy counterpoint to the deep cocoa flavor.
Orange Zest and Dark Chocolate
Mix in freshly grated orange zest to the batter for a bright citrus note that elevates every bite.
Espresso Infusion
Boost the espresso powder to one full teaspoon for a stronger mocha flavor, perfect for coffee lovers.
Coconut Chocolate Molten Cake
Incorporate shredded coconut or substitute part of the butter with coconut oil for a tropical flair.
For a fruity twist, serve your molten cakes alongside fresh raspberries or swirl a raspberry coulis over the plate for a burst of tartness. And if you’re craving more rich desserts, try our Caramel Crunch Brownies Recipe – Foodarohub for a similar decadent delight or explore the gooey charm of our Irresistible S’mores Cupcakes Recipe – Foodarohub for another chocolatey treat.
How to Serve Chocolate Molten Cake Recipe
Garnishes
Elevate your cake with a dusting of powdered sugar, fresh berries such as raspberries or strawberries, a dollop of whipped cream, or a smooth scoop of vanilla ice cream. A light drizzle of chocolate sauce or a sprinkle of cocoa powder adds an elegant finishing touch.
Side Dishes
Pairs wonderfully with a crisp espresso or a smooth, creamy hot chocolate for a chocolate lover’s dream team. Fresh fruit salads or tangy citrus sorbets provide a refreshing contrast.
Creative Ways to Present
Serve the cakes in their ramekins for a rustic appeal or invert them onto delicate dessert plates. Garnish with edible flowers or a sprig of mint for special occasions to impress your guests.
Make Ahead and Storage
Make-Ahead Instructions
You can prepare the batter a few hours ahead and keep it covered in the fridge. When ready, give the batter a gentle stir and bake as directed. Alternatively, pre-grease and dust the ramekins, then fill them with batter and refrigerate until baking.
Storage
Store any baked cakes covered in the refrigerator for up to 2 days. For best texture, gently warm before serving.
Freezing
You can freeze baked cakes in an airtight container for up to 1 month. Thaw overnight in the fridge before reheating.
Reheating
Warm cakes in a microwave for about 20-30 seconds or in a preheated oven at 300°F for 5-7 minutes to revive the molten center warmth.
Expert Tips for Success
- Use high-quality chocolate: It truly makes a difference in richness and melt.
- Whip eggs properly: The fluffier your eggs, the lighter your cake.
- Trust your oven temperature: Use an oven thermometer to be sure; 450°F is essential.
- Prep ramekins thoroughly: Butter and cocoa powder create a non-stick barrier and add flavor.
- Serve immediately: Timing is key for that glorious molten center.
- Customize garnishes: Fresh berries and ice cream are classics but have fun experimenting!
- Be gentle when folding: Preserve air bubbles for a tender crumb.
Frequently Asked Questions
Can I make this recipe gluten-free?
Yes! Use a gluten-free all-purpose flour blend instead of regular flour for a similar texture and taste.
What kind of chocolate is best for this recipe?
High-quality bittersweet or semisweet chocolate bars work beautifully. Ghirardelli is a personal favorite for its smooth melting quality and deep flavor.
Why is my molten cake not gooey in the center?
Most likely it’s baked a bit too long. Try reducing the baking time slightly, aiming for soft edges with a jiggle in the center.
Can I use cake flour instead of all-purpose flour?
Cake flour can be used and may produce a slightly lighter texture, but stick to all-purpose flour for the traditional balance.
Is it necessary to use espresso powder?
While optional, espresso powder enhances chocolate depth without tasting like coffee. You can omit it if you prefer.
Can I prepare this recipe without a stand mixer?
Yes, a hand mixer will also do the job. Just be patient whipping the eggs to get that fluffy consistency.
How do I store leftovers?
Cover and refrigerate for up to 2 days, then warm gently before serving to enjoy soft centers again.
Final Thoughts
This Chocolate Molten Cake recipe is your ticket to a memorable dessert that brings joy every time it’s served. The contrast of the tender cake with a molten chocolate heart creates a moment of indulgence that feels both lavish and homey. Whether you’re celebrating a special occasion or simply craving chocolate comfort, this recipe delivers a cozy hug from the inside out. Make this recipe your own, enjoy the process, and savor every luscious bite shared with loved ones.
Related Recipes You’ll Love
If you enjoyed this recipe, you’ll also love these delicious recipes:
- Caramel Crunch Brownies Recipe – Foodarohub – Dive into rich layers of chocolate and caramel for a decadent twist on your classic brownie.
- Irresistible S’mores Cupcakes Recipe – Foodarohub – Capture campfire nostalgia with chocolate, marshmallow, and graham cracker in cupcake form.
Related Recipes You’ll Love
If you enjoyed this recipe, you’ll also love these delicious recipes:
- Funfetti Shortbread Sandwich Cookies with Frosting Recipe – Foodarohub – Celebrate with these delightfully buttery cookies bursting with colorful sprinkles and creamy frosting.
Chocolate Molten Cake Recipe
This rich and decadent Chocolate Molten Cake recipe delivers a warm, gooey center with a perfectly baked outer layer, perfect for an indulgent dessert that’s quick to prepare and sure to impress.
- Prep Time: 15 minutes
- Cook Time: 13 minutes
- Total Time: 30 minutes
- Yield: 4 servings 1x
- Category: Dessert
- Method: Baking
- Cuisine: American
- Diet: Vegetarian
Ingredients
Ingredients
- 2 Tbsp. softened butter
- 1–2 Tbsp. cocoa powder
- 8 oz. chocolate, roughly chopped (I use Ghirardelli)
- 8 Tbsp. butter, unsalted
- 1/2 tsp. espresso powder
- 2–3 eggs*, room temperature
- 2–3 egg yolks*, room temperature
- 1/2 cup confectioners sugar or granulated sugar
- 1 tsp. vanilla extract
- 1/2 tsp. salt
- 1/4 cup all purpose flour
- garnish: powdered sugar, berries, whipped cream, ice cream, chocolate sauce, cocoa powder
Instructions
- Preheat the oven: Preheat the oven to 450°F (see note)
- Prep the ramekins: You’ll need 4, 6 oz. ramekins. Grease each ramekin by spreading a thin layer of softened butter in each ramekin. Then add in some cocoa powder, twirl and tap it around so it coats the sides and bottoms and then gently tap out any excess cocoa powder. You may also use flour, either or will help to release the cake from the ramekin. Place the ramekins on a parchment paper lined baking sheet and set aside.
- Melt the chocolate and butter: Melt the chocolate and butter in the microwave in 20-30 second intervals until smooth, stirring in between. Add the espresso powder and stir until silky. Set aside.
- Beat the egg mixture: In a stand mixer fitted with the whisk attachment, beat the eggs, egg yolks, sugar, vanilla, and salt at high speed until light and fluffy, about 3-4 minutes.
- Stir in chocolate: Gently stir in the chocolate mixture into the egg mixture. It will look very fluffy still at this point.
- Fold in flour: Sprinkle the flour on top and fold in the flour using a rubber spatula until no more flour pockets remain but do not overmix. The batter will thicken as the flour hydrates it.
- Bake: Divide into the prepared ramekins. I like to use a cookie scoop to make this easier. Bake ~9-13 minutes or until the edges are firm and the center is slightly soft. Every oven is a little different, but it should be set, not wet to the touch, and the center will have a slight jiggle. Feel free to bake longer if needed, just be careful because we still want that lava center!
- Cool: Let the cakes cool in the ramekins for about 2 minutes. Then run a butter knife around the edges to loosen them, and invert the cakes onto serving plates. (the longer you keep the molten cake in the ramekins, the less ooey-gooey the centers
- Serve: Dust with powdered sugar, and serve immediately with fresh berries and ice cream and enjoy!
Notes
- Use either cocoa powder or flour to coat the ramekins to help release the cakes.
- Oven times may vary; bake until edges are firm and center slightly soft with a slight jiggle.
- Letting cakes sit longer in ramekins will reduce gooeyness of the center.
Keywords: chocolate molten cake recipe, easy molten lava cake, chocolate dessert, quick chocolate cake, gooey chocolate cake

