
Honey Thyme Cloverleaf Rolls Recipe
I never thought I’d find a bread recipe easier than this Honey Thyme Cloverleaf Rolls Recipe, yet here we are! Imagine the irresistible aroma of melted butter mingling with sweet honey and fresh thyme, filling your kitchen as the rolls bake to a perfect golden glow. These fluffy, soft rolls, kissed with a subtle garlic warmth, bring comfort to any meal and will have everyone at the table reaching for seconds.
Why You’ll Love This Honey Thyme Cloverleaf Rolls Recipe
- Irresistible Flavors: The blend of honey, thyme, and garlic butter creates a delicate yet deeply comforting taste that turns simple rolls into a bakery-worthy treat.
- Simple Ingredients: Made with pantry basics like frozen Rhodes dinner rolls, butter, honey, and fresh herbs, this recipe is accessible even on busy days.
- Perfect for Gathering: These rolls are an ideal complement to family dinners or special occasions, effortlessly elevating your table with their light, fluffy texture and charming appearance.
- Visual Appeal: The cloverleaf design makes each roll look inviting and elegant, providing a homemade touch that impresses guests and loved ones alike.
- Customizable Touch: The subtly herbed butter glaze means you can easily tweak the flavor by adding your favorite herbs or spices for a personalized twist.
Why This Honey Thyme Cloverleaf Rolls Recipe Works
This recipe shines because of its clever use of Rhodes frozen dough, which takes the guesswork out of making soft rolls from scratch. The thoughtful kneading and shaping technique creates that classic cloverleaf pattern, ensuring a perfect bite every time. The honey-thyme-garlic butter glaze is brushed on after baking, adding a glossy finish and a burst of fresh, aromatic flavor without overpowering the bread’s delicate crumb. Baking at 350°F helps the rolls rise nicely to a golden perfection, giving you both visual appeal and irresistible texture.
Ingredients You’ll Need
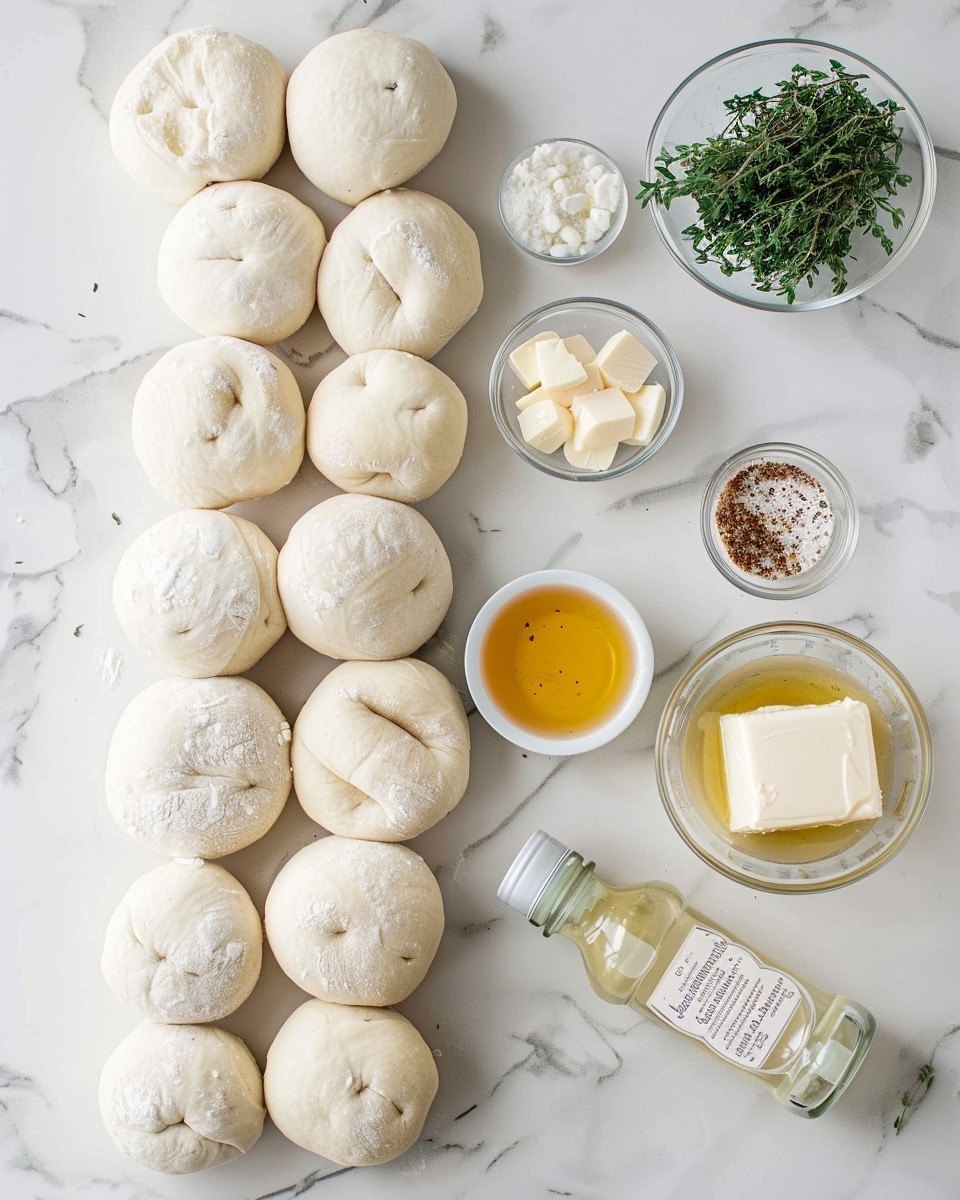
Gather your ingredients to bring this comforting recipe to life: from the convenience of frozen dough to the natural sweetness of honey and the earthy hint of fresh thyme, every item plays a delicious role.
- 18 frozen unbaked Rhodes dinner rolls: The foundation of our fluffy cloverleaf rolls, ready to thaw and transform.
- Nonstick cooking spray: Ensures easy release and perfect baking in the muffin pan.
- 3 tbsp regular salted butter (melted): Adds richness and a wonderful buttery bite.
- 1½ tbsp honey: Sweetens the glaze, balancing the savory herbs beautifully.
- 1 tsp very finely chopped fresh thyme: Brings a subtle, fragrant herbal note straight from the garden.
- ½ tsp garlic powder: Offers a gentle savory kick that rounds out the flavor profile.
Ingredient Substitutions & Tips
- Frozen Rhodes dinner rolls: You can substitute with any frozen dinner roll dough, but ensure it’s unbaked for the best rise.
- Salted butter: Unsalted butter works fine too—just add a pinch of extra salt if you like.
- Fresh thyme: If fresh isn’t available, dried thyme can be used but reduce the amount to ½ teaspoon to avoid overpowering.
- Honey: Maple syrup or agave nectar makes a lovely alternative for a slightly different sweetness.
👨🍳 Pro Tips for Perfect Results
- Tip 1: Make sure to thaw the rolls until soft but still cool to prevent the dough from becoming sticky and hard to shape.
- Tip 2: Generously spray your muffin pan on all surfaces to help the rolls release easily and keep their perfect shape.
- Tip 3: Use nonstick spray also on the plastic wrap to prevent it from sticking to the rising dough—this keeps your lumps smooth and pretty.
- Tip 4: Keep an eye on the rolls as they rise; warmer kitchens will speed this up, so don’t rush the wait—good rise delivers amazing fluff!
- Tip 5: Brush the honey thyme butter gently after baking to preserve the puffiness and add a glossy, enticing finish.
How to Make Honey Thyme Cloverleaf Rolls Recipe
Step 1: Thaw
Begin by placing your frozen dinner rolls in a large casserole dish or on a sheet pan, leaving plenty of room around each one. Loosely cover with plastic wrap and set them out at room temperature until they’re soft enough to cut but still cool to the touch. This tender stage typically takes about 2 hours, depending on your kitchen’s warmth.
💡 Pro Tip: Avoid rushing thawing by keeping them cold but pliable for easier shaping.
Step 2: Cut each thawed dough ball in half
Next, gently slice each softened dough ball in half. Then, roll each half back into a small, smooth ball, carefully pinching any excess dough underneath to create a neat little orb. You should end up with 36 petite dough balls, perfect for those signature cloverleaf clusters.
💡 Pro Tip: Handle the dough gently to keep it light and airy.
Step 3: Spray
Generously coat a 12-slot muffin pan with nonstick cooking spray, making sure each slot’s bottom and sides are well covered. This step is key to ensuring your rolls don’t stick and slide right out after baking.
💡 Pro Tip: Spraying spray on your plastic wrap too prevents it from sticking to the dough during rising.
Step 4: Arrange
Place 3 of your small dough balls in each greased muffin slot. Seeing these tiny dough balls nestled together hints at the soft, pull-apart goodness coming soon.
💡 Pro Tip: Space them well for an even rise into the classic cloverleaf shape.
Step 5: Cover
Take a large piece of plastic wrap and generously coat one side with nonstick cooking spray. Place this sprayed side down over the muffin pan, so the wrap lightly touches the dough. This helps keep moisture in and prevents sticking during the final rise.
💡 Pro Tip: The spray makes the plastic wrap easy to remove without tearing your delicate dough.
Step 6: Rise
Allow the dough to rise until it has doubled in size, pushing just over the muffin tin edges. Depending on your kitchen’s temperature, this can take anywhere from 30 to 90 minutes. Be patient—this rising step is what gives you those irresistibly fluffy rolls.
💡 Pro Tip: Check for your rolls nearly spilling over the pan edges—it’s the perfect sign they’re ready.
Step 7: Preheat
As your rolls near their prime, preheat your oven to 350°F. This steady, moderate heat will bake the rolls evenly, allowing their textures to perfect beautifully.
💡 Pro Tip: Preheating toward the end of the rise ensures the oven is just right when you pop the rolls in.
Step 8: Uncover
Carefully remove the plastic wrap to reveal your puffy dough balls reaching their golden potential. This moment always feels like lifting the curtain before the grand finale.
💡 Pro Tip: Try to do this slowly to keep your beautiful rise intact.
Step 9: Bake
Place the muffin pan in the center rack of your oven and bake for 15 to 18 minutes. Watch for the rolls to puff up and develop a rich golden color that will make your kitchen smell like heaven.
💡 Pro Tip: Rotate the pan halfway through baking if your oven tends to have hot spots for even browning.
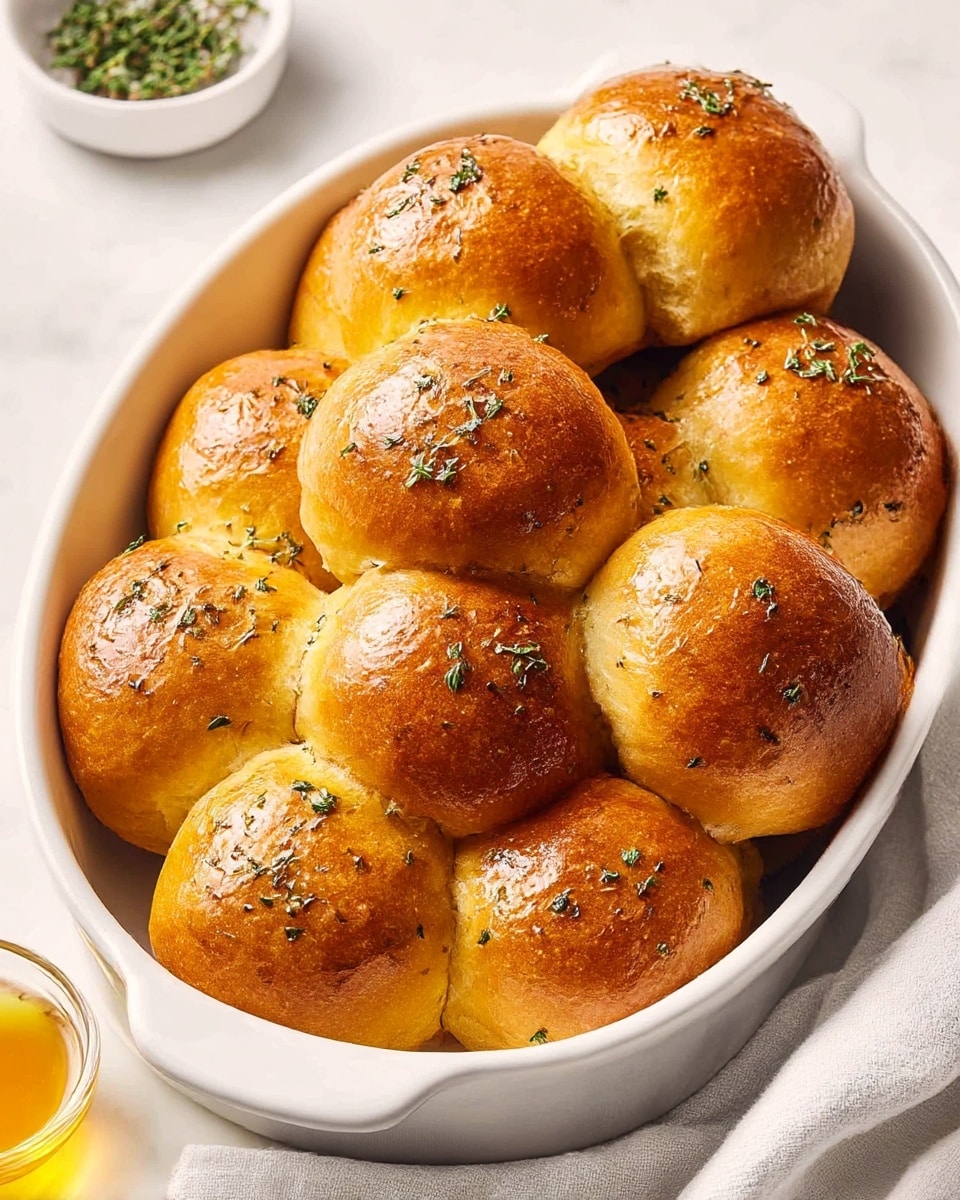
Step 10: Brush
While the rolls are hot and fresh from the oven, whisk together melted butter, honey, thyme, and garlic powder. Gently brush this magical glaze all over the rolls to add shine, moisture, and that signature flavor blend.
💡 Pro Tip: Use a soft brush for an even coating without deflating the rolls.
Step 11: Serve
Let your rolls cool in the pan for a few minutes before transferring to a wire rack. Serve while warm to enjoy the full buttery, honeyed, thyme-kissed experience.
💡 Pro Tip: These are absolutely perfect fresh but also wonderful at room temperature.
Common Mistakes to Avoid
Learn from these common pitfalls:
- Not thawing dough fully: Dough that’s too cold will be difficult to cut and shape evenly.
- Skipping the plastic wrap spray: Without spray, the wrap can stick to the dough and ruin the rise.
- Rushing the rise time: Underproofed rolls will be dense rather than light and fluffy.
- Baking at too high temperature: This can cause uneven browning and dry texture.
- Brushing butter too late or thickly: Applying the glaze gently and immediately after baking preserves moisture without flattening the rolls.
- Overcrowding the muffin pan: Crowding can stop the rolls from rising properly and affect the cloverleaf shape.
Delicious Variations to Try
Once you’ve mastered this classic Honey Thyme Cloverleaf Rolls Recipe, why not experiment to delight your taste buds even more?
Rosemary Garlic Rolls
Swap out thyme for fresh rosemary and add a pinch of minced garlic to the butter glaze for a fragrant and savory twist that pairs beautifully with hearty meals.
Maple Cinnamon Cloverleaf Rolls
Replace honey with maple syrup and sprinkle a dash of cinnamon into the butter glaze to give your rolls a sweet and warming flavor perfect for breakfast or brunch.
Parmesan Herb Rolls
Add finely grated Parmesan and Italian herbs to your melted butter glaze for a cheesy, aromatic finish that stands out at any dinner table.
Everything Bagel Cloverleaf Rolls
Brush with butter and sprinkle everything bagel seasoning on top before baking. This adds a crunchy, savory burst that’s irresistible as a snack or side.
Honey Thyme Sun-Dried Tomato Rolls
Fold finely chopped sun-dried tomatoes into the dough balls before rising for a vibrant, slightly tangy addition to the classic flavor profile.
How to Serve Honey Thyme Cloverleaf Rolls Recipe
Garnishes
Try garnishing your rolls with an extra sprinkle of fresh thyme leaves or a light dusting of flaky sea salt just after glazing to elevate their visual appeal and flavor even more.
Side Dishes
These rolls are divine alongside roasted chicken, hearty soups like butternut squash or tomato basil, or buttery mashed potatoes for a meal that feels both cozy and refined.
Creative Ways to Present
Serve the rolls warm in a rustic basket lined with a soft linen napkin to keep them cozy and inviting. Alternatively, place them on a wooden board with small bowls of herb butter or honey for dipping fun.
Make Ahead and Storage
Make-Ahead Instructions
You can prepare the dough balls and arrange them in the muffin tin, then cover and refrigerate overnight. Bring them to room temperature and let them rise just before baking for fresh, fluffy rolls anytime.
Storage
Store cooled rolls in an airtight container at room temperature for up to 2 days or refrigerate for up to 4 days to maintain softness.
Freezing
These rolls freeze beautifully—freeze baked and cooled rolls in sealed bags for up to 3 months. Thaw overnight and warm gently before serving.
Reheating
Reheat rolls in a 300°F oven for about 10 minutes wrapped in foil to refresh their softness and bring back that just-baked aroma.
Expert Tips for Success
- Always thaw rolls until just soft and cool for better shaping.
- Use fresh thyme for the most vibrant herbal flavor.
- Spray both the muffin tin and plastic wrap generously.
- Be patient on the rise to achieve fluffy texture.
- Brush butter glaze immediately after baking for perfect shine.
- Rotate your pan halfway through baking to ensure even color.
- Cool rolls briefly before removing to a wire rack to set their shape.
Frequently Asked Questions
Can I use fresh rolls instead of frozen Rhodes dough?
This recipe relies on the specific texture and convenience of frozen Rhodes dough, so fresh dough may not yield the same consistent cloverleaf shape and fluffiness without adjustments.
How long should I let the rolls rise?
The time varies from 30 to 90 minutes depending on your kitchen temperature. Aim for the rolls to double in size and spill just over the muffin tin edges.
Can I make these rolls gluten-free?
This recipe as written requires regular wheat-based dough. For gluten-free, you would need a specialized gluten-free dough suitable for rising and shaping similarly.
Is it okay to replace honey with sugar?
Sugar can be used, but honey adds a unique sweetness and moisture that enhances the glaze’s flavor and texture.
How should I store leftover rolls?
Keep leftovers in an airtight container at room temperature for a couple of days or freeze for longer storage. Warm before serving.
Can I skip the garlic powder?
Yes, but garlic powder adds a subtle savory depth that balances the sweet honey and earthy thyme beautifully.
What is the best way to reheat these rolls?
Wrap the rolls in foil and warm them in a 300°F oven for about 10 minutes to restore softness and warmth.
Final Thoughts
Making these Honey Thyme Cloverleaf Rolls Recipe is a delightful experience from start to finish. The simple act of brushing on that honey-thyme butter glaze after baking turns ordinary rolls into a special treat that fills your home with heartwarming aromas. Whether for a weeknight dinner or a festive gathering, these soft, buttery cloverleaf rolls will bring smiles and requests for seconds. Dive in and enjoy the comfort and joy of homemade bread with a twist that your family will cherish.
PrintHoney Thyme Cloverleaf Rolls Recipe

These soft and buttery Cloverleaf Rolls are made from frozen Rhodes dinner rolls, transformed into charming pull-apart bites with a flavorful honey-thyme garlic butter glaze. Perfect for warming any meal or as a delightful snack.
- Prep Time: 15 minutes
- Cook Time: 18 minutes
- Total Time: 3 hours 3 minutes
- Yield: 12 servings 1x
- Category: Bread
- Method: Baking
- Cuisine: American
- Diet: Vegetarian
Ingredients
Ingredients
- 18 frozen unbaked Rhodes dinner rolls
- nonstick cooking spray
- 3 tbsp regular salted butter (melted)
- 1½ tbsp honey
- 1 tsp very finely chopped fresh thyme
- ½ tsp garlic powder
Instructions
- Thaw Place frozen dinner rolls in a large casserole dish or on a sheet pan, with plenty of space in between. Loosely cover with plastic wrap. Thaw at room temperature until soft enough to cut, but still cold. This typically takes about 2 hours depending on the temperature of your kitchen.
- Cut each thawed dough ball in half then gently roll each half into a ball again, pinching any excess dough toward the bottom of the ball. You should have 36 newly formed small dough balls.
- Spray Generously spray a standard 12-slot muffin pan with nonstick cooking spray, making sure to get the bottom and sides of each slot.
- Arrange Place 3 dough balls in each greased muffin slot.
- Cover Using nonstick cooking spray, generously coat one side of a large piece of plastic wrap. Place over the muffin pan (spray-side down so it’s touching the dough.)
- Rise Allow to rise until doubled in size, expanding just over the top edge of the muffin slots. The time it takes will depend on the temperature of your kitchen—it could be anywhere between 30 and 90 minutes.
- Preheat Toward the end of the rise time, preheat the oven to 350°F.
- Uncover Carefully remove the plastic wrap.
- Bake Bake on the middle/center rack for 15 to 18 minutes until the rolls are puffed up and golden.
- Brush Whisk together melted butter, honey, thyme, and garlic powder until combined. Gently brush over the baked rolls.
- Serve Allow to cool in pan for a few minutes before removing to a rack. Serve warm.
Notes
Keywords: Cloverleaf rolls recipe, homemade dinner rolls, Rhodes roll recipe, pull-apart rolls, honey thyme rolls


