
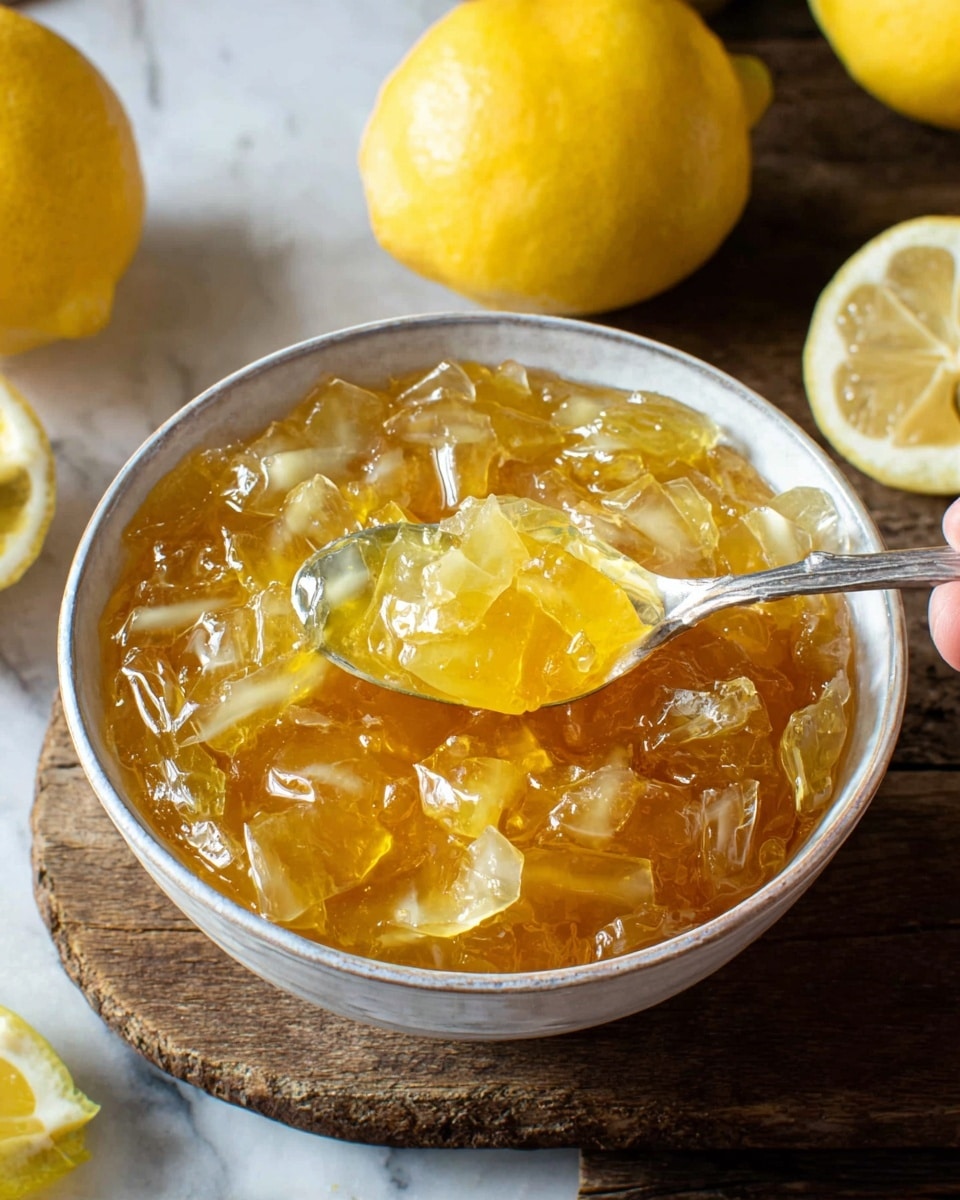
Lemon Jam Recipe (2 Ingredients Only!) Recipe
Imagine the bright, zesty aroma of fresh lemons filling your kitchen, promising a burst of sunshine with every spoonful. This Lemon Jam Recipe (2 Ingredients Only!) Recipe is a delightful journey from simple peels to sweet, tangy perfection. With just the natural goodness of lemons and sugar, you’ll craft a preserve that bursts with bold citrus flavor and a luscious, glossy texture that’s simply irresistible.
Why You’ll Love This Lemon Jam Recipe (2 Ingredients Only!) Recipe
- Vibrant Flavor: The combination of thick-skinned lemons and pure sugar creates a tangy yet sweet jam that tastes like summer in a jar.
- Simple Ingredients: Using only lemons and sugar, plus a couple of kitchen essentials like cheesecloth and canning jars, this jam is perfect for those who love minimalism with maximum taste.
- Traditional Technique: The stovetop method brings out deep, rich lemon notes, and the careful simmering ensures a perfect consistency you’ll want on toast, desserts, or as a glaze.
- Perfect Balance: Whether you prefer a strong lemon punch or a mellow, light flavor, this recipe lets you adjust by soaking the lemons for up to 18 hours — a gentle way to customize your jam’s profile.
- Lovely Texture: The thinly sliced lemons maintain a beautiful presence in the jam, giving each bite delightful bursts of citrus peel alongside the silky syrup.
Why This Lemon Jam Recipe (2 Ingredients Only!) Recipe Works
This jam’s magic lies in its simplicity and attention to detail. The method of boiling and then soaking the lemons multiple times softens their peel and mellows bitterness, while preserving their bright flavor. Weighing the lemon skins against the lemon juice and water mixture ensures the perfect sugar ratio for an ideal set without artificial pectin. Using a cheesecloth bag for the pulp and seeds adds natural pectin to help the jam gel beautifully. The stovetop simmer is carefully timed to dissolve sugar and develop a glossy, set texture, making this a truly classic Mediterranean delight.
Ingredients You’ll Need
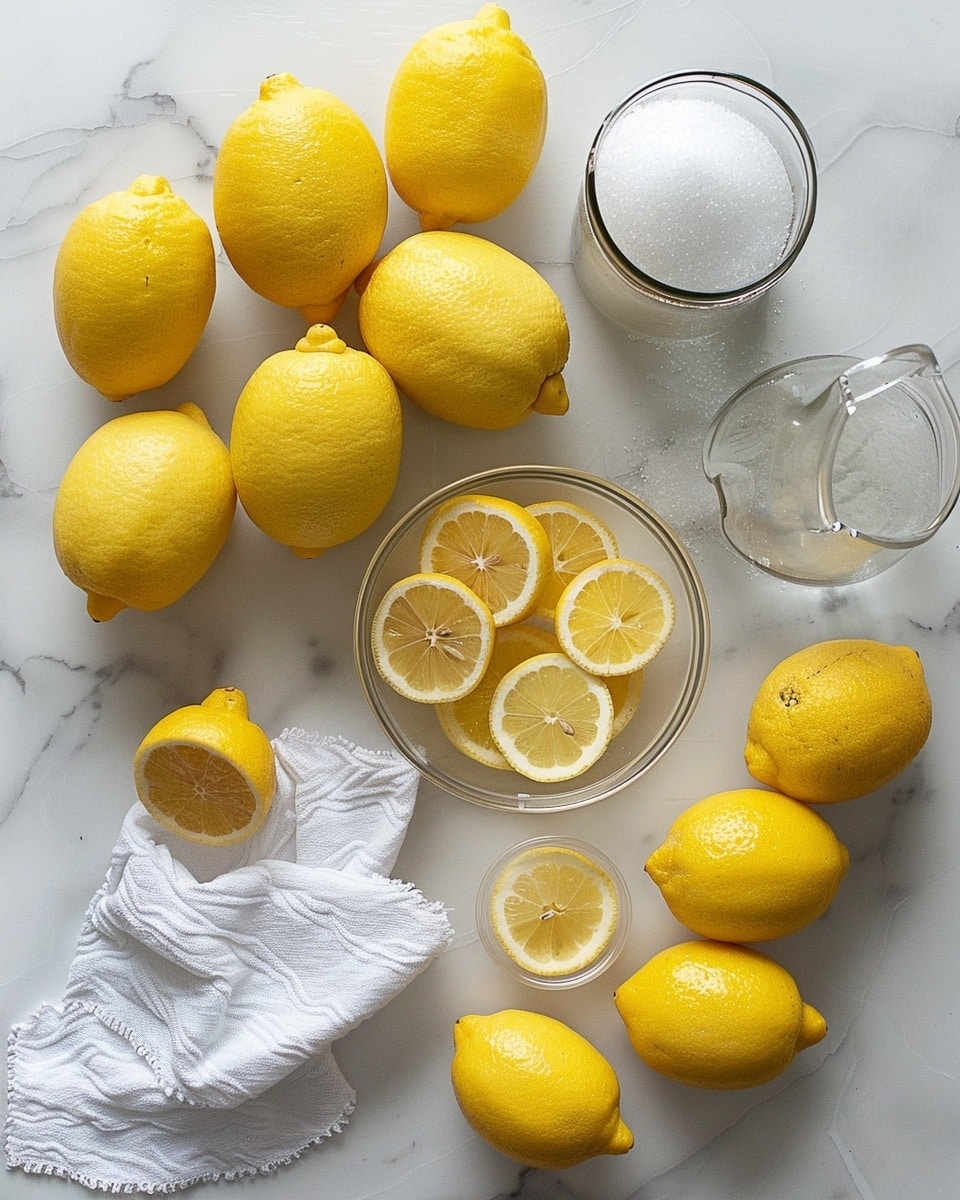
Grab yourself some thick-skinned lemons—think of varieties like “Citrons,” “Lemonade,” or “Femminello”—and prepare for a culinary love affair with just one more ingredient: sugar. With a few household essentials on hand, you’re all set to create pure, sun-kissed lemon bliss.
- 8-10 large thick-skinned lemons (“Citrons”, “Lemonade”, or “Femminello”): These hearty, aromatic lemons form the star of your jam.
- Sugar: The sweet partner that transforms tartness into velvety harmony.
- Canning jars (like these): Necessary for stunning storage and presentation.
- Cheesecloth: Holds the pulp and seeds, adding natural pectin and smoothness.
Ingredient Substitutions & Tips
- Lemons: If unavailable, Meyer lemons offer a sweeter, floral alternative with less bitterness.
- Sugar: You can experiment with organic cane sugar or raw sugar to add a subtle depth.
- Canning jars: Standard mason jars work beautifully and seal tightly.
- Cheesecloth: A fine muslin cloth can be used if you don’t have cheesecloth handy.
👨🍳 Pro Tips for Perfect Results
- Use thick-skinned lemons: They hold up better during the boiling and soaking process, giving a sturdier texture to your jam.
- Soak the lemons properly: Changing the water 3 or more times keeps the flavor bright and removes excess bitterness.
- Weigh precisely: Matching the weights of lemon juice/water and sugar balances sweetness and texture perfectly.
- Cook in a tall pot: Prevent jam foam overflow and keep your stovetop clean.
- Test the jam setting: Use the frozen plate trick to check consistency before finishing.
How to Make Lemon Jam Recipe (2 Ingredients Only!) Recipe
Step 1: Sterilize the jars
Start by scrubbing your canning jars with soap and warm water until spotless. Keep them wet and nestle them on a clean tea towel inside a pan. Pop the pan into a 160°C / 320°F oven for 15 minutes to ensure they’re beautifully sterilized and ready.
💡 Pro Tip: Sterilizing jars while preparing other ingredients saves time and avoids contamination.
Step 2: Heat water
Fill a large pot with water and crank up the heat to high. You want the water at a rolling boil for the next step to soften those lemons perfectly.
💡 Pro Tip: A big, heavy pot helps maintain steady boiling and prevents temperature drops when adding lemons.
Step 3: Prepare lemons
Trim the bottoms off your lemons and slice each in half. This prepping step gets your lemons ready to release all their sunshine in the next stages.
💡 Pro Tip: Using ripe, firm lemons ensures smooth slicing without squishing.
Step 4: Squeeze lemons
Squeeze the juice from all your lemons, storing it in a bottle and chilling it in the fridge. Bundle the remaining pulp and seeds inside a small cheesecloth bag—this little bundle packs natural pectin to help your jam set!
💡 Pro Tip: Chilling the juice keeps it fresh and ready for combining with sugar later.
Step 5: Boil lemons
Once your water boils, gently dip in those lemon halves. Let them bubble for 10 minutes before transferring to a large bowl of cold water—a quick shock that locks in bright lemon flavor.
💡 Pro Tip: Use tongs to safely move hot lemons without breaking them.
Step 6: Repeat boiling or soak
Repeat this boil-and-cool cycle two more times for a punchy lemon taste. Alternatively, for a lighter flavor, soak the lemons in plenty of cold water for 14-18 hours, changing the water at least three times. Taste the peel to find your perfect zing.
💡 Pro Tip: The soaking option is fantastic if you want a mellow jam with subtle citrus notes.
Step 7: Drain lemons
Set your lemons in a strainer and give them about 10 minutes to drip dry. Then weigh them precisely with a food scale; jot down this number – it’s key for balancing the jam!
💡 Pro Tip: Accurate weighing is essential for proportional sugar and liquid mixing.
Step 8: Prepare lemon juice and water mix
Weigh the lemon juice you’ve kept cold, then add enough water to make its weight equal to the lemons. This 1:1 ratio of juice and water creates the perfect balance for simmering.
💡 Pro Tip: This dilutes acidity slightly, ensuring smooth, well-rounded flavor.
Step 9: Weigh sugar
Measure sugar equal to the combined weight of lemon skins and the lemon juice-water mix. For example, if both together weigh 1 kg, you’ll need 2 kg of sugar to harmonize the sweetness and acidity.
💡 Pro Tip: Use granulated sugar for consistent melting and clarity in the jam.
Step 10: Slice lemons
Scrape any residual pulp from the lemon cups into a large bowl. Cut the cups in half, then slice to your preferred chunk size—thin or chunky slices will make the jam look stunning and taste wonderful.
💡 Pro Tip: Uniform slices cook evenly and create beautiful texture.
Step 11: Combine ingredients and bring to boil
Put the lemon juice-water mixture, sugar, and the cheesecloth bundle into a large pot—ideally a tall stockpot to manage foam. Bring everything to a lively boil over medium-high heat.
💡 Pro Tip: Stir occasionally to prevent sugar from sticking and burning on the bottom.
Step 12: Dissolve sugar
Turn the heat down to medium-low and simmer for 2 minutes until the sugar has mostly dissolved, turning the mixture glossy and smooth—a crucial stage in jam-making.
💡 Pro Tip: Rushing this step can leave grainy sugar crystals in your jam.
Step 13: Cook jam
Add your lemon slices and cook everything while stirring now and then. In about 25 minutes, you’ll see a shiny glaze forming on top—that’s your cue. Test on a cold plate to ensure the jam has set firm but spreadable.
💡 Pro Tip: This simmer is where your jam develops that luscious, perfect texture.
Step 14: Cool and distribute lemons
Remove the pot from heat and let it rest a few moments so lemon slices sink slightly beneath the surface. This helps the jam distribute evenly when you jar it, ensuring every spoonful has a lovely balance of fruit and syrup.
💡 Pro Tip: Stir gently before jarring to keep the peel intact but well coated.
Common Mistakes to Avoid
Learn from these common pitfalls:
- Not sterilizing jars properly: This can lead to spoilage, so always sterilize jars as described.
- Skipping the soaking or boiling cycles: It’s vital for mellowing bitterness and unlocking flavor.
- Improper weighing of ingredients: Mismatched sugar or water ratios throw off the jam’s set and taste.
- Cooking at too high a heat: Leads to burnt sugar and bitter jam instead of silky smooth texture.
- Not testing for set: Without checking, you might end up with runny jam.
- Ignoring foam overflow: Using a shallow pot can cause messy boil-overs.
Delicious Variations to Try
Once you’ve mastered the classic Lemon Jam Recipe (2 Ingredients Only!) Recipe, consider these delightful twists to elevate your creations:
Orange Twist
Add thinly sliced oranges during the simmering phase to introduce a sweeter, citrusy depth that balances the lemon’s tang beautifully.
Ginger Zest
Grate fresh ginger into the jam for a warming, spicy kick that brings complexity to the sweet tartness.
Vanilla Bean Infusion
Simmer a split vanilla bean pod with the sugar and lemon juice for subtle aromatic sweetness and creamy undertones.
Lavender Lemon Jam
Introduce dried culinary lavender buds during the cooking process to create a floral and sophisticated spread perfect for afternoon tea.
Mint Freshness
Stir chopped fresh mint leaves into the cooled jam for a refreshing herbal note that brightens every spoonful.
How to Serve Lemon Jam Recipe (2 Ingredients Only!) Recipe
Garnishes
Sprinkle a few thin lemon zest curls or a few fresh mint leaves on your serving dish to add color and fresh fragrance.
Side Dishes
This lemon jam pairs beautifully with crusty bread, warm scones, or a dollop of creamy ricotta or mascarpone. Balance the tang with rich cheeses or simply spread it atop your morning toast for a bright, sweet start.
Creative Ways to Present
Serve your jam in small glass jars as delightful hostess gifts, or spoon it over yogurt and granola bowls. Use it as a glaze for roasted vegetables or grilled chicken to impress guests with a sophisticated, homemade touch.
Make Ahead and Storage
Make-Ahead Instructions
You can prepare the lemon jam entirely in advance, allowing the flavors to mature in the jars for even more depth. The soaking stage itself can be done the day before, making the intensive cooking a breeze when you’re ready.
Storage
Keep your lemon jam refrigerated once opened. It will stay fresh and flavorful for up to a month. Unopened, properly sterilized jars can safely keep for several months stored in a cool, dark place.
Freezing
While fresh jam is best enjoyed right away, you can freeze portions in airtight containers for up to 3 months. Thaw gently in the fridge to preserve texture.
Reheating
Warm gently in a saucepan over low heat if you want to loosen the jam before serving or to use as a glaze—avoid boiling to protect the jam’s delicate texture.
Expert Tips for Success
Always use thick-skinned lemons to maintain structure and reduce bitterness.
Be patient with soaking or boiling cycles to perfect flavor and texture.
Accurate weighing of ingredients guarantees a balanced set and sweetness.
Use a tall pot to prevent boil-over foam and keep your stove tidy.
Test for set with the frozen plate method before finishing your jam.
Adjust slice thickness to your preferred texture, from smooth to chunky.
Store properly in sterilized jars for safety and longevity.
Frequently Asked Questions
Can I use other types of lemons?
Yes! Meyer lemons offer a sweeter, less tart option, while other thick-skinned lemons work best for texture.
Why do I need to boil the lemons multiple times?
Boiling softens the peel, reduces bitterness, and preps the lemons for a smooth, palatable jam.
What if I skip the soaking step?
The jam will have a stronger, more intense lemon flavor and slightly more bitterness, which some may prefer.
Can I use powdered pectin instead of the cheesecloth method?
This recipe relies on natural pectin in lemon pulp and seeds; using powdered pectin is not necessary but can speed up setting.
How should I test if the jam is ready?
Place a spoonful on a frozen plate and let it cool; if it thickens and wrinkles when pushed, it’s ready.
Is this recipe suitable for a vegetarian diet?
Absolutely! This jam is 100% vegetarian and contains no animal products.
Can I reduce the sugar amount?
Reducing sugar may affect preservation and texture, leading to a runnier jam and shorter shelf life.
Final Thoughts
Sharing this Lemon Jam Recipe (2 Ingredients Only!) Recipe feels like passing down a slice of sunshine from my kitchen to yours. It’s a celebration of simplicity and bright, fresh flavors that will elevate breakfast, teatime, and desserts alike. The process, though a bit involved, rewards you with a jar of liquid gold that bursts with the essence of lemons and homemade love. Dive in, experiment, and enjoy the sweet, tangy joy of your very own handcrafted lemon jam!
PrintLemon Jam Recipe (2 Ingredients Only!) Recipe

This simple two-ingredient lemon jam recipe uses whole lemons and sugar to create a bright, tangy preserve with a perfect balance of tartness and sweetness. The method includes soaking and boiling the lemons to mellow their bitterness, resulting in a delicious jam that’s easy to make and bursting with natural lemon flavor.
- Prep Time: 30 minutes
- Cook Time: 40 minutes
- Total Time: 19 hours 10 minutes
- Yield: 5 servings 1x
- Category: Preserves
- Method: Stovetop
- Cuisine: Mediterranean
- Diet: Vegetarian
Ingredients
Ingredients
- 8–10 large thick-skinned lemons ( “Citrons”, “Lemonade”, or “Femminello”)
- sugar
- canning jars (like these)
- cheesecloth
Instructions
- Sterilize Jars: Sterilize the canning jars. Wash them well with soap and water. Without letting them dry, place them on a pan that you have covered with a clean tea towel. Then place the pan in a preheated 160°C /320°F oven for 15 minutes.
- Heat Water: Heat a large cooking pot with water over high heat.
- Prepare Lemons: Cut the bottoms of the lemons. And cut the lemons in half.
- Squeeze Lemons: Squeeze all the lemons. Add the fresh lemon juice to a bottle and keep it in the fridge. Save all the pulp and seeds from the squeezed lemons tied inside a small cheesecloth.
- Boil Lemons: Once the water in the pot starts to boil, dip in the squeezed lemons. Cook for 10 minutes and then transfer them into a very large bowl or pot filled with cold water.
- Repeat Boiling: Repeat this process two more times. At this point, you may proceed to the next step and start making the jam, if you want it to be strong-flavored. Otherwise, let the lemons soak in plenty of cold water for about 14-18 hours. Changing the water they soak in at least 3 times. You may taste some of the skin to see if it is to your liking. If you want a real light lemon flavor. Keep changing the water a few times more.
- Drain Lemons: Transfer the lemons to a strainer. Let the lemons stand for 10 minutes. Then weigh them using a digital food scale and write down that number. Set the lemons aside.
- Prepare Juice Mixture: Weigh the squeezed lemon juice you’ve been saving in the fridge. Add as much water as needed so it will weigh the same as the lemons. (weight of Lemon juice + water = weight of lemon skins). 1:1 ratio.
- Weigh Sugar: Now weigh the sugar. It should be equal to the amount of the lemon juice + water + the lemon skins. So for example, if your lemon skins weigh 1 kg and the lemon juice and water weigh 1 kg then you need 2 kg of sugar.
- Slice Lemons: Take the squeezed lemon cups and with a spoon scrape any remaining pulp from the inside. Place it in a large mixing bowl. Then cut the cups in half. Then cut each half into thin slices depending on how chunky you want your jam to be cut into smaller or bigger slices. Place in the bowl as well.
- Combine Ingredients: Place the lemon juice and water along with the sugar inside a large pot. Add the cheesecloth inside as well. Ideally use a tall one or a stockpot, because jam tends to get foamy and rise a lot on the surface. Bring to a boil over medium-high heat.
- Dissolve Sugar: Reduce heat to medium-low and simmer for 2 minutes until most of the sugar dissolves.
- Cook Jam: Add the sliced lemons and cook until the jam sets. Stirring every now and then. Takes about 25 minutes. You will see the surface starting to look glazy. To check if the jam is thick enough, place a little plate in your freezer for 5 minutes. Then take a spoonful of the jam with a teaspoon and add it to the plate. As the jam cools on the cold plate you can see how thick it is.
- Cool and Settle: So once the jam is set, remove the pot from heat and set it aside. Let it stand for a few minutes until you see the lemons going under the surface of the jam. This will help to distribute the jam equally into the jars, ensuring there is an equal quantity of lemons and “liquid” on each.
Notes
- Changing the soaking water multiple times allows control over the intensity of the lemon flavor in the jam.
- Using a tall pot or stockpot is recommended to avoid boil-over caused by foam during jam cooking.
- Testing jam thickness is best done by chilling a plate and observing how the jam sets on it.
Keywords: lemon jam, homemade jam, easy lemon preserves, 2 ingredient jam, stovetop jam recipe


