
White Chocolate Raspberry Cheesecake Recipe
Picture this: a velvety cheesecake that melts in your mouth, with luscious white chocolate and vibrant raspberry swirls that dance across a decadent Oreo crust. The gentle aroma of cocoa and vanilla fills your kitchen as the cheesecake bakes slowly in a water bath, promising a silky, perfectly set dessert that will wow every guest at your table. This White Chocolate Raspberry Cheesecake Recipe is truly a celebration of flavors and textures, a dessert experience you’ll cherish and want to make again and again.
Why You’ll Love This White Chocolate Raspberry Cheesecake Recipe
- Decadent flavor harmony: The rich creaminess of white chocolate paired with the tart brightness of fresh raspberries creates a heavenly balance that delights every bite.
- Simple pantry staples: Using beloved ingredients like Oreos, cream cheese, and fresh raspberries means no complicated shopping trips — just pure comfort food vibes.
- Perfect for celebrations: Whether it’s a birthday, holiday, or special dinner, this cheesecake’s stunning marbled top and smooth texture impress effortlessly.
- Crispy Oreo crust: The chocolate cookie base adds just the right crunch to complement the luscious filling, making every forkful a textural dream.
- Customize your toppings: Add fresh whipped cream, additional raspberries, or a sprinkle of grated white chocolate to match your mood and occasion.
Why This White Chocolate Raspberry Cheesecake Recipe Works
This recipe’s magic comes from a few key techniques that ensure a flawless cheesecake: first, bringing the cream cheese, sour cream, and eggs to room temperature helps avoid lumps and creates a luscious batter. The Oreo crust bakes just long enough to hold firm but stays tender against the creamy filling. Swirling fresh raspberry puree — thickened with cornstarch and perfectly strained — adds vibrant color and a burst of tartness that cuts through the richness. Finally, baking the cheesecake in a water bath keeps the texture silky and prevents cracking, delivering that impeccable melt-in-your-mouth experience.
Ingredients You’ll Need
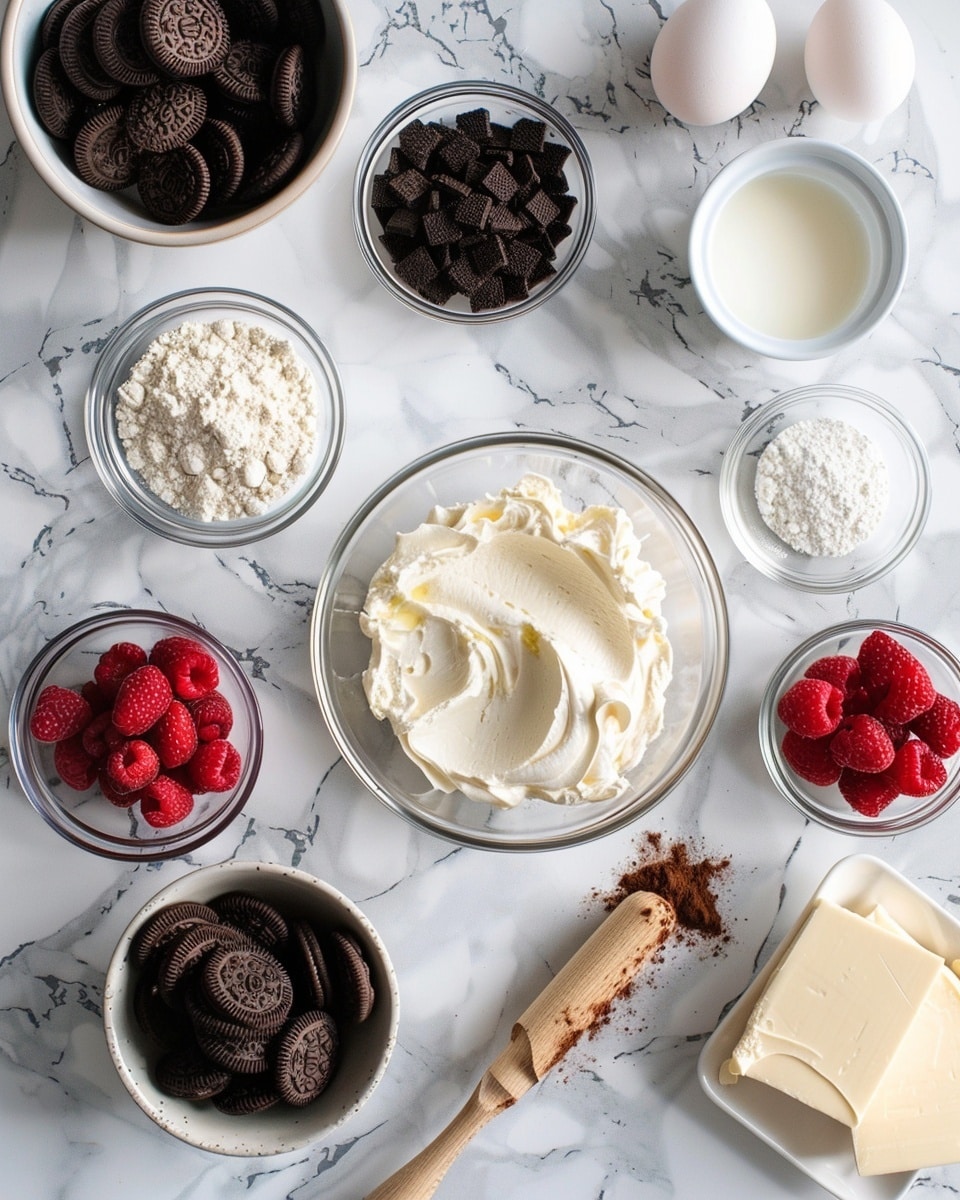
Gather vibrant raspberries bursting with freshness, luscious white chocolate, and a secret ingredient: Oreos crushed into a buttery crust that holds this cheesecake together. Every bite promises a delicious contrast of textures and flavors.
- Raspberry Filling: 2 1/2 tsp cornstarch, 1 tsp fresh lemon juice, 1 tbsp warm water, 2 1/2 cups (319g) fresh or frozen raspberries, 2 1/2 tsp sugar
- Oreo Crust: 35 Oreos (3 cups | 403g Oreo crumbs), 4 tbsp (56g) butter, melted (salted or unsalted is fine)
- Cheesecake Filling: 24 ounces (678g) cream cheese, room temperature; 1 cup (207g) sugar; 3 tbsp (24g) all-purpose flour; 1 cup (230g) sour cream; 1 1/2 tsp vanilla extract; 8 oz (1 1/3 cups) white chocolate, melted and slightly cooled; 4 large eggs, room temperature
- Whipped Cream Topping: 1 cup (240ml) heavy whipping cream, cold; 1/2 cup (58g) powdered sugar; 3/4 tsp vanilla extract; white chocolate bar, optional
Ingredient Substitutions & Tips
- Oreos: For a twist, try chocolate wafer cookies or gluten-free chocolate cookies if needed.
- White chocolate: Use high-quality white chocolate chips or bars; avoid white chocolate-flavored coatings for best melt and flavor.
- Raspberries: Fresh are best for vibrant flavor, but frozen raspberries work beautifully if thawed and drained well.
- Sour cream: Greek yogurt is a lovely substitute to add tang and creaminess in the filling.
👨🍳 Pro Tips for Perfect Results
- Room temperature ingredients: Patience here prevents lumpy batter and ensures a smooth, silky cheesecake texture.
- Water bath baking: Wrap your springform pan tightly with foil to prevent leaks and keep the filling moist for a creamy finish.
- Swirling technique: Gently swirl raspberry filling using a knife to create beautiful marbled patterns without overmixing.
- Cooling steps: Slow cooling inside the turned-off oven helps avoid cracks and ensures a flawless surface.
- Chill thoroughly: Give the cheesecake ample chilling time—at least 5-6 hours or overnight—for perfect slicing and flavor melding.
How to Make White Chocolate Raspberry Cheesecake Recipe
Step 1: Prepare Ingredients
Start by letting your cream cheese, sour cream, and eggs come to room temperature. This key move helps the batter blend uniformly, giving you a buttery smooth texture without lumps.
💡 Pro Tip: Set these out about an hour before you plan to bake.
Step 2: Make Raspberry Filling Base
Whisk together cornstarch, fresh lemon juice, and warm water until the cornstarch disappears. This mixture will thicken the raspberries perfectly.
💡 Pro Tip: This step ensures a glossy, jam-like consistency for your raspberry swirl.
Step 3: Cook Raspberry Filling
Simmer raspberries and sugar over medium heat, stirring gently for 3 minutes until the fruit releases its vibrant juices, infusing your filling with fresh, tangy flavor.
💡 Pro Tip: Stir continuously to prevent scorching and maximize juice extraction.
Step 4: Thicken Raspberry Filling
Add your cornstarch mixture into the saucepan, continue cooking and gently smashing the raspberries for another 3 minutes, until bubbling and slightly thickened — perfect for swirling.
💡 Pro Tip: Aim for a consistency that holds but still spreads easily.
Step 5: Puree and Strain
Puree the cooked raspberry mixture in a food processor, then strain it through a fine sieve to remove seeds for a silky texture free of crunch.
💡 Pro Tip: Let this cool completely before incorporating it into your cheesecake filling.
Step 6: Preheat Oven and Prepare Pan
Preheat your oven to 325°F (163°C). Line a 9-inch springform pan’s bottom with parchment paper and grease the sides to help the cheesecake release easily after baking.
💡 Pro Tip: Don’t skip the parchment; it makes unmolding a breeze.
Step 7: Make Oreo Crust
Pulse Oreos into fine crumbs, then combine them with melted butter. Press this irresistible mixture evenly into the bottom and partway up the sides of your springform pan.
💡 Pro Tip: Chill the crust briefly if it feels too soft before baking.
Step 8: Bake Crust
Bake the crust for 8-10 minutes until set but not browned; this ensures a sturdy base that won’t turn soggy when the cheesecake layer is added.
💡 Pro Tip: Let it cool completely before filling.
Step 9: Prepare Water Bath and Reduce Oven Temp
Wrap foil around the springform pan sides to protect the crust from water. Lower the oven temperature to 300°F (148°C) for gentle, even baking.
💡 Pro Tip: Warm water in the water bath prevents sudden temperature changes for a crack-free finish.
Step 10: Mix Cream Cheese Base
Beat cream cheese, sugar, and flour on low to medium speed until silky smooth, scrapping the bowl sides often to keep a uniform batter and reduce air incorporation.
💡 Pro Tip: Avoid high speed here to prevent cracks later.
Step 11: Add Sour Cream and Vanilla
Mix in the sour cream and vanilla extract on low speed, blending until just combined for a creamy, fragrant cheesecake filling.
💡 Pro Tip: This adds body and subtle tang.
Step 12: Incorporate White Chocolate
Fold melted white chocolate into the batter in three additions, stirring gently each time until luscious and fully integrated.
💡 Pro Tip: Slightly cooled white chocolate prevents eggs from cooking prematurely.
Step 13: Add Eggs One at a Time
Beat in eggs individually, scraping the bowl between additions to ensure a smooth, homogenous batter that sets flawlessly.
💡 Pro Tip: Keep mixing slow to avoid too much air.
Step 14: Combine Raspberry and Cheesecake Fillings
Stir two tablespoons of your cheesecake base into the cooled raspberry puree. This lightens the raspberry while keeping its bold flavor and silky texture.
💡 Pro Tip: This helps the swirl blend beautifully without breaking the puree texture.
Step 15: Fill Crust with Cheesecake Mixture
Pour about three-quarters of the cheesecake filling into the crust-lined pan, preparing an even canvas for your raspberry art.
💡 Pro Tip: Smooth the top to make swirling easier.
Step 16: Add Raspberry Swirls
Drop half the raspberry filling by spoonfuls onto the cheesecake layer, then use a knife or spatula to swirl the two together, creating captivating marbled patterns.
💡 Pro Tip: Go slow with the swirl to keep distinct color contrast.
Step 17: Add Remaining Cheesecake Filling
Pour the rest of the cheesecake batter over your first swirl layer, creating layers of creamy delight.
💡 Pro Tip: Tap the pan gently to release any air bubbles.
Step 18: Add Remaining Raspberry Swirls
Spoon the remaining raspberry puree on top and swirl again for a stunning finish that will impress before the first bite.
💡 Pro Tip: Reserving some raspberry puree for the top adds depth and visual drama.
Step 19: Bake in Water Bath
Place the springform pan into a larger pan, pour warm water halfway up the sides, and bake for 2 hours until the edges are set and the center gently jiggles.
💡 Pro Tip: The water bath ensures gentle cooking for custard-like silkiness.
Step 20: Cool in Oven
Turn off the oven and leave the cheesecake inside with the door closed for 30 minutes. This slow cooling prevents cracks and promotes even texture.
💡 Pro Tip: Resist the urge to open the door during this time.
Step 21: Slowly Remove Heat
Crack the oven door open and keep the cheesecake inside for another 30 minutes to finish cooling gradually.
💡 Pro Tip: This step lets the cheesecake settle beautifully.
Step 22: Chill
Transfer the cheesecake to the fridge and chill for 5-6 hours or overnight until fully firm and slice-ready.
💡 Pro Tip: Overnight chill makes slicing clean and easy.
Step 23: Remove from Pan
Carefully detach the springform sides and move your masterpiece to a serving plate to prepare for decoration.
💡 Pro Tip: Run a warm knife around the edges if it sticks.
Step 24: Prepare Whipped Cream
Beat cold heavy cream, powdered sugar, and vanilla on high speed until stiff peaks form, creating a cloud of sweetness to crown your cheesecake.
💡 Pro Tip: Chill your mixing bowl beforehand for quicker whipping.
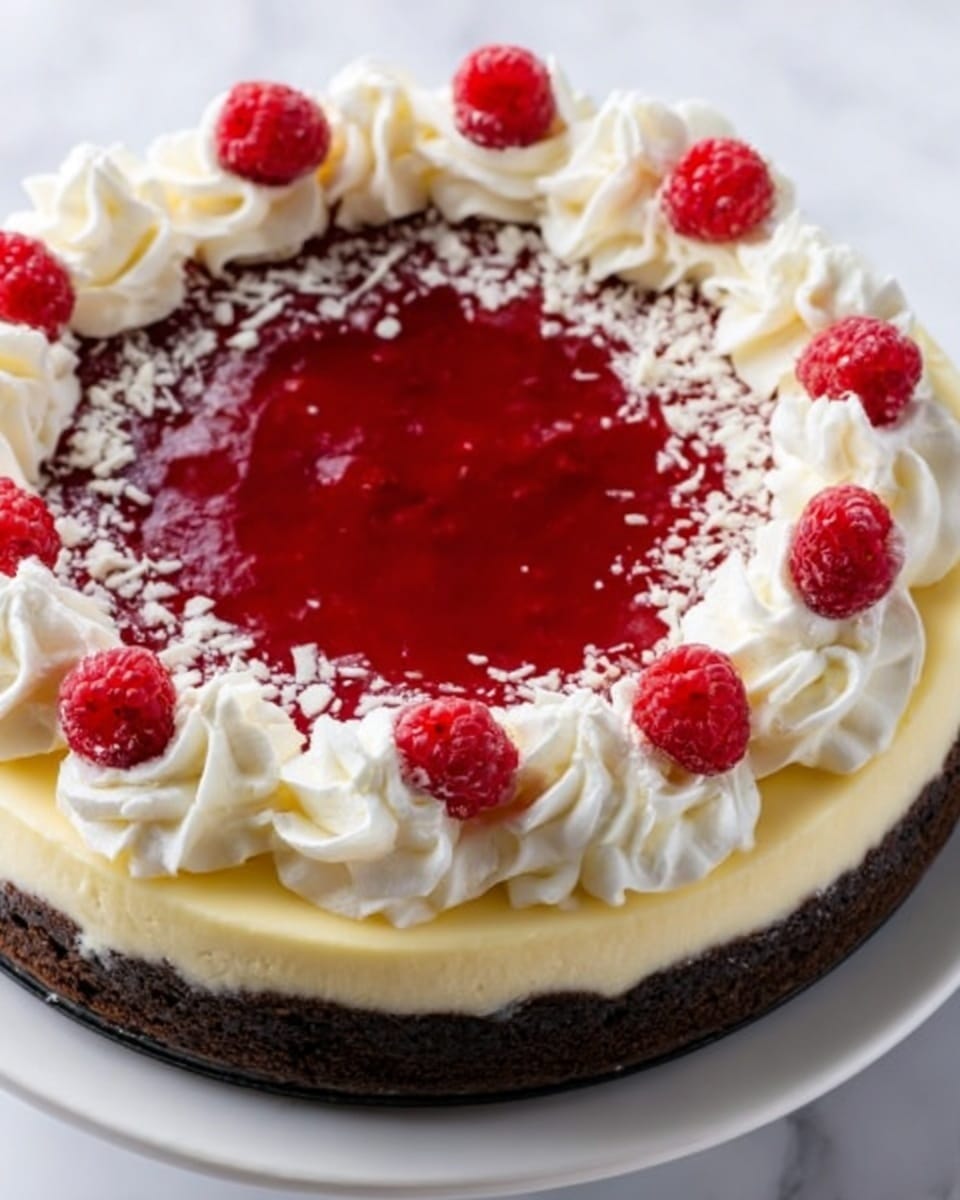
Step 25: Decorate Cheesecake
Pipe whipped cream along the edges, scatter fresh raspberries generously, and grate white chocolate on top for an elegant finish.
💡 Pro Tip: Save a few raspberries for garnish right before serving to keep them fresh.
Step 26: Refrigerate Before Serving
Keep your White Chocolate Raspberry Cheesecake refrigerated until it’s time to indulge. Remember to enjoy within 3-4 days for the freshest experience.
💡 Pro Tip: Wrapping loosely with plastic wrap prevents fridge odors from sneaking in.
Common Mistakes to Avoid
Learn from these common pitfalls:
- Using cold ingredients: Leads to lumps and a cracked cheesecake surface.
- Skipping water bath: Risk dry edges and an uneven bake.
- Overmixing batter: Introduces air pockets, causing cracks as cheesecake cools.
- Swirling too aggressively: Can muddy the beautiful raspberry patterns.
- Rushing the chilling process: Causes a filling that’s too soft to slice cleanly.
- Not wrapping pan properly: Water might seep in, ruining the crust texture.
Delicious Variations to Try
Once you’ve mastered this White Chocolate Raspberry Cheesecake Recipe, why not mix things up with some fun twists?
Tropical Mango Twist
Add fresh mango puree to the cheesecake base for a sunny burst of flavor—try pairing it with some tropical or citrus zest reminiscent of our Tropical Mango Cheesecake Recipe – Foodarohub for an exotic flair.
Lemon Zest Infusion
Brighten up the filling by stirring in lemon zest for a refreshing contrast to the white chocolate sweetness. A delicious compliment would be light lemony truffles like the Creamy Lemon Truffles Recipe – Foodarohub on the side for an elegant dessert plate.
Chocolate-Dipped Raspberries
Enhance the garnish by dipping fresh raspberries in dark chocolate before placing them atop the whipped cream; the hint of rich cocoa pairs beautifully with the white chocolate filling.
Nutty Crunch
Sprinkle toasted almonds or pistachios over the whipped cream topping for a lovely textural contrast and a subtle nutty flavor.
Mini Cheesecakes
Divide the batter into cupcake tins with crust for adorable, single-served cheesecakes that are perfect for parties or gifts.
How to Serve White Chocolate Raspberry Cheesecake Recipe
Garnishes
Top with a generous swirl of freshly whipped cream, a handful of juicy raspberries, and a delicate sprinkle of grated white chocolate to add elegance and a touch of indulgence.
Side Dishes
Complement this rich dessert with fresh fruit salad or a light herbal tea to balance sweetness. Serve alongside mint leaves or a citrus sorbet for an extra refreshing finish.
Creative Ways to Present
Consider layering slices with fresh raspberry coulis drizzle on the plate or placing decorative edible flowers for a sophisticated presentation. A dusting of powdered sugar over the top can add a charming, snow-kissed effect perfect for special occasions.
Make Ahead and Storage
Make-Ahead Instructions
This cheesecake is ideal to prepare a day ahead. Follow the steps thoroughly, then chill overnight to allow the flavors and texture to set and meld beautifully.
Storage
Store the cheesecake covered in the refrigerator for up to 3-4 days. Use a cake dome or an airtight container to maintain moisture and prevent it from absorbing other fridge odors.
Freezing
You can freeze this cheesecake for up to one month. Wrap tightly with plastic wrap and aluminum foil. Thaw in the refrigerator overnight before serving to keep its creamy texture intact.
Reheating
This cheesecake is best served chilled. If you prefer a slightly warmer slice, let it sit at room temperature for 20 minutes before serving to soften the texture gently.
Expert Tips for Success
- Use fresh or properly thawed raspberries to keep the raspberry filling flavorful and vibrant.
- Always mix on low speed when combining cheesecake ingredients to avoid incorporating too much air.
- Be patient with the water bath setup—sealing the pan well prevents soggy crusts and ensures even baking.
- Allow the cheesecake to cool gradually in the oven to prevent cracking from temperature shock.
- Whip cream in a chilled bowl to speed up the process and help achieve firmer peaks.
- Knife smoothing between layers helps you create polished and distinct swirls that look professional.
- Serve chilled but not ice cold for the best flavor and texture experience.
Frequently Asked Questions
Can I use frozen raspberries for the raspberry filling?
Absolutely! Just make sure to thaw and drain them well before cooking to avoid excess water diluting the filling.
Do I really need to bake the crust before adding the filling?
Yes, baking the crust briefly sets it and prevents sogginess when the creamy filling is added.
Why do I need a water bath for this cheesecake?
The water bath gently bakes the cheesecake, providing moisture and even heat that prevents cracking and ensures a smooth, creamy texture.
Can I make this cheesecake gluten-free?
Yes, by substituting gluten-free chocolate sandwich cookies for Oreos, you can easily make this dessert gluten-free.
How long can I keep leftovers?
Store leftovers in the fridge, covered, for 3-4 days for the best freshness and texture.
Can I freeze the leftover cheesecake?
Yes, wrap it well and freeze up to one month. Thaw in the fridge overnight before serving.
Can I skip the white chocolate or use dark chocolate instead?
To keep the intended flavor profile, white chocolate is best. For a dark chocolate version, consider a different recipe that balances the bitterness appropriately.
Final Thoughts
This White Chocolate Raspberry Cheesecake Recipe is truly a celebration of creamy richness intertwined with bright, juicy raspberry swirls and a crunchy Oreo crust. Baking it fills your kitchen with irresistible aromas and builds delicious anticipation for the first forkful. Whether you’re treating yourself or impressing guests, this cheesecake promises unforgettable flavor and an elegant presentation that feels like a slice of pure joy. I hope you’ll enjoy making and sharing this decadent dessert as much as I do!
Related Recipes You’ll Love
If you enjoyed this recipe, you’ll also love these delicious recipes:
- Tropical Mango Cheesecake Recipe – Foodarohub – A tropical take on cheesecake bursting with fresh mango puree for a sunny, fruity treat.
- Creamy Lemon Truffles Recipe – Foodarohub – Luscious lemon-flavored truffles with a smooth cream cheese base and white chocolate that make a perfect light dessert accompaniment.
Related Recipes You’ll Love
If you enjoyed this recipe, you’ll also love these delicious recipes:
- Baby Lemon Impossible Pies Recipe – Foodarohub – Delightfully tangy and creamy lemon pies that come together with simple ingredients for a sweet, refreshing finish.
White Chocolate Raspberry Cheesecake Recipe

This luscious White Chocolate Raspberry Cheesecake features a creamy white chocolate-infused filling swirled with fresh raspberry puree on a crunchy Oreo crust, baked to perfection with a smooth and velvety texture. Perfect for elegant dessert occasions, it’s topped with homemade whipped cream and fresh raspberries for a delightful finish.
- Prep Time: 45 minutes
- Cook Time: 2 minutes
- Total Time: 7 minutes
- Yield: 12 servings 1x
- Category: Dessert
- Method: Baking
- Cuisine: American
- Diet: Vegetarian
Ingredients
Raspberry Filling
- 2 1/2 tsp cornstarch
- 1 tsp fresh lemon juice
- 1 tbsp warm water
- 2 1/2 cups (319g) fresh or frozen raspberries
- 2 1/2 tsp sugar
Crust
- 35 Oreos (3 cups | 403g Oreo crumbs)
- 4 tbsp (56g) butter, melted (salted or unsalted is fine)
Cheesecake Filling
- 24 ounces (678g) cream cheese, room temperature
- 1 cup (207g) sugar
- 3 tbsp (24g) all-purpose flour
- 1 cup (230g) sour cream
- 1 1/2 tsp vanilla extract
- 8 oz (1 1/3 cups) white chocolate, melted and slightly cooled
- 4 large eggs, room temperature
Whipped Cream Topping
- 1 cup (240ml) heavy whipping cream, cold
- 1/2 cup (58g) powdered sugar
- 3/4 tsp vanilla extract
- White chocolate bar, optional
Instructions
- Prepare Ingredients: Remove the cream cheese, sour cream, and eggs from the refrigerator and place them on the counter to come to room temperature. This helps ensure a smooth batter.
- Make Raspberry Filling Base: Whisk cornstarch, lemon juice, and warm water in a small bowl until cornstarch dissolves fully.
- Cook Raspberry Filling: Combine raspberries and sugar in a medium-large saucepan over medium heat, stirring continuously for 3 minutes to release juices.
- Thicken Raspberry Filling: Add cornstarch mixture to saucepan, cook and smash raspberries for another 3 minutes until bubbling and slightly thickened.
- Puree and Strain: Puree raspberry mixture in a food processor, then strain to remove seeds. Set aside to cool.
- Preheat Oven and Prepare Pan: Preheat oven to 325°F (163°C). Line a 9-inch springform pan with parchment paper on the bottom and grease the sides.
- Make Oreo Crust: Crush Oreos into fine crumbs using a food processor or rolling pin, then combine with melted butter. Press evenly into bottom and up sides of prepared springform pan.
- Bake Crust: Bake crust for 8-10 minutes. Remove from oven and cool.
- Prepare Water Bath: Wrap pan sides with aluminum foil to prevent water seepage and set aside.
- Reduce Oven Temperature: Lower oven temperature to 300°F (148°C) for baking cheesecake.
- Mix Cream Cheese Base: In a large mixer bowl, blend cream cheese, sugar, and flour on low speed until well combined, scraping down the sides to prevent lumps and minimize air incorporation.
- Add Sour Cream and Vanilla: Mix in sour cream and vanilla extract on low speed until integrated.
- Incorporate White Chocolate: Add melted white chocolate in three additions, stirring gently after each to incorporate smoothly.
- Add Eggs: Add eggs one at a time, beating slowly and scraping the bowl after each egg.
- Combine Raspberry and Cheesecake Fillings: Stir two tablespoons of cheesecake filling into the cooled raspberry puree.
- Fill Crust with Cheesecake Mixture: Pour about three-quarters of the cheesecake filling into the crust-lined pan.
- Add Raspberry Swirls: Drop half of the raspberry filling spoonfuls onto the cheesecake filling. Use a knife or spatula to swirl the raspberry and cheesecake fillings together.
- Add Remaining Cheesecake Filling: Pour in the rest of the cheesecake filling over the swirl layer.
- Add Remaining Raspberry Swirls: Spoon remaining raspberry filling on top and swirl again with a knife or spatula.
- Bake in Water Bath: Place the springform pan inside a larger pan. Pour warm water into larger pan halfway up sides of springform. Bake for 2 hours until outer edges are set and center is slightly jiggly.
- Cool in Oven: Turn oven off, leave cheesecake in oven with door closed for 30 minutes.
- Slowly Remove Heat: Crack oven door open and leave cheesecake inside for another 30 minutes.
- Chill: Remove cheesecake from oven, chill 5-6 hours or overnight until firm.
- Remove from Pan: Detach sides of springform pan and transfer cheesecake to serving plate.
- Prepare Whipped Cream: Beat heavy cream, powdered sugar, and vanilla on high speed in a chilled bowl until stiff peaks form.
- Decorate Cheesecake: Pipe whipped cream along edges, garnish with fresh raspberries, and optionally grate white chocolate to sprinkle on top.
- Refrigerate Before Serving: Chill cheesecake until ready to serve. Consume within 3-4 days for best quality.
Notes
- Remove cream cheese, sour cream, and eggs from fridge to reach room temperature for smooth batter.
- Wrap pan sides with aluminum foil for water bath to prevent seepage.
- Use a chilled bowl for whipping cream to achieve stiff peaks.
- Chill cheesecake 5-6 hours or overnight for best firmness.
- Consume within 3-4 days for best quality.
Keywords: white chocolate cheesecake, raspberry cheesecake, Oreo crust dessert, creamy cheesecake recipe, baked cheesecake

