
Toasted Siopao Recipe
Imagine the irresistible scent of tender chicken simmering with garlic and soy sauce, mingling with the warm, comforting aroma of freshly baked buns wafting through your kitchen. This Toasted Siopao recipe wraps that blissful filling inside a soft, fluffy dough that turns a perfect golden brown when baked. It’s a Filipino classic that’s not only a feast for your taste buds but also a soul-soothing snack or meal to share with loved ones.
Why You’ll Love This Toasted Siopao Recipe
- Rich, savory flavors: Juicy chicken thigh filling cooked to tender perfection, accented with a hint of sweetness and fragrant hoisin sauce, delivers a perfect balance with every bite.
- Simple ingredients: This recipe embraces pantry staples like soy sauce, garlic, sugar, and all-purpose flour, making it easy to gather everything you need without extra trips to the store.
- Perfect for gatherings: Whether it’s a casual snack or a weekend treat, these buns impress with their golden, toasted finish and generous filling, feeding a crowd delightfully.
- Handmade with love: Crafting the dough and shaping the buns is a fun process that connects you with traditional baking methods that bring out deep flavors and wonderful textures.
- Customizable feast: The filling can be adapted to your taste by adjusting seasoning or adding ingredients, plus you get to indulge in the comforting mix of soft dough and warm, savory chicken.
Why This Toasted Siopao Recipe Works
The magic behind this Toasted Siopao lies in its carefully built layers of flavor and texture. The chicken thigh fillet simmers gently in soy sauce, brown sugar, and bay leaves, allowing the meat to soak up aromatic, caramelized notes that make the filling deeply savory and tender. The dough, enriched with instant yeast and baking powder, is kneaded until smooth and elastic, promising buns that are both pillowy soft and sturdy enough to hold the hearty filling. The final baking step at 170°C (325°F) creates that inviting golden crust that elevates the simple steamed bun into a toasted masterpiece. The combination of techniques—from slow simmering to precise dough development—ensures your Toasted Siopao hits every perfect note.
Ingredients You’ll Need
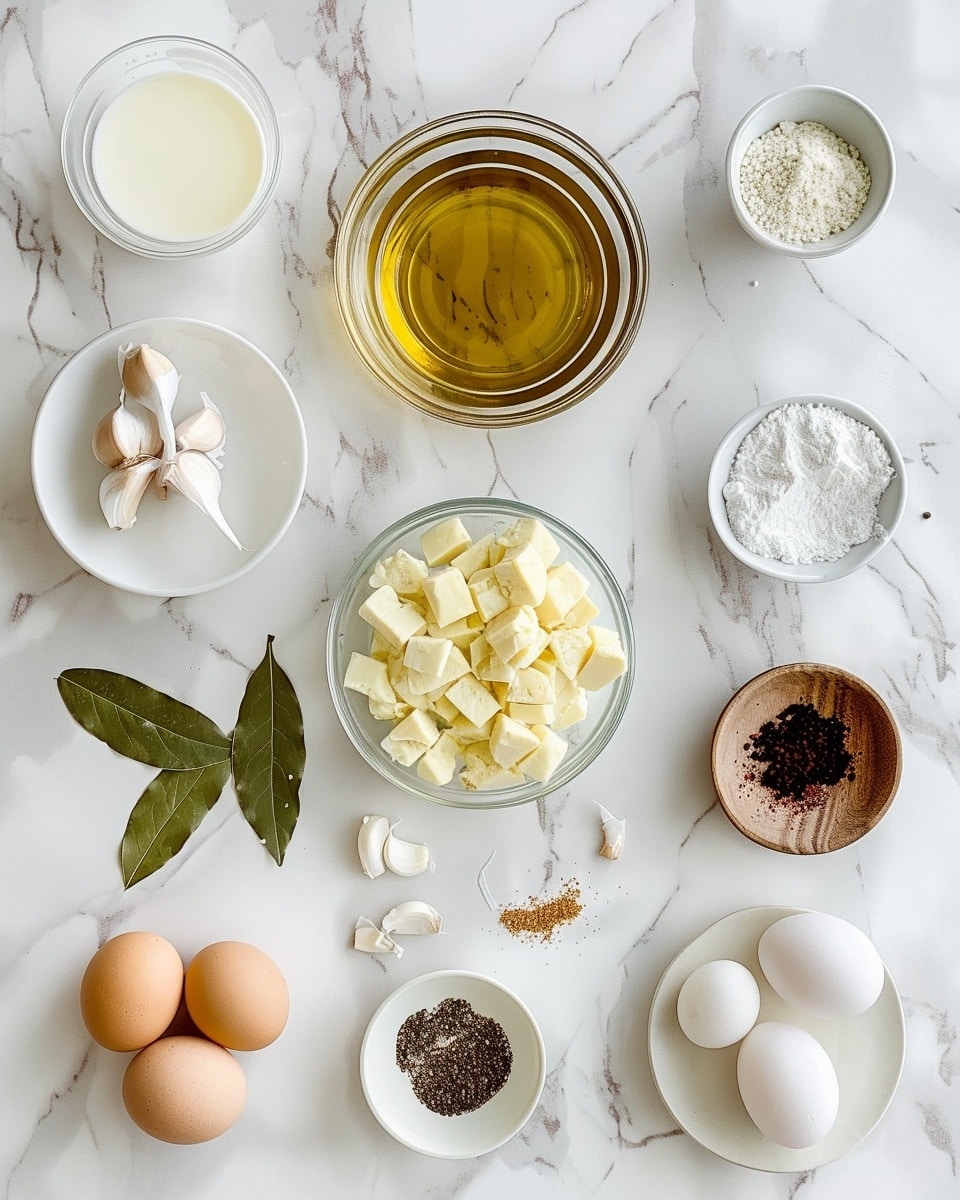
Gather fresh ingredients and everyday staples to create this comforting Filipino treat. From the aromatic garlic and onions to the rich chicken thighs and pantry-friendly condiments, these components are gearing up to make your kitchen smell irresistible.
- 2 tablespoons oil: For sautéing and bringing out the filling’s flavors.
- 2 cloves garlic – minced: Adds that classic aromatic base.
- 1 medium onion – chopped finely: Sweetens the filling naturally.
- 1 pound chicken thigh fillet (diced small): Juicy protein that stays tender through simmering.
- 2 cups water: Keeps the filling moist as it simmers down.
- 3 tablespoons soy sauce: The salty umami backbone.
- 2 tablespoons brown sugar: For a subtle caramel sweetness.
- 3-4 pieces bay leaf: Adds herbal depth to the aroma.
- 2 tablespoons Hoisin sauce: A touch of complex sweetness and richness.
- ¼ teaspoon pepper: A gentle hint of spice.
- 2 tablespoon cornstarch: Helps thicken the sauce to a luscious glaze.
- ½ cup water: To make the cornstarch slurry.
- 3 hard-boiled eggs (each cut into quarters): Classic filling surprise wrapped inside the bun.
- 1 teaspoon instant yeast: For dough rising and fluffiness.
- ⅔ cup lukewarm milk: Adds tenderness to the dough.
- ⅓ cup lukewarm water: Activates yeast and moistens the dough.
- ⅓ cup sugar: Balances the dough with a touch of sweetness.
- 3 cups all-purpose flour: The dough’s foundation.
- 1 teaspoon baking powder: For extra rise and lightness.
- 3 tablespoon oil and a bit more for coating: Keeps the dough smooth and moist.
Ingredient Substitutions & Tips
- Chicken thigh fillet: You can use chicken breast for a leaner option, but expect a less juicy filling.
- Lukewarm milk: Substitute with almond milk or any plant-based milk for a dairy-free version, adjusting liquid amounts slightly.
- Brown sugar: Replace with coconut sugar or honey for a subtle flavor twist.
- Hoisin sauce: Use a spoonful of oyster sauce or a blend of soy sauce and plum jam if unavailable.
👨🍳 Pro Tips for Perfect Results
- Tip 1: Always keep the water simmering gently to avoid drying out the chicken filling.
- Tip 2: Test your dough’s elasticity with the windowpane test for the best fluffy buns.
- Tip 3: Cover dough properly during rising to lock in moisture and promote proper fermentation.
- Tip 4: Use freshly boiled eggs for the richest filling texture and taste.
- Tip 5: When shaping buns, keep the edges thin but the middle thick to hold plenty of filling.
How to Make Toasted Siopao Recipe
Step 1: Prepare the Filling
Heat oil in a deep pan and sear the diced chicken thighs until they develop a light golden brown crust—this quick browning amps up the depth of flavor. Add the minced garlic and finely chopped onion, sautéing until they release their enticing aroma and soften beautifully.
💡 Pro Tip: Don’t rush the garlic and onion; letting them sweat gently fills your kitchen with that unmistakable warm scent.
Step 2: Simmer the Chicken
Pour in soy sauce, sprinkle the brown sugar, and toss in the bay leaves. Watch as the sugar starts to caramelize slightly, enriching the sauce’s complexity. Add the water, bring to a boil, then simmer the mixture for 20-30 minutes until the meat reaches fork-tender perfection, adding more water as needed to keep everything moist.
💡 Pro Tip: Stir occasionally and check water levels to prevent scorching and ensure even cooking.
Step 3: Finish the Filling
Stir in hoisin sauce along with a dash of pepper for that final flavor boost. Mix cornstarch with water to create a smooth slurry, then add it into the pot to thicken the sauce to a luscious, velvety consistency. Keep the filling warm as you prepare the dough.
💡 Pro Tip: The thickened sauce clings beautifully to the chicken, making every bite satisfyingly rich.
Step 4: Make the Dough
In a large bowl, dissolve the sugar into the lukewarm milk and water. Sprinkle in the instant yeast and stir gently to activate. Add the oil, then sift in the flour and baking powder. Mix until the dough comes together into a shaggy ball.
💡 Pro Tip: Lukewarm liquids help the yeast bloom perfectly without killing it.
Step 5: Knead the Dough
Transfer the dough onto a lightly floured surface and knead with your hands for 8-10 minutes until it becomes smooth, elastic, and passes the windowpane test—meaning it stretches thin without tearing.
💡 Pro Tip: Use the heel of your hand to push the dough forward, then fold it back toward you, developing strong gluten strands.
Step 6: First Rise
Shape the dough into a smooth ball and coat it with a little oil. Place it in a clean bowl, cover it tightly with plastic wrap, and let it rest in a warm spot for 30 minutes to 1 hour until it nearly doubles in size.
💡 Pro Tip: This gentle rise is where flavors develop and the dough gains incredible fluffiness.
Step 7: Divide and Rest Dough
Turn the dough out onto a floured work surface, flatten gently into a circle, and divide into 12 equal wedges—like slicing a pie. Roll each piece into a neat ball and let them rest for 3-5 minutes, covered with a kitchen towel to relax the gluten.
💡 Pro Tip: Resting the dough balls makes them easier to shape without springing back.
Step 8: Form Buns and Fill
Lightly flour your counter and flatten each dough ball using your palm, then roll the edges thinner while leaving a plump bulge in the center. Scoop about a tablespoon of the luscious filling into the middle, add a quarter of a hard-boiled egg, then gather and pinch the edges tightly to seal the bun. Repeat for all pieces.
💡 Pro Tip: Pinching and twisting the dough ends creates a secure seal to keep fillings inside during baking.
Step 9: Second Rise
Place your filled buns onto a baking sheet, cover loosely with a kitchen towel, and allow them to rise for another 20-30 minutes. They’ll puff up beautifully, almost doubling in size, ready to transform in the oven.
💡 Pro Tip: This second rise creates the airy texture that makes toasted siopao so irresistibly soft.
Step 10: Bake to Golden Perfection
Preheat your oven to 170°C (325°F). Slide the tray in and bake for 12 to 15 minutes, watching as the buns turn a glowing golden brown all over. These toasty edges add an inviting crunch, complementary to the pillowy interior.
💡 Pro Tip: Keep an eye on your oven during the last minutes so nothing over-browns.
Step 11: Cool and Serve
Remove the buns from the oven and transfer to a cooling rack. Let them cool slightly but serve while still warm to enjoy that perfect balance of tender bun and melty flavorful filling.
💡 Pro Tip: Pair with a hot tea or your favorite dipping sauce for a complete experience.
Common Mistakes to Avoid
Learn from these common pitfalls:
- Skipping the windowpane test: Without this, your dough may not develop enough elasticity, leading to dense buns.
- Overfilling the buns: Too much filling can cause the buns to burst open during baking.
- Not covering dough properly: Leads to a dry crust forming on the dough, which hampers rising.
- Cooking filling at too high heat: Can dry out the chicken instead of tenderizing it.
- Ignoring dough resting times: Skipping resting can make shaping difficult and affect texture.
- Baking at incorrect temperature: Too hot can burn outsides while leaving insides doughy; too low prevents browning.
Delicious Variations to Try
Once you’ve mastered the classic version, feel free to explore new flavors in your Toasted Siopao Recipe:
Spicy Chicken Siopao
Add diced chili peppers or a splash of hot sauce to the filling for a fiery kick that wakes up your taste buds without overpowering the cozy bun.
Mushroom and Tofu Delight
Swap chicken for a savory blend of sautéed mushrooms and cubed tofu seasoned with soy and Hoisin, creating a vegetarian-friendly version that’s just as hearty.
Sweet BBQ Chicken
Introduce a touch of halal BBQ sauce to the filling for a smoky, sweet layer that pairs beautifully with the soft toasted bread.
Cheesy Surprise
Add a small cube of mild cheese inside the filling for a luscious, melty center that complements the savory chicken.
Pair with Snacks for a Complete Meal
Serving your toasted siopao alongside fresh snacks can truly elevate your spread. Try pairing with our Vegan Taquitos with Easy Vegan Queso Salsa for a vibrant, crunchy contrast.
How to Serve Toasted Siopao Recipe

Garnishes
Sprinkle chopped scallions or toasted sesame seeds on top for added texture and visual appeal. A side of chili-garlic vinegar or soy dipping sauce amplifies each bite.
Side Dishes
Pair these buns with a fresh cucumber salad or sautéed greens to complement the rich filling with light, crisp flavors.
Creative Ways to Present
Arrange your toasted siopao on a bamboo steamer basket lined with banana leaves for an authentic Filipino vibe that will impress guests instantly.
Or serve with a small bowl of warm broth on the side to dip the buns into for an extra moist experience.
For dessert lovers, wrapping up your meal with a Healthy Banana Peanut Butter Snack with Chocolate Dipping is a sweet treat that pairs well with these savory buns.
Make Ahead and Storage
Make-Ahead Instructions
Prepare the filling and dough up to the first rise. Refrigerate the filling and cover the dough bowl tightly, allowing the dough to ferment slowly overnight for enhanced flavor.
Storage
Keep baked siopao in an airtight container at room temperature for up to 2 days or refrigerate for up to 4 days. Reheat gently to maintain softness.
Freezing
You can freeze both raw filled buns and fully baked ones. Wrap them tightly and freeze for up to 1 month. Thaw in the fridge overnight before baking or reheating.
Reheating
Reheat baked buns in a steamer or microwave covered with a damp cloth to revive their fluffy texture without drying out.
Expert Tips for Success
- Use fresh instant yeast: Always check the expiration date for best rise.
- Maintain warm, draft-free rising spots: Yeast works best at stable temperatures.
- Do not over-knead: Knead just until elastic to keep buns tender.
- Don’t rush the second rise: It ensures luscious softness in the final bun.
- Brush baked buns lightly with melted oil: This enhances the golden color.
- Use small scoops for filling: Keeps every bun perfectly proportioned for eating.
Frequently Asked Questions
Can I use chicken breast instead of thigh?
Yes, but chicken thigh stays juicier and more flavorful. If using breast, be careful not to overcook as it can dry out.
Do I have to bake the siopao after steaming?
This recipe skips steaming to achieve a toasted golden crust by baking, which adds an enjoyable texture contrast.
What if I don’t have hoisin sauce?
Try substituting with oyster sauce or mix equal parts soy sauce and plum jam for a similar sweet-savory flavor.
How long can I store leftover buns?
Refrigerate baked buns in an airtight container for up to 4 days; consume sooner for the best texture and taste.
Can I freeze the siopao dough before baking?
Yes, freeze immediately after shaping and filling the buns. Thaw overnight before baking.
What is the best way to reheat toasty siopao?
Steaming or microwaving covered with a damp towel helps keep them soft and moist.
Is this recipe suitable for halal diets?
Absolutely, the ingredients comply with halal diets, focusing on chicken and avoiding prohibited items.
Final Thoughts
Bringing this Toasted Siopao Recipe to your table means welcoming the warmth of homemade Filipino comfort food that fills your kitchen and heart. Crafting each bun with your hands adds a personal touch that makes sharing these golden, tender pockets of flavorful chicken even more special. It’s a journey of savoring tradition, flavor, and simple joy—so roll up your sleeves and enjoy every delicious moment!
Related Recipes You’ll Love
If you enjoyed this recipe, you’ll also love these delicious recipes:
- Crispy Cottage Cheese Chips Recipe – Foodarohub – Crunchy, cheesy chips perfect as a savory snack or side to your siopao adventure.
Toasted Siopao Recipe

This Toasted Siopao recipe offers a deliciously soft and flavorful Filipino steamed bun filled with tender chicken and hard-boiled eggs, baked to a perfect golden brown. A delightful treat perfect for sharing with family and friends.
- Prep Time: 20 minutes
- Cook Time: 45 minutes
- Total Time: 2 hours 35 minutes
- Yield: 12 servings 1x
- Category: Bread
- Method: Baking
- Cuisine: Filipino
- Diet: Halal, Vegetarian
Ingredients
Filling
- 2 tablespoons oil
- 2 cloves garlic – minced
- 1 medium onion – chopped finely
- 1 pound chicken thigh fillet (diced small)
- 2 cups water
- 3 tablespoons soy sauce
- 2 tablespoons brown sugar
- 3–4 pieces bay leaf
- 2 tablespoons Hoisin sauce
- ¼ teaspoon pepper
- 2 tablespoon cornstarch
- 1/2 cup water
- 3 hard-boiled eggs (each cut into quarters)
Dough
- 1 teaspoon instant yeast
- ⅔ cup lukewarm milk
- ⅓ cup lukewarm water
- ⅓ cup sugar
- 3 cups all-purpose flour
- 1 teaspoon baking powder
- 3 tablespoon oil and a bit more for coating
Instructions
- Filling: In a deep pan or pot, heat oil over medium heat. Add chicken and sear until lightly browned. Add garlic and onion and saute until aromatic and limp.
- Cooking filling: Pour in soy sauce and add brown sugar and bay leaves. Cook until the sugar has slightly caramelized, then add water. Once it starts to boil, turn down the heat and simmer for 20-30 minutes or until the meat becomes tender–add more water if needed.
- Thickening sauce: Once the liquid is reduced to a thicker sauce and the meat is fork-tender. Add Hoisin sauce and season with pepper. Combine cornstarch and water to make a slurry and add this and simmer for another minute or two stirring regularly until the sauce thickens and becomes velvety.
- Dough preparation: In a large bowl, dissolve the sugar in lukewarm milk and water. Sprinkle the yeast and stir. Then add the oil followed by the flour and baking powder. Mix well until a dough forms.
- Kneading: Turn dough out onto a lightly floured surface. Knead the dough for 8-10 minutes or until smooth and elastic. Do the windowpane test.
- First rise: Shape the dough in a ball and coat it with oil and place in a bowl. Cover the bowl with plastic wrap and let the dough rise for 30 minutes to an hour or just until it almost doubles in size.
- Dividing dough: Turn the dough out onto a floured surface. Flatten it a bit into a circle and divide into 12 like a pie.
- Resting dough pieces: Form each piece into a ball, cover them with a kitchen towel and let them rest for 3-5 minutes.
- Forming the buns: Flour the surface of your counter and take a piece of the dough and flatten it a bit by pressing it with the palm of your hand against the counter. Flatten the edges a bit more using a rolling pin while turning the dough around leaving a small bulge in the middle.
- Filling buns: Hold the flattened dough on the curve of your palm and scoop a tablespoon of filling and place it in the middle. Add a slice of hard-boiled egg. Gather the ends towards the middle from one side until you reach the other end closing the filling in. Pinch and twist to seal the ends together on top. Repeat with the remaining dough balls.
- Second rise: Arrange the filled dough in a baking sheet and cover the filled buns with a kitchen towel and let them rise for 20-30 minutes or until almost double in size.
- Baking: Bake in a preheated oven at 170C/325F for 12 to 15 minutes or until they turn golden brown.
- Cooling and serving: Take them out of the oven and transfer to a cooling rack. Let them cool down a bit. Serve while still warm.
Notes
- Make sure to do the windowpane test to ensure the dough is kneaded properly and elastic.
- Adjust water amount if the filling mixture reduces too much during simmering.
- Letting the dough rise properly is key to light and fluffy buns.
Keywords: toasted siopao recipe, Filipino siopao, chicken siopao, baked siopao, steamed bun recipe


